作者: 刘, 子豪

To use the QubiMap VIP features on a computer within an intranet, offline authorization is required. Once the computer is authorized, as long as the device ID remains unchanged, you can keep using the VIP features (excluding account login and cloud synchronization) until the VIP service plan expires. Note that the device ID may change if you replace the motherboard, CPU, or network card.

★ Note:

(1) Each VIP offline license (authorization code) can only be used on one device. You cannot change the device.

(2) If the device code changes due to the replacement of computer components, the offline authorization expires. In this case, you need to purchase a new VIP offline license (authorization code).

(3) After updating the QubiMap software, you can reauthorize the computer for free if the VIP service plan has not expired.

1. Procedure

Assume that you have two computers: Computer A, which is connected to the Internet, and Computer B, deployed within the intranet. You can use Computer A to authorize Computer B so that the QubiMap VIP features are available on Computer B.

Before offline authorization, make sure that QubiMap is installed on both Computer A and Computer B.

Log in to your QubiMap account on Computer A. If you don’t have an account, please sign up.

QubiMap Coins are required for offline authorization, so make sure that your account has sufficient QubiMap Coins before authorization. For more information about how how to purchase QubiMap Coins, see the help document “How to purchase QubiMap Coins“.

1.1. Retrieve the device code and registration code of Computer B

Start the QubiMap software on Computer B. Choose [Help] > [VIP Management]. In the dialog box that appears, click [Offline Authorization].

image-20260615145023406

Click [Copy] to copy the device code and registration code respectively.
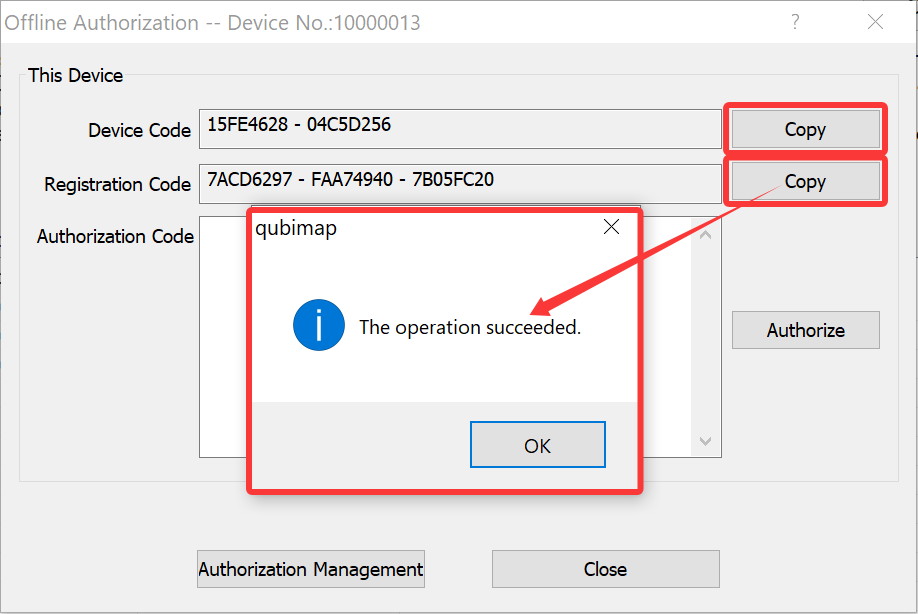
image-20260609142345646

Paste them into Notepad and then copy the TXT file to Computer A.
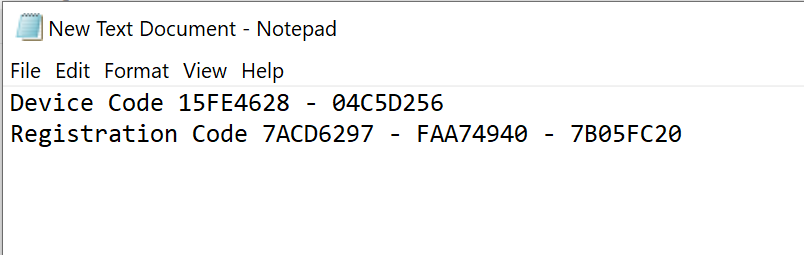
image-20260609142648524

1.2. Upgrade the VIP service plan and Generate an authorization code

On the main UI of QubiMap on Computer A, Choose [Help] > [VIP Management]. In the dialog box that appears, click [Offline Authorization].

In the [Offline Authorization] dialog box, click [Authorization Management].
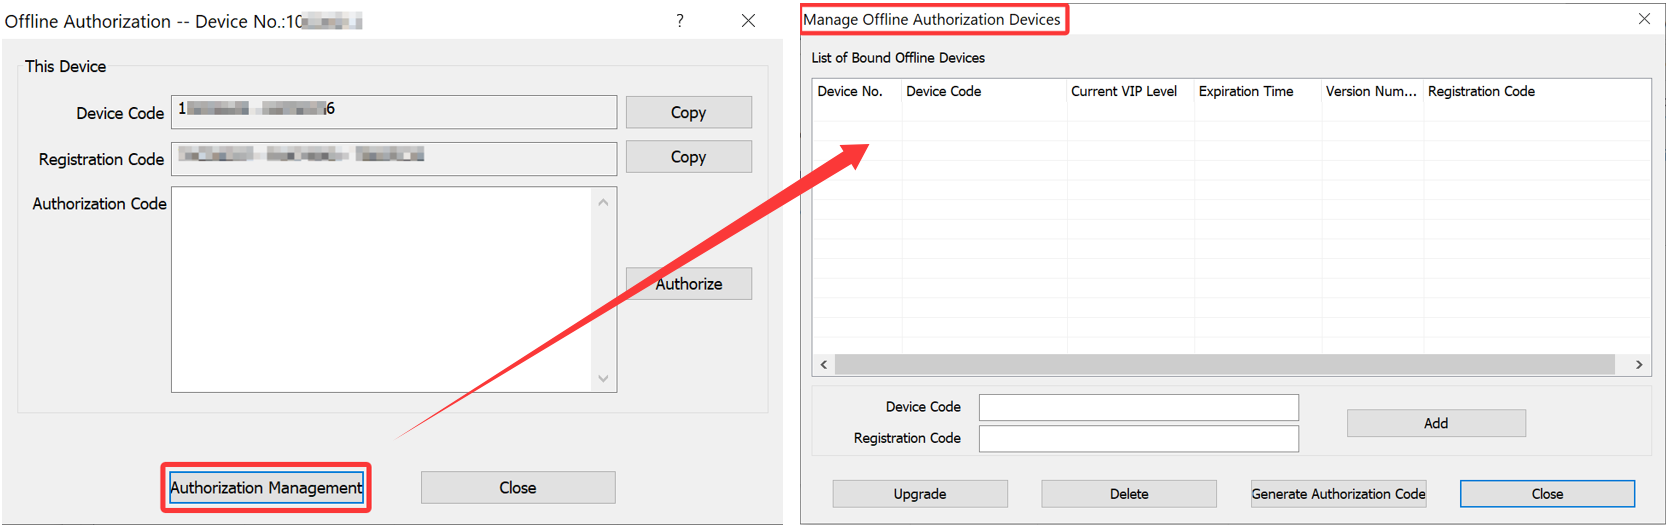
image-20260609143345760

Enter the device code and registration code of Computer B in the corresponding fields, and click [Add]. The added device is displayed in the list.
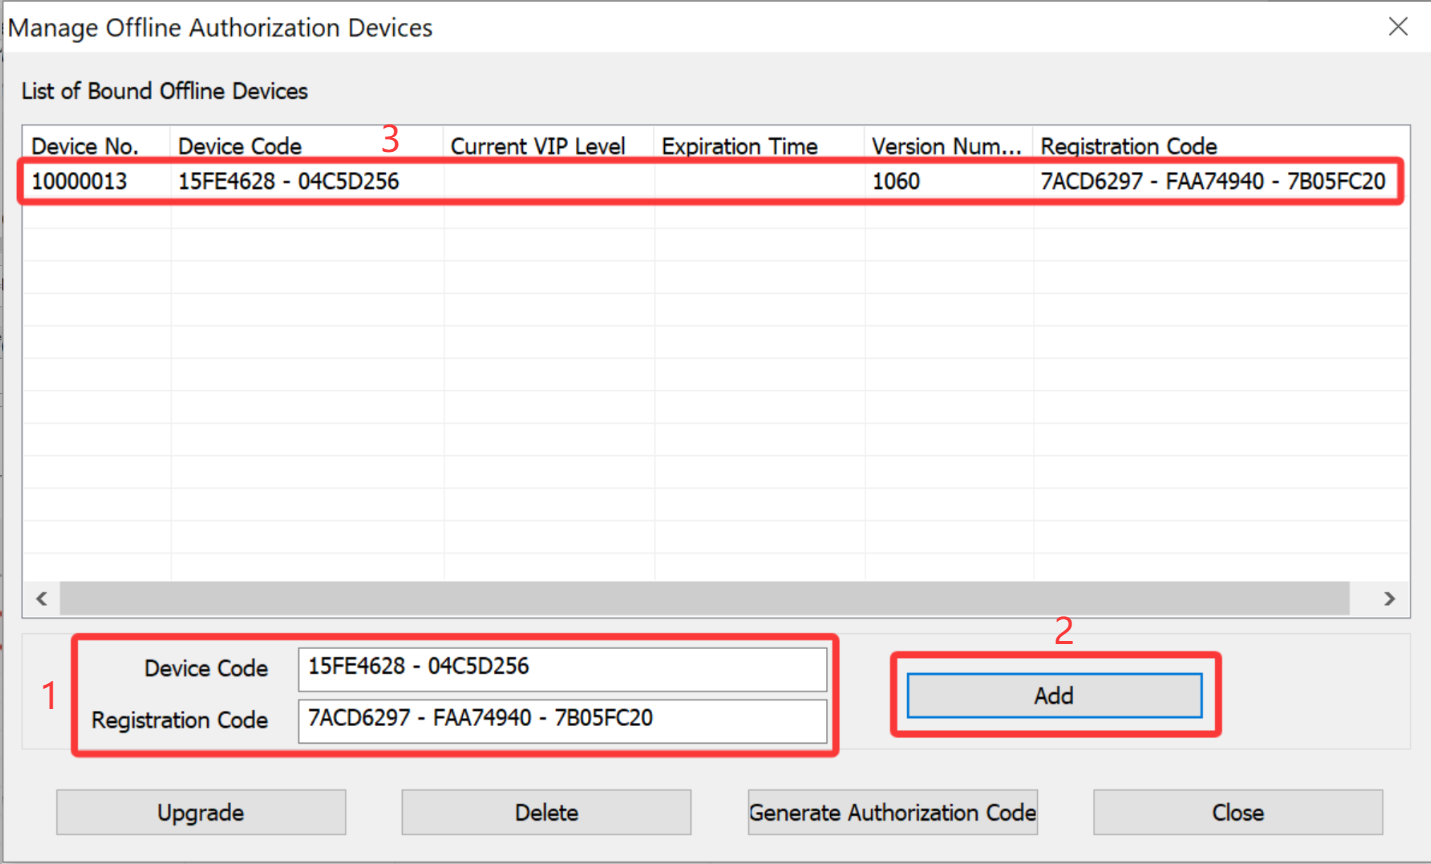
image-20260609143911743

Select the device, and click [Upgrade]. In the [Upgrade VIP for Offline Device] dialog box, set the [VIP Level] and [VIP Validity Period] parameters, and click [OK].

☆ Note: The system will prompt you how many QubiMap Coins are needed. Make sure that your account has enough QubiMap Coins.
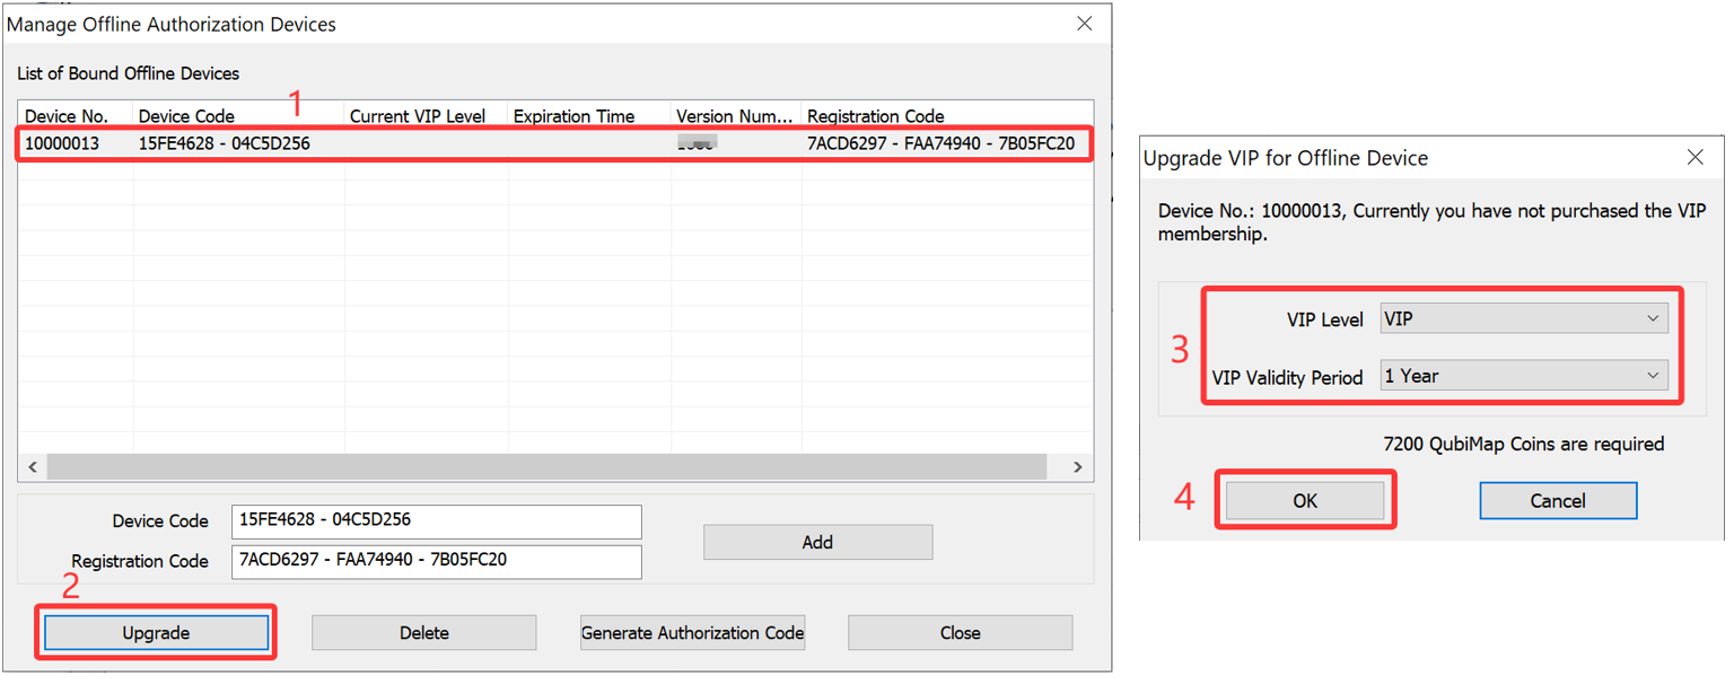
Check the [I have read and agree] box, and click [OK]. The message “Purchased.” appears, indicating that the purchase is successful.

image-20260616141502230

Select the device, and click [Generate Authorization Code]. The generated authorization code is displayed in the window that appears.
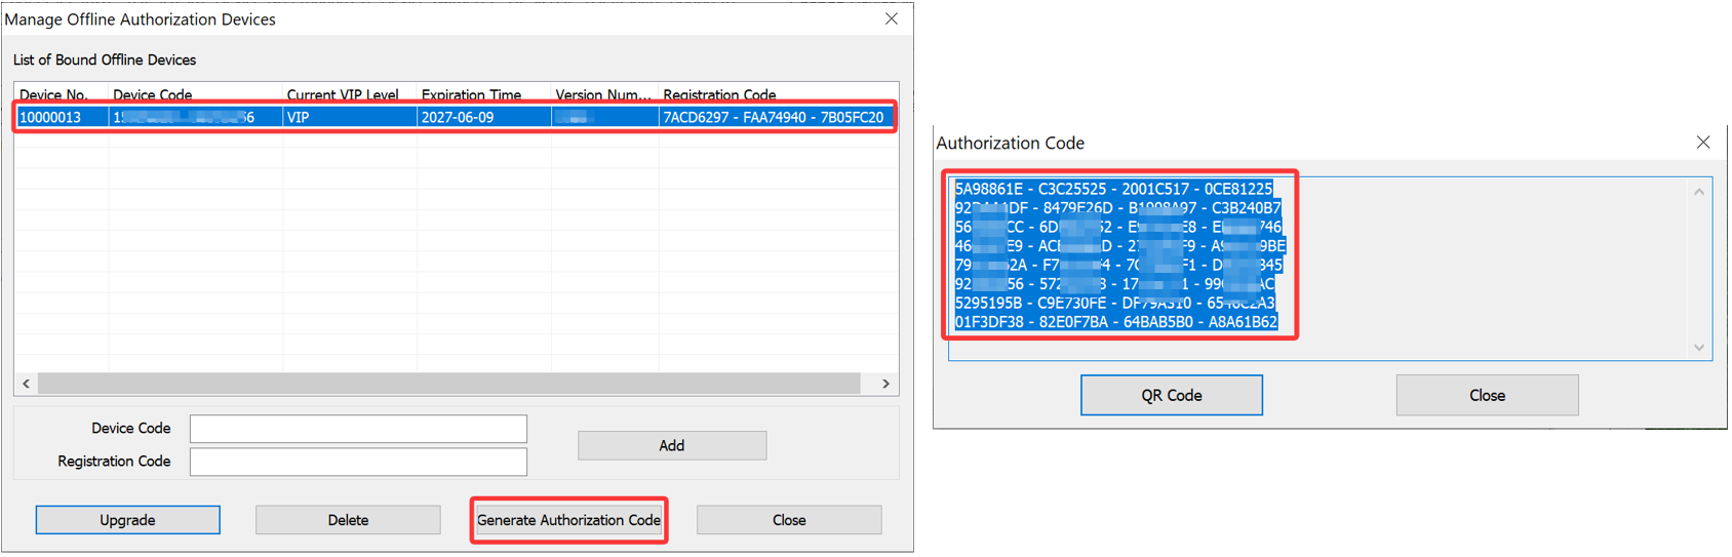
image-20260609171832193

Paste it into Notepad and then copy the TXT file to Computer B.
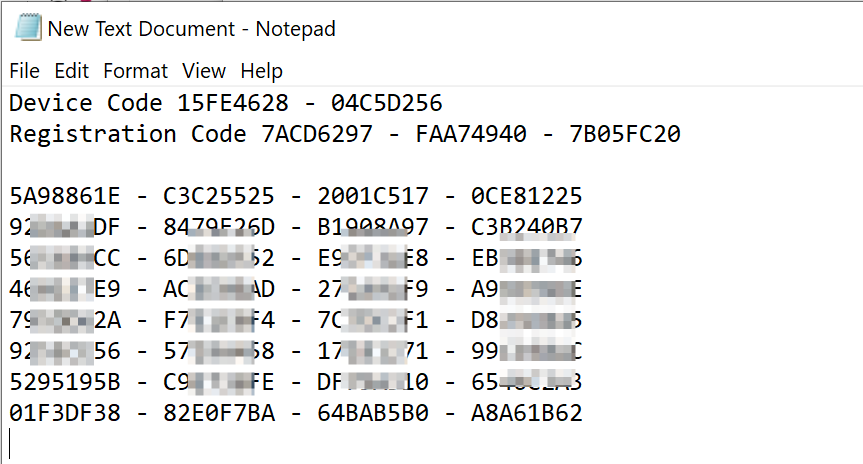
image-20260609164052337

1.3. Authorize the offline device

On the main UI of QubiMap on Computer B, Choose [Help] > [VIP Management]. In the dialog box that appears, click [Offline Authorization].

In the [Offline Authorization] dialog box, copy the authorization code from the TXT file into the [Authorization Code] field, and click [Authorize].
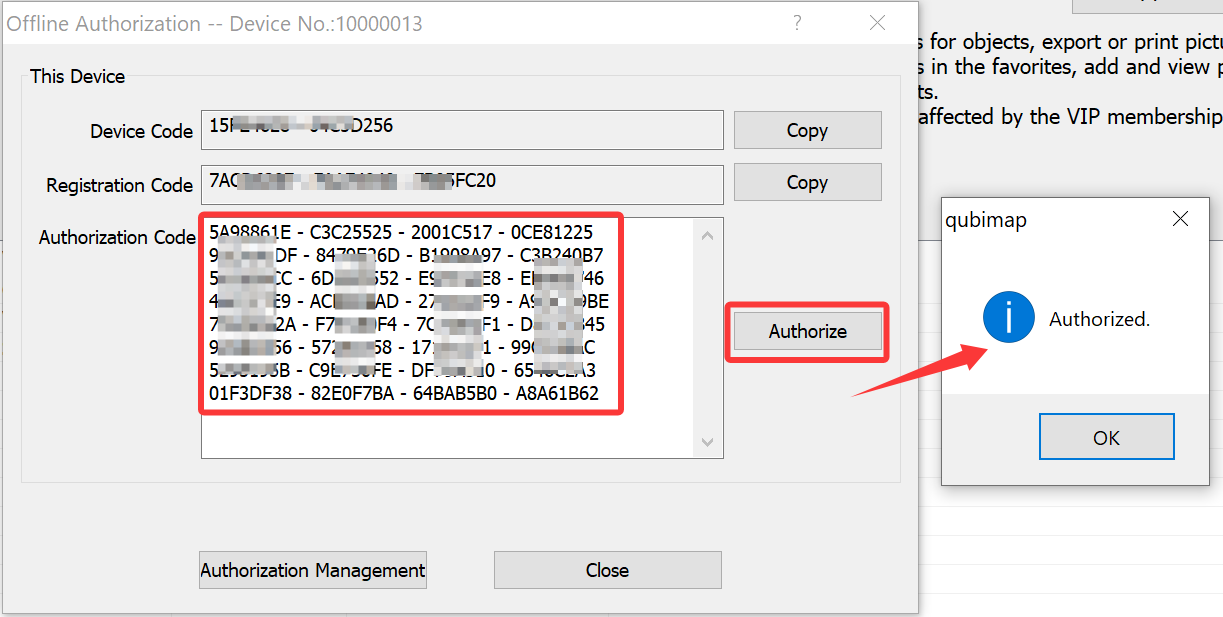
image-20260609164654607

After the authorization is successful, you can view the authorization information in the [VIP Management] dialog box.
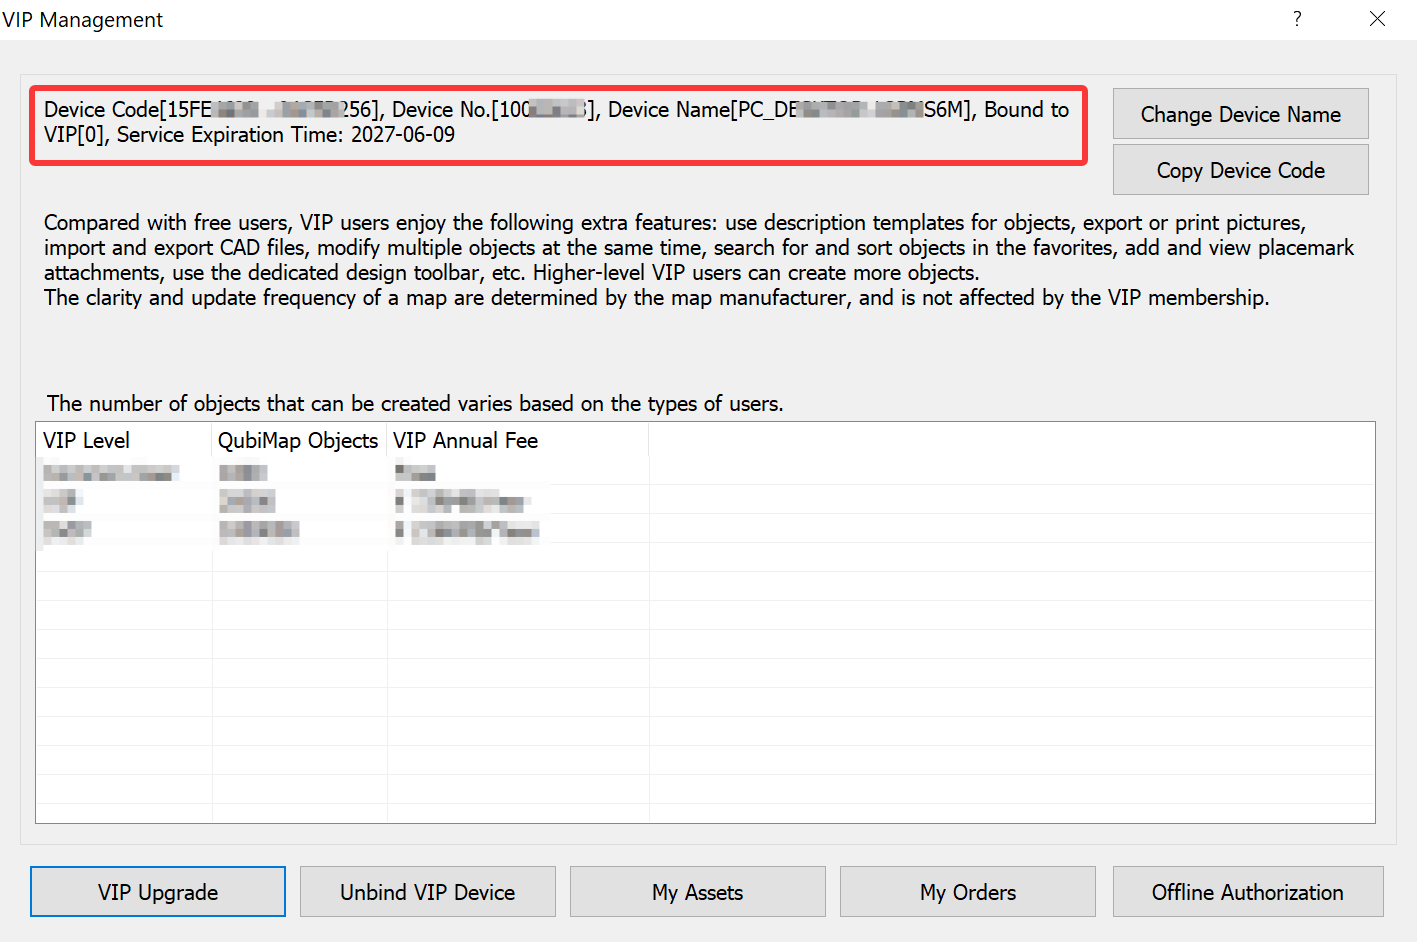
image-20260615114615642

2. Reauthorize the computer after software updates

If you update the QubiMap software on the offline computer, the VIP plan will become invalid. In this case, you can reauthorize the computer for free.

As shown in the following figure, the version number of QubiMap previously installed on Computer B within the intranet is 10.5.6. The current version number is 10.6.0.
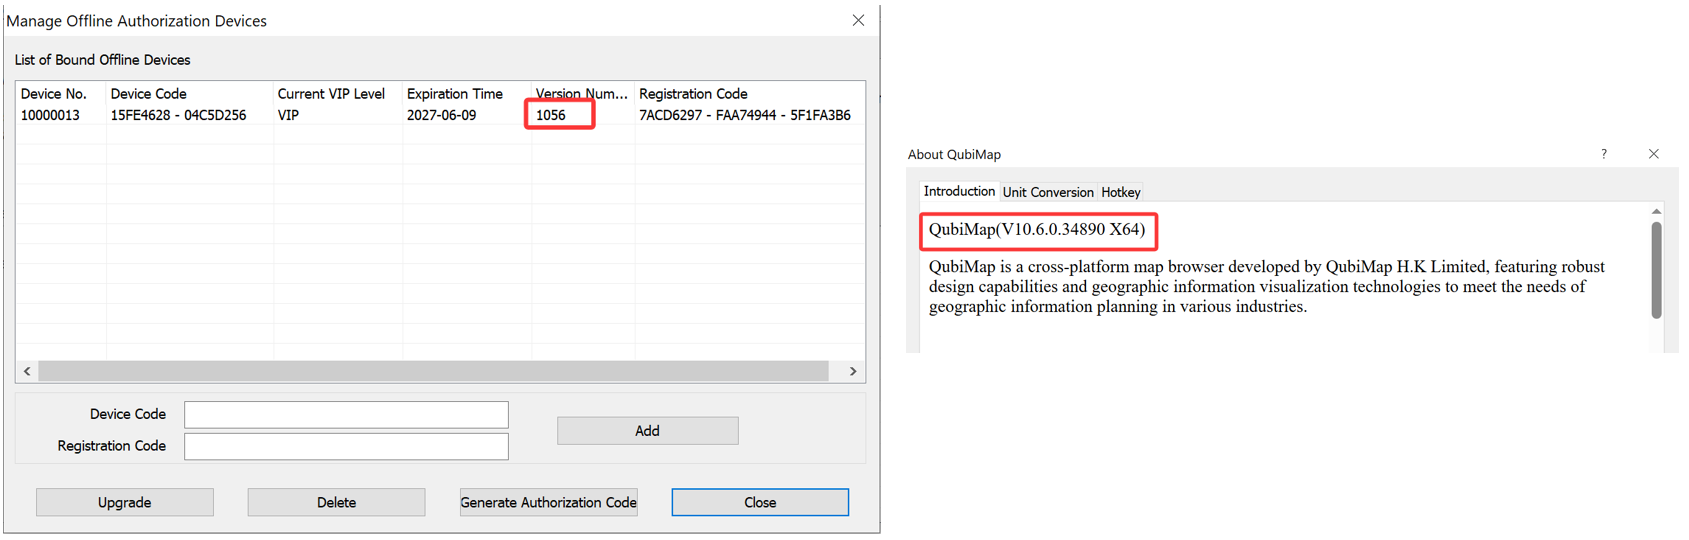
image-20260610114251137

You can reauthorize the computer by following these steps:

On the main UI of QubiMap on Computer B, Choose [Help] > [VIP Management]. In the dialog box that appears, click [Offline Authorization]. Copy the device code and registration code to a TXT file, and then copy the file to Computer A.

On the main UI of QubiMap on Computer A, Choose [Help] > [VIP Management]. In the dialog box that appears, click [Offline Authorization]. In the [Offline Authorization] dialog box, click [Authorization Management]. Enter the new device code and registration code of Computer B, and click [Add].

The displayed version number becomes 1060, which indicates the current version of QubiMap installed on computer B.
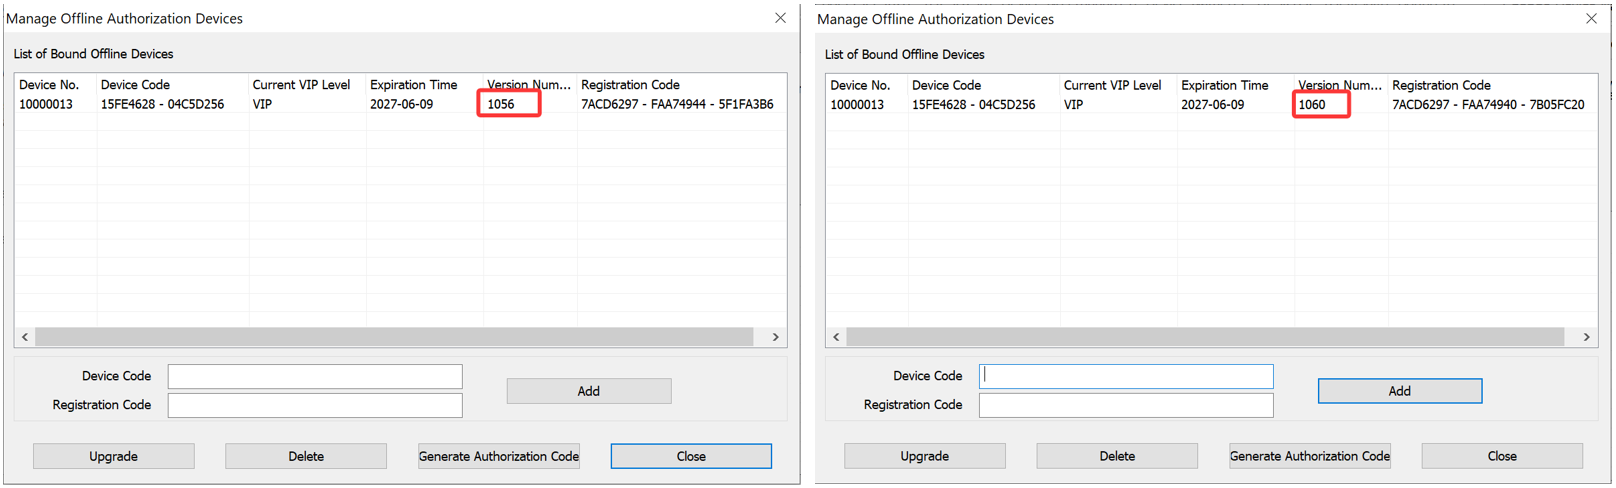
image-20260610114742388

Select the device, and click [Generate Authorization Code].
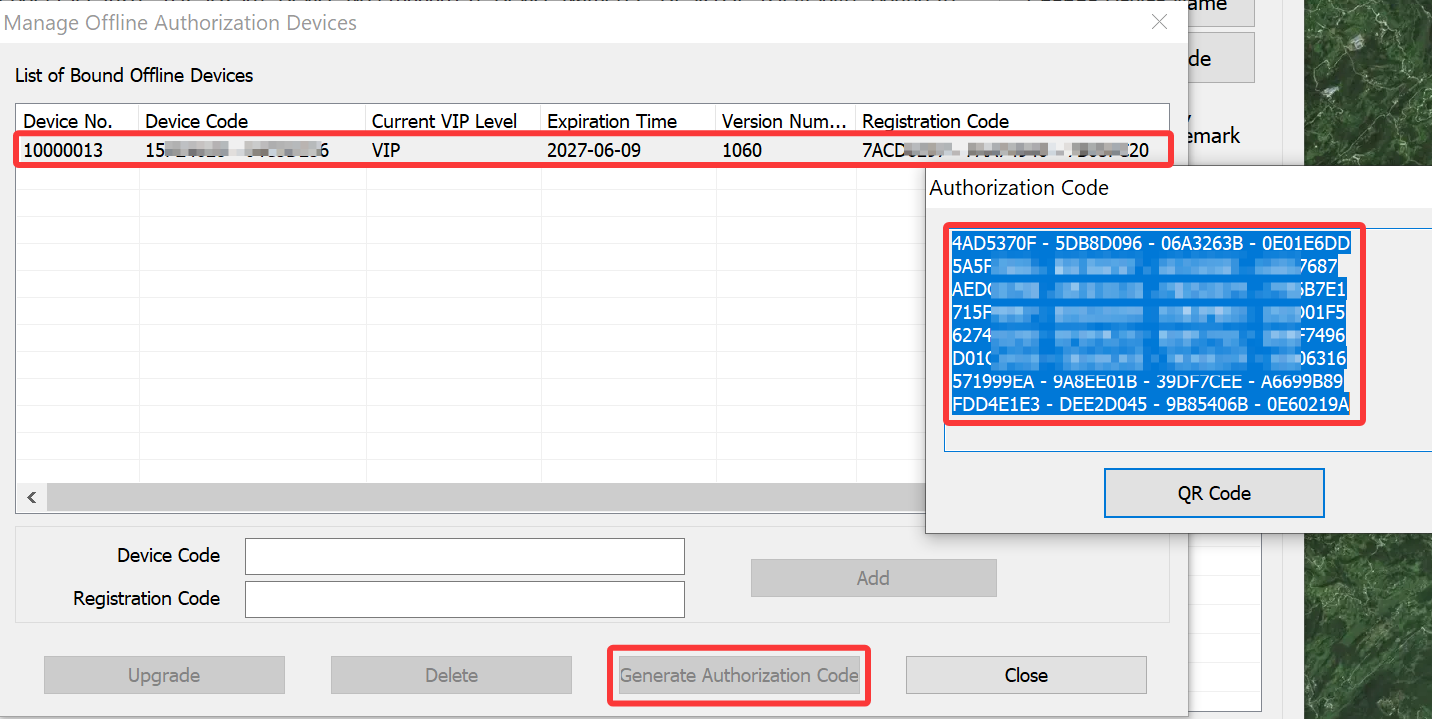
image-20260610115021498

Paste the new authorization code into Notepad and then copy the TXT file to Computer B.

On the main UI of QubiMap on Computer B, Choose [Help] > [VIP Management]. In the dialog box that appears, click [Offline Authorization].

In the [Offline Authorization] dialog box, copy the authorization code from the TXT file into the [Authorization Code] field, and click [Authorize].
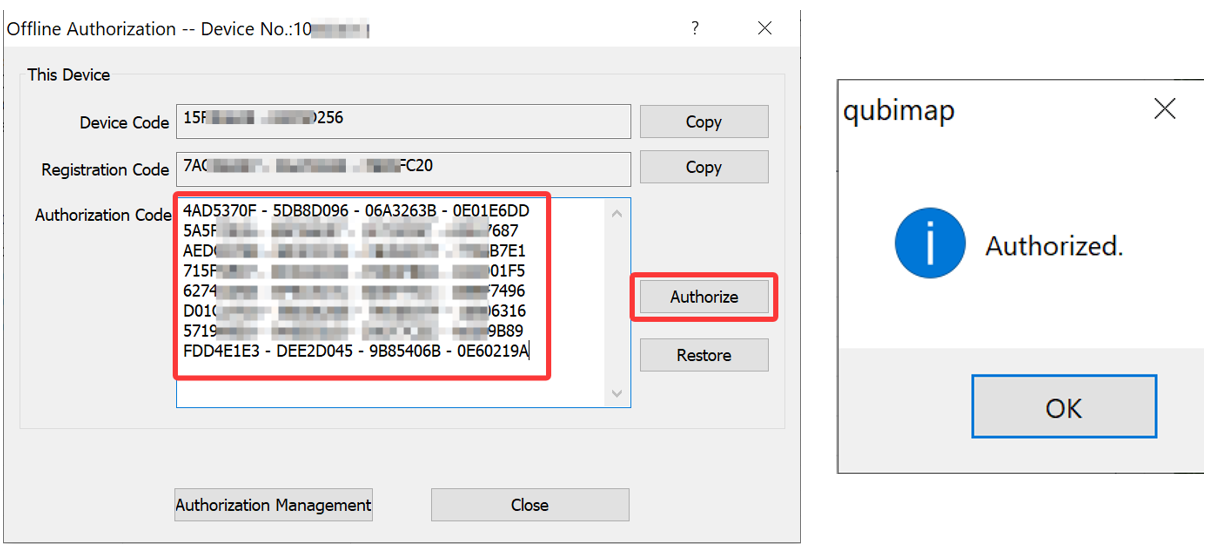
image-20260610115357066

After the authorization is successful, the QubiMap VIP plan becomes valid again on Computer B. You can view the authorization information in the [VIP Management] dialog box.
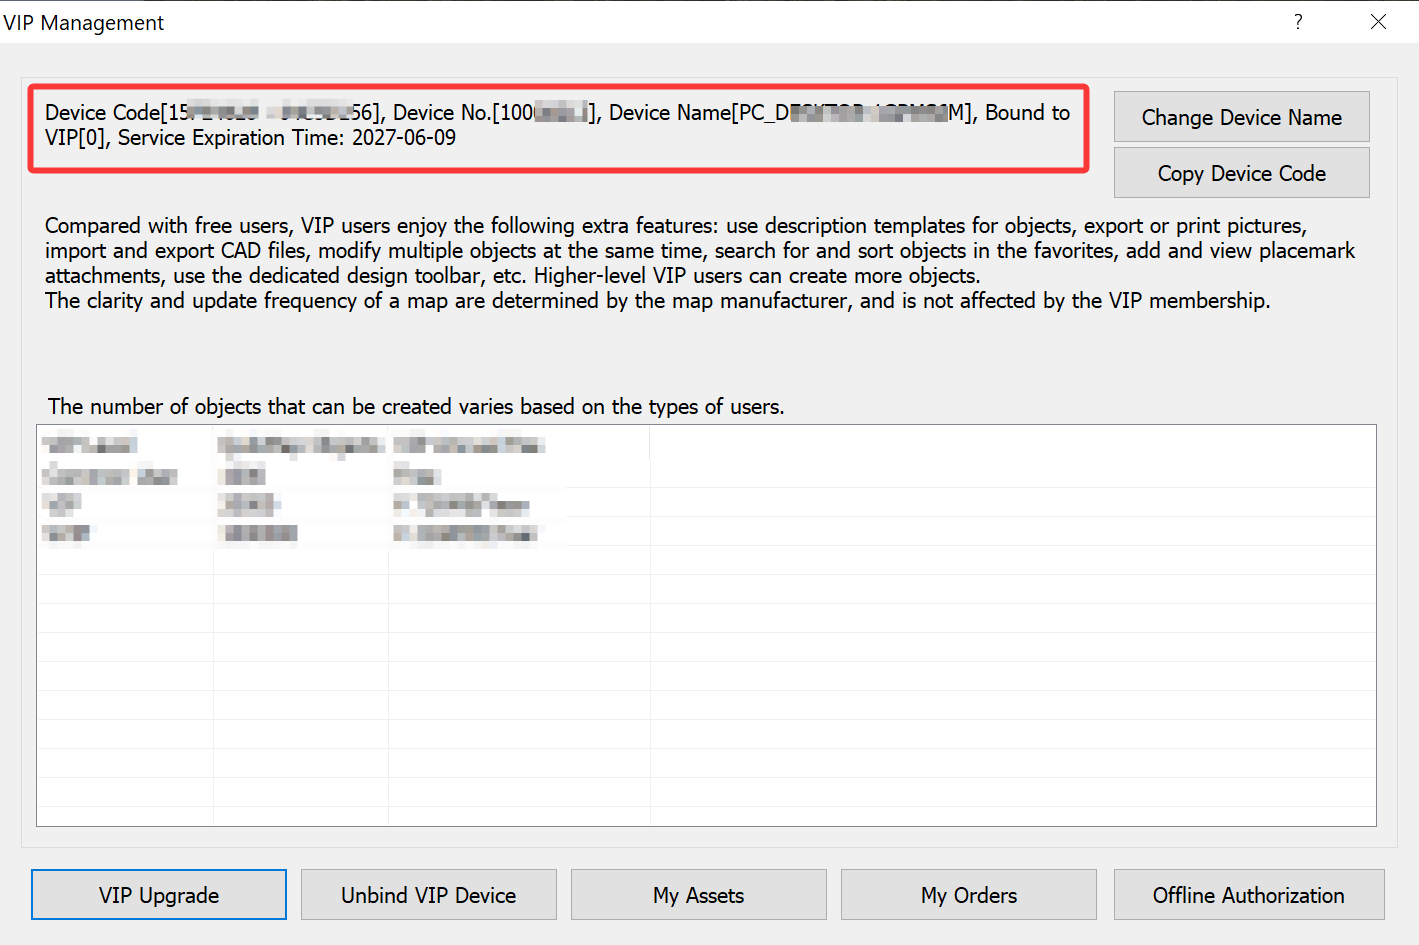
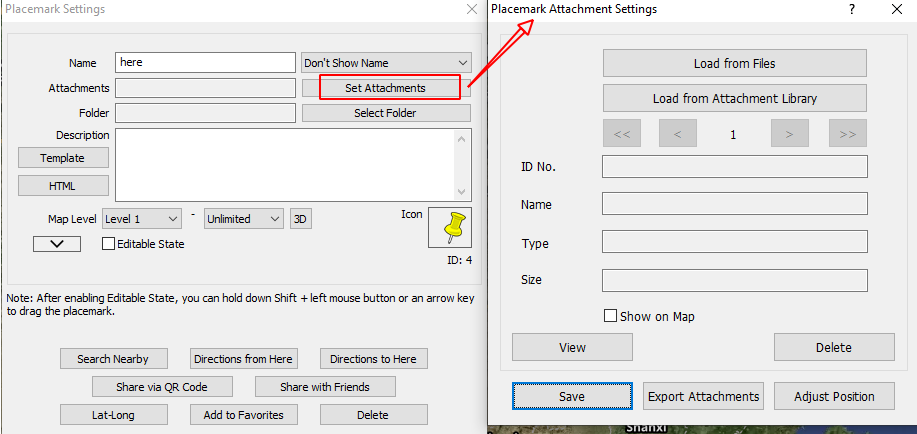
image-20260615114850176

1. Purposes of placemark attachments:

Placemark attachments are used to expand the information of placemarks, including documents, images, and audio/video files. You can set placemark attachments to be displayed on the map if needed.

2. How to add and configure placemark attachments

In the placemark settings, click [Set Attachments] to go to the [Placemark Attachment Settings] dialog box.
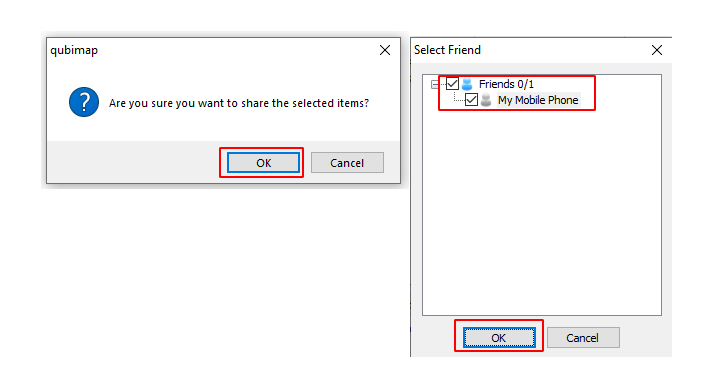
image-20260508173138752

Load from Files: Load the required files directly from the local disk and adds them to the placemark attachment library.

Load from Attachment Library: Select attachments from the attachment library.

> (Next): Click to add or view the next attachment. A placemark can have a maximum of 100 attachments.

Show on Map: If the first placemark attachment is an image, you can select [Show on Map] to demonstrate it on the map.

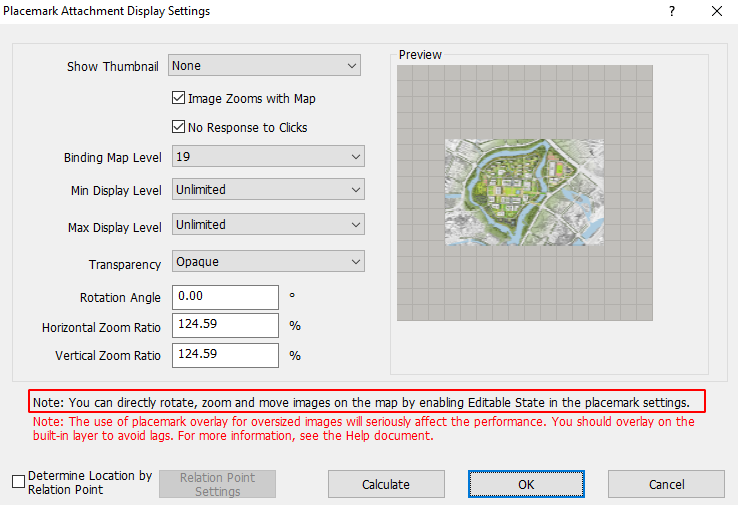
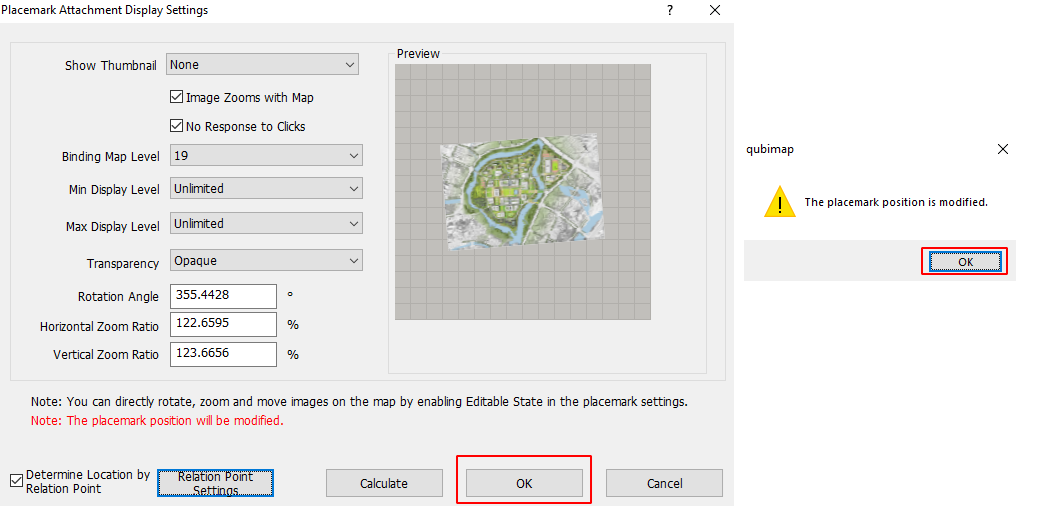
Display Settings: Click [Display Settings] to configure the display settings of the image attachment, as shown in the following figure:

image-20260509111930086

You can set the display position of the image attachment by performing the following steps:

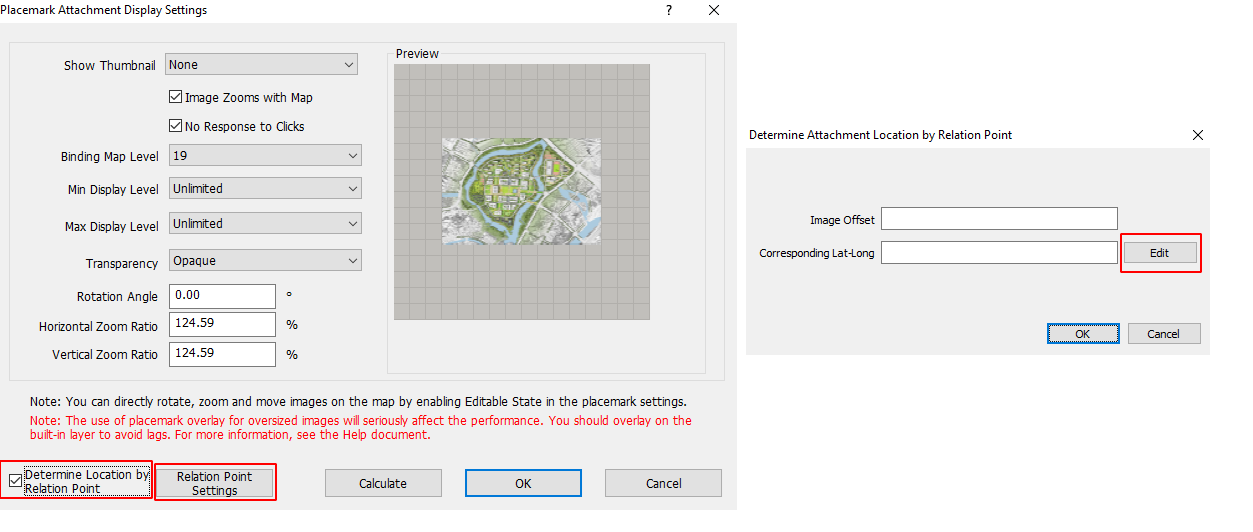
In the [Placemark Attachment Display Settings] dialog box, select [Determine Location by Relation Point] and then click [Relation Point Settings].

In the [Determine Attachment Location by Relation Point] dialog box, click [Edit].

image-20260509112230748

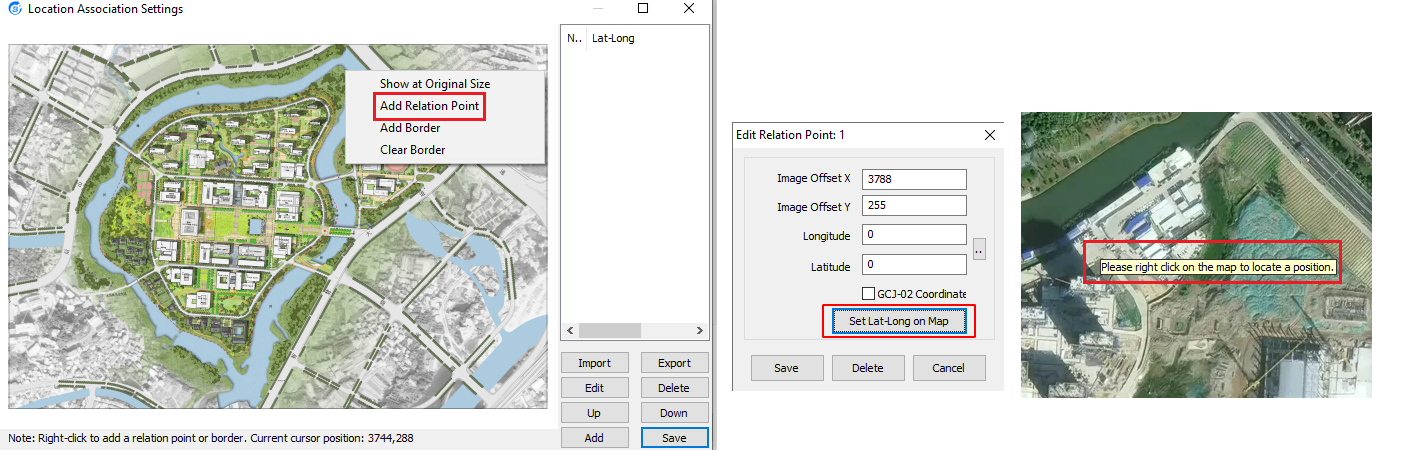
In the [Location Association Settings] dialog box, right-click at the required location on the image attachment, and select [Add Relation Point] to add Relation Point 1. In the [Edit Association Point: 1] dialog box, click [Set Lat-Long on Map], move the mouse cursor to the map window to locate Relation Point 1, right-click it to retrieve the latitude and longitude, and then click [Save]. We recommend that you set 2 or 3 relation points that are distributed at the four corners.

image-20260509113959572

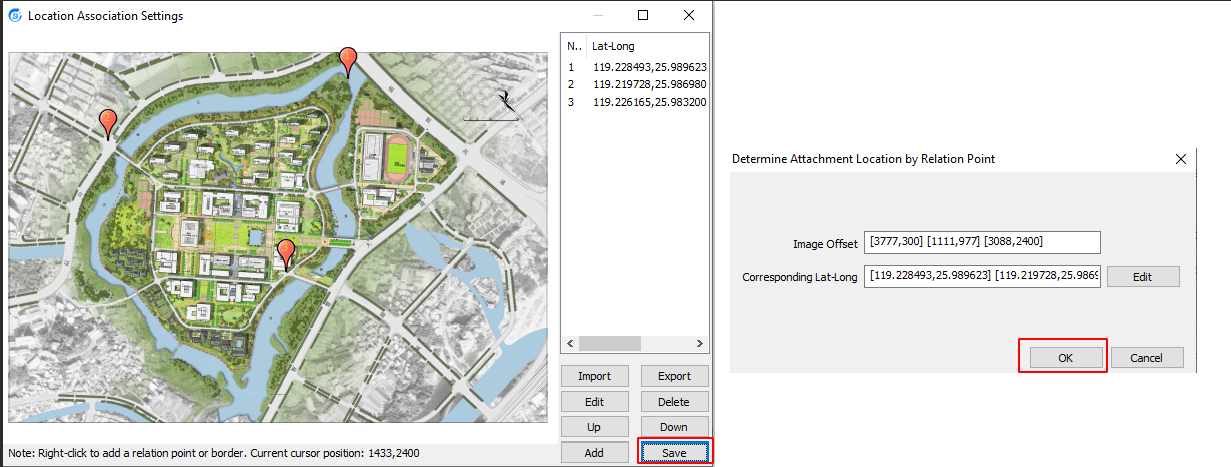
After all relation points are added, click [Save] → [OK].

image-20260509114825185

In the [Placemark Attachment Display Settings] dialog box, click [OK] → [OK].

image-20260509115050977

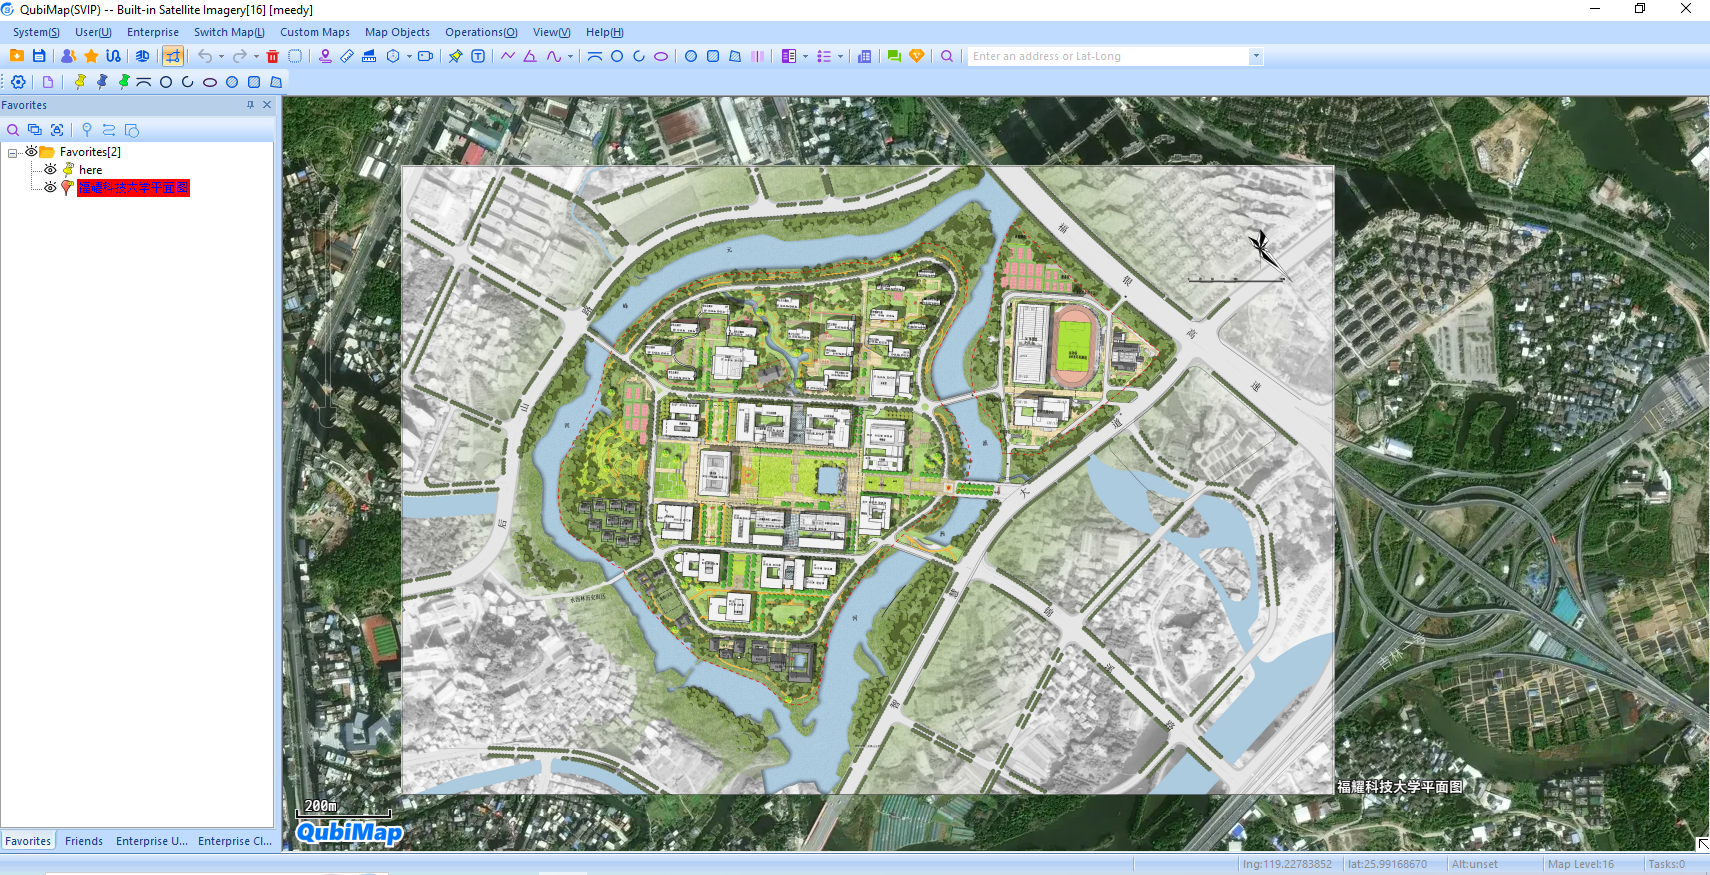
The image attachment will be displayed on the map based on the previously set parameters, as shown in the following figure:

image-20260509115148524

Note: If an image is very large in size, we do not recommend that you demonstrate it on the map by setting it as a placemark attachment. Otherwise, the performance may be tremendously compromised. You can overlay it on a built-in layer to avoid system lags. For more information, see the help document “How to import custom aerial images and set overlays“.

Transparency: Set the transparency degree of the image. This is typically needed when you demonstrate design drawings as placemark attachments on the map).

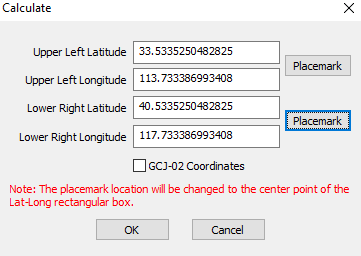
Calculate: Set the latitude and longitude of the top-left and bottom-right corners of the image, so that it can be displayed on the map at the specified location. This feature is applicable when the latitude and longitude of these two corners are already known.

image-20260509103930907

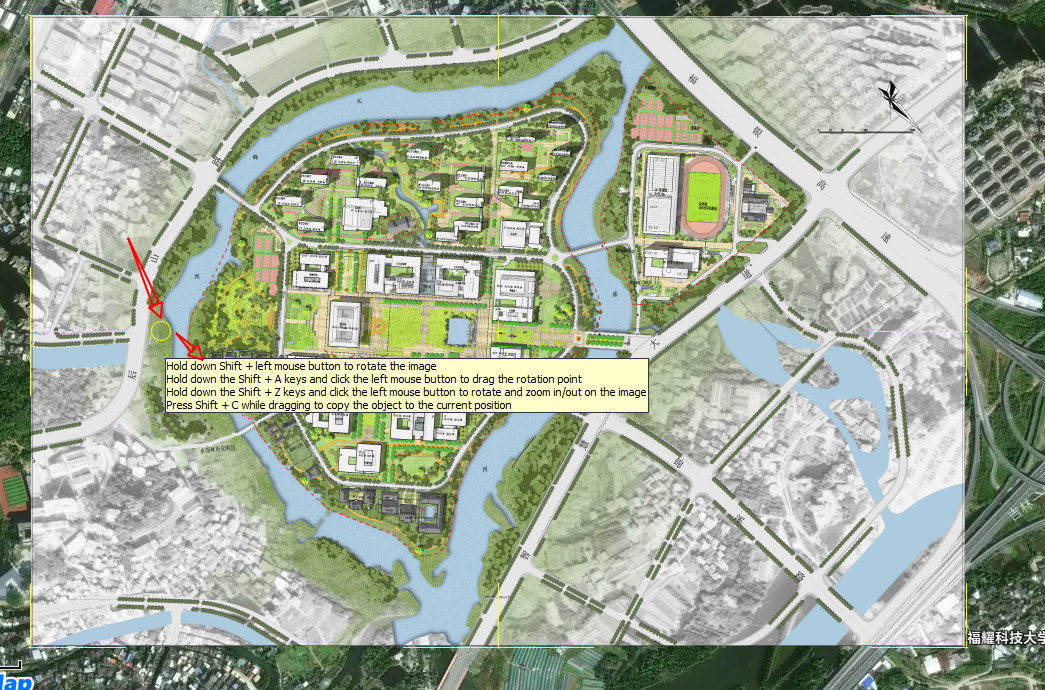
After you enable Editable State in the placemark settings, you can directly edit the image on the map, such as select, zoom, and move.

image-20260509120116028

image-20260509120328609

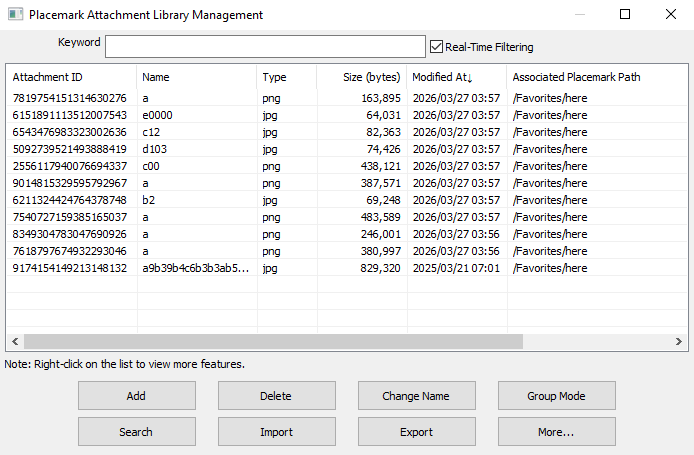
3. Placemark Attachment Library

You can manage placemark attachments in the placemark attachment library. On the main UI, choose [System] > [Data Management] > [Placemark Attachment Library Management].

image-20260509104401213

Add: Add a local files to the placemark attachment library.

Delete: Delete the selected placemark attachments.

Rename: Rename the selected placemark attachment.

Group Mode: Display placemark attachments in group or list mode.

Search: Search for attachments by name, time, or placemark.

Attachment Association: Specify the application to open for each type of placemark attachments.

Import: Import .ovobj files from local storage to the placemark attachment library. Attachment IDs remain unchanged, and if the attachments are already added to placemarks, the paths of the associated placemarks are automatically displayed in the list.

Export: Export placemark attachments from the attachment library to the local disk as .ovobj files.

The latest versions of QubiMap supports automatic association of placemarks and attachments, so that you do not need to handle attachments while syncing or uploading placemarks.

In QubiMap, you can download map data of specific areas for offline browsing and data sharing. To share the downloaded map data, you can enable the HTTP tile service for other devices. You can also use the Qubimap enterprise map service to share the data within your enterprise .

Any PC or mobile client of QubiMap that is connected to the Internet can be used to download map data.

This article describes how to download map data on a computer. For information about how to map data on a mobile device, see the help document “How to download map data on a mobile device”.

1. Download map data on your PC

You can select a system area or draw a custom area to download map data.

1.1. Procedure

1.1.1. Download map data of a system area

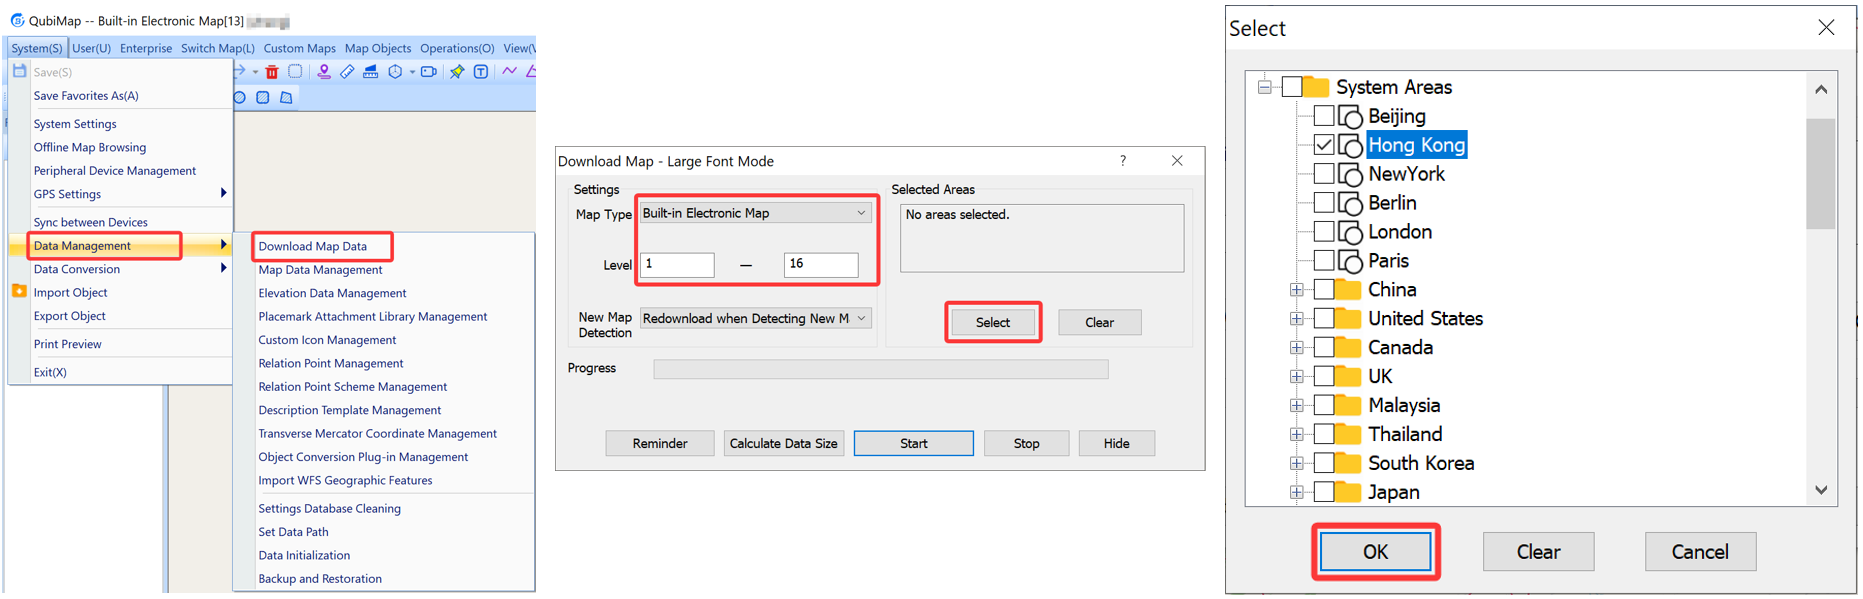
Choose [System] > [Data Management] > [Download Map Data]. In the [Download Map] dialog box, set the parameters as needed.

  • Map Type: Select a built-in map or a custom map.

  • Level: The higher the level, the clearer the map. Each level increase quadruples the map data size. The maximum level is 18. If you select a level higher than 18, the map does not become clearer, but the pixel size increases.

  • Selected Areas: Click [Select] to select areas. In the dialog box that appears, expand [System Areas], select the required areas, and click [OK]. We recommend that you select only a city each time to avoid the overwhelmingly large data volume.

image-20260615094201058

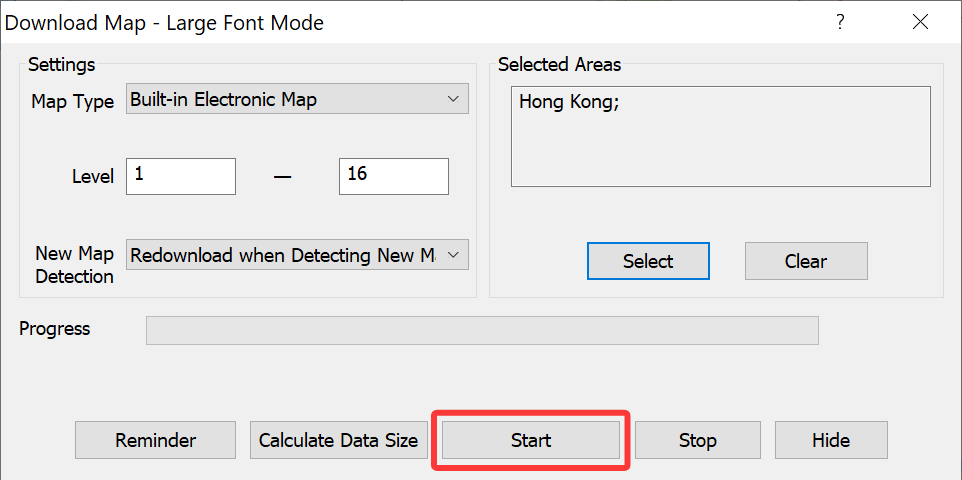
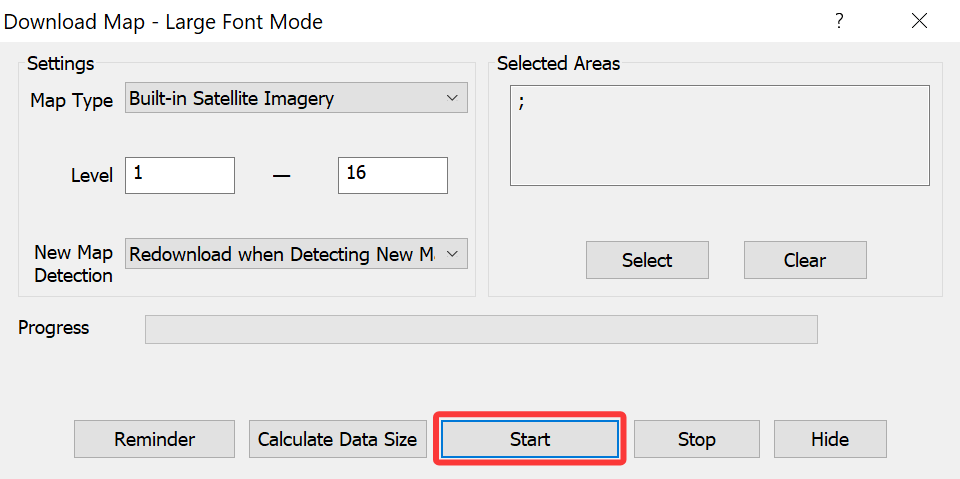
Click [Start] to start downloading.

image-20260615094318047

1.1.2. Download map data of a custom area

You can draw a rectangle, polygon, or circle on the map to specify an area. In this example, a polygonal area is drawn.

Click the polygon button in the toolbar, and draw an area as instructed.

image-20260615100602675

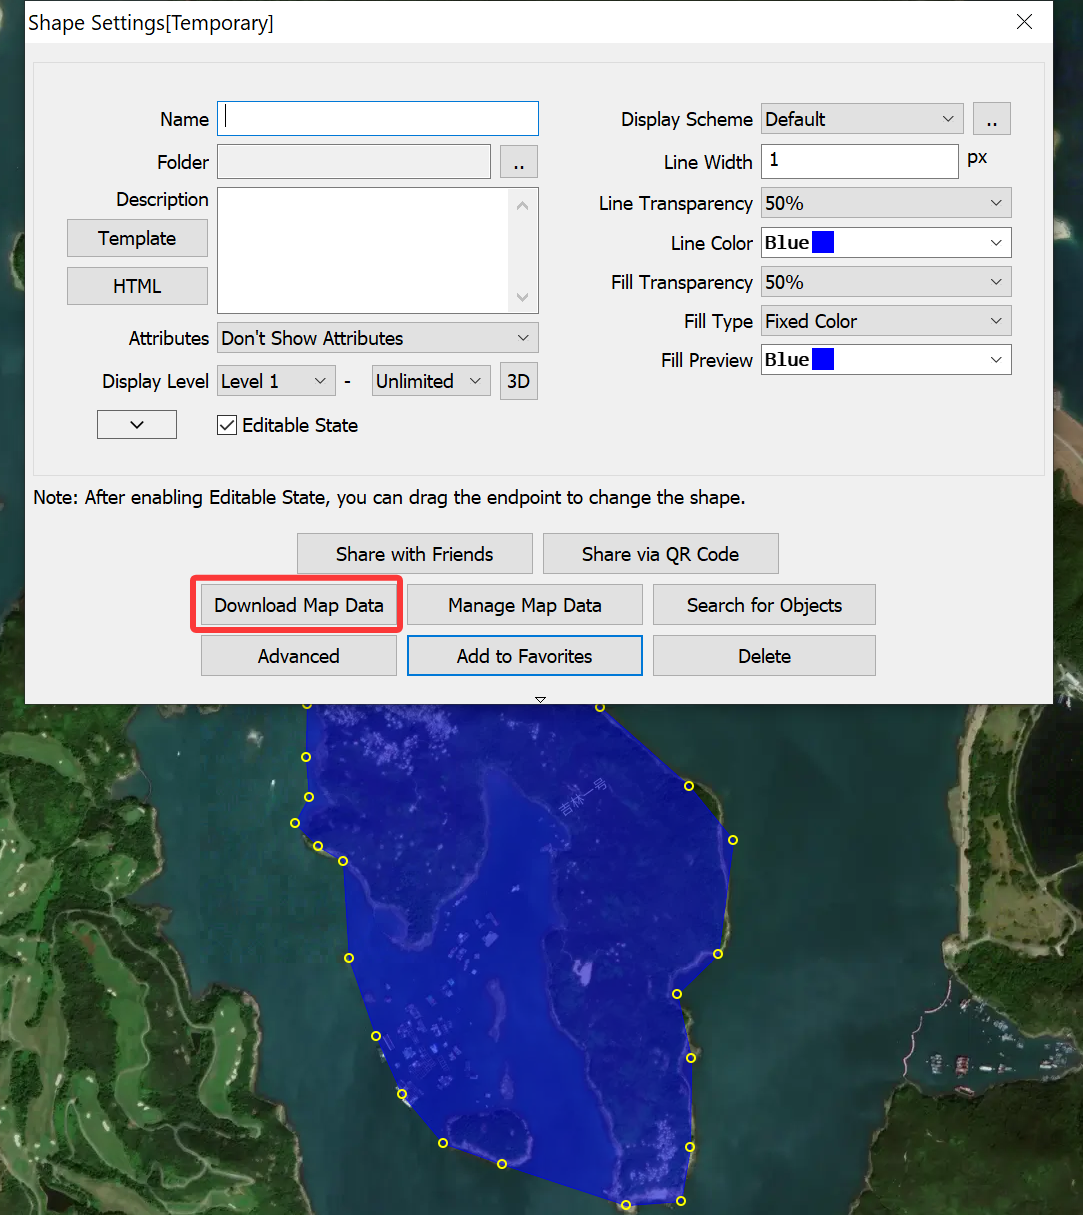
When drawing the last vertex, double-click the left mouse button. In the [Shape Settings] dialog box, click [Download Map Data].

image-20260615095828842

In the [Download Map] dialog box, set the parameters as needed, and click [Start].

image-20260615100845946

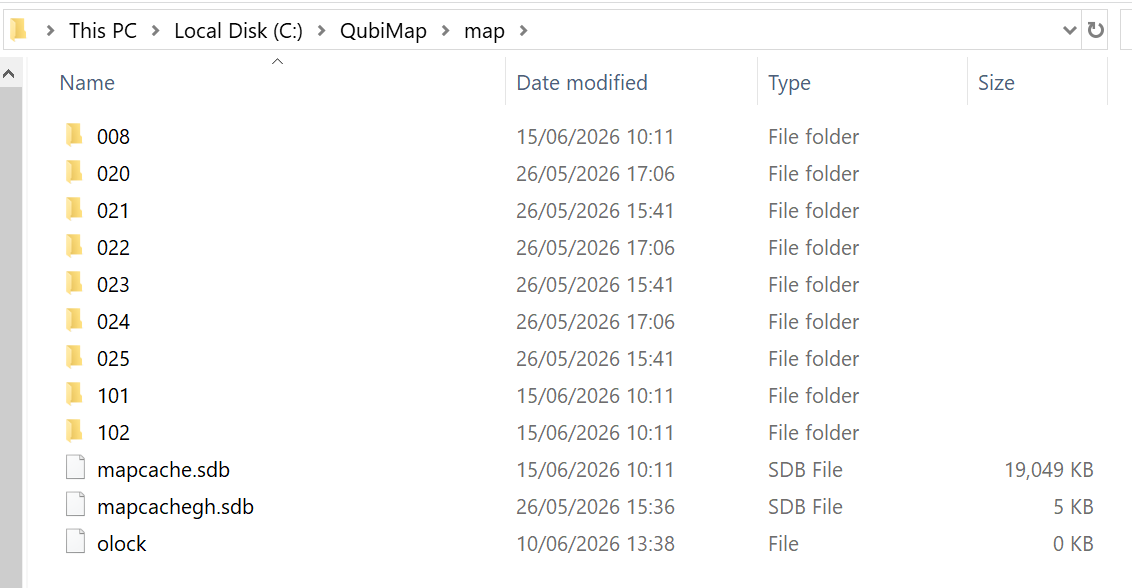
1.2. Offline map storage directories

Downloaded map tile data is saved in the map folder under the QubiMap root directory. The path may vary based on user settings. In this example, a Windows PC is used. The path of the root directory is C:\QubiMap.

The subfolders in the map folder are named with numbers, which indicate different maps. 101: built-in satellite imagery; 102: built-in electronic map. Numbers above 200 indicate custom maps.

image-20260615101321780

2. Applications

After downloading map data to your local storage, you can perform the following operations:

(1) Browse the map data in the offline environment on your PC

Choose [System] > [Offline Map Browsing].

Only the areas with the map data downloaded are displayed on the map.

(2) Send the map data to other devices

For more information, see the help document “How to send offline map data from a PC to mobile device“.

(3) Enable the HTTP tile service for other devices to access the map data

For more information, see the help document “How to enable the WEB tile service in QubiMap“.

(4) Export the map data as an image

For more information, see the help document “How to export QubiMap data as an image“.

1. Service Plans

QubiMap provides the following two service plans: VIP and SVIP (Super VIP). Common users can upgrade to VIP or SVIP users.

Plan Price
Free trail /
VIP $2 (/user/month)
SVIP $6(/user/month)

2. Feature Comparison

QubiMap offers some features for free for common users. Compared with common users, VIP and SVIP users can enjoy more advanced features, as shown in the following table:

Module Feature Free trail VIP SVIP
Placemark VIP icons ×
Placemark-related features ×
icon association ×
Batch retrieval of placemark altitudes ×
Conversion from shapes to placemarks ×
Generation of objects from placemarks ×
Track Track point editing ×
Track sectional view ×
Track playback by time ×
Insertion of placemarks and track points on a track at equal spacings ×
Insertion of placemarks at track points ×
Auto retrieval of track point elevations ×
Swap of track starting point and end point ×
Replication of tracks by offset ×
Generation of CAD objects by offset ×
Export track details as a CSV file ×
Track composition and object decomposition ×
Track extended attribute settings ×
Shape Shape composition ×
In-view search ×
Shape point editing ×
Folder Folder locking ×
Route navigation Modification of routes ×
Batch operation for objects in the favorites Objects that can be added to the favorites 1,000 20,000 1,000,000
Object search ×
Sort by name, file type, creation time, or modification time ×
Batch moving of objects ×
Batch modification of object attributes ×
Data export Batch export of track distance information to a table ×
Batch export of shape area and perimeter information to a table ×
Export as CAD files (DXF format) ×
Export as ArcGIS files (SHP format) ×
Export as tables (CSV format) ×
Export as TXT files ×
Export as KMZ/GPX/PLT files ×
Data import Import of CSV/SHP files ×
3D models: import of OVMOD/DAE files
Triangles: 500,000
Data backup Auto backup of the favorites ×
Backup of unloaded folders ×
Peripheral device Display of icons, tracks, and attributes ×
Sync of device tracks ×
Enabling of GPS settings ×
Enterprise server and enterprise cloud favorites × ×
Note: “×” in the table indicates that the feature is not supported, and “√” indicates that the feature is supported.

​ If you have any questions, please contact the customer service.

QubiMap supports customizing fill types for shapes. You can use a single color, gradient, image pattern, or CAD pattern to fill a shape. CAD patterns are defined consistent with common CAD software, enabling the seamless integration of QubiMap with CAD software.

This article describes how to use a CAD pattern to fill a shape.

1. Select a built-in CAD pattern to fill a shape

1) PC

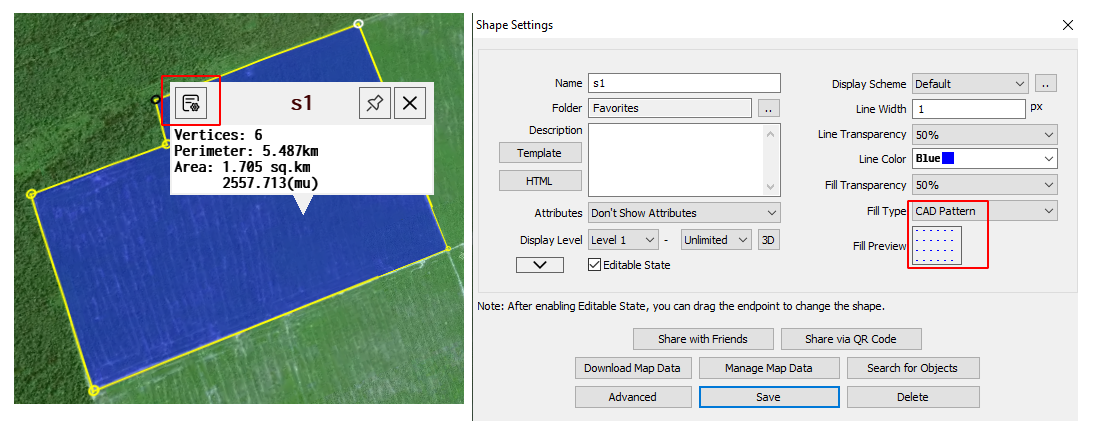
On the map, click on the shape to go to the [Shape Settings] dialog box.
Select [CAD Pattern] from the [Fill Type] drop-down list, and click [Fill Preview].

image-20260616140856928

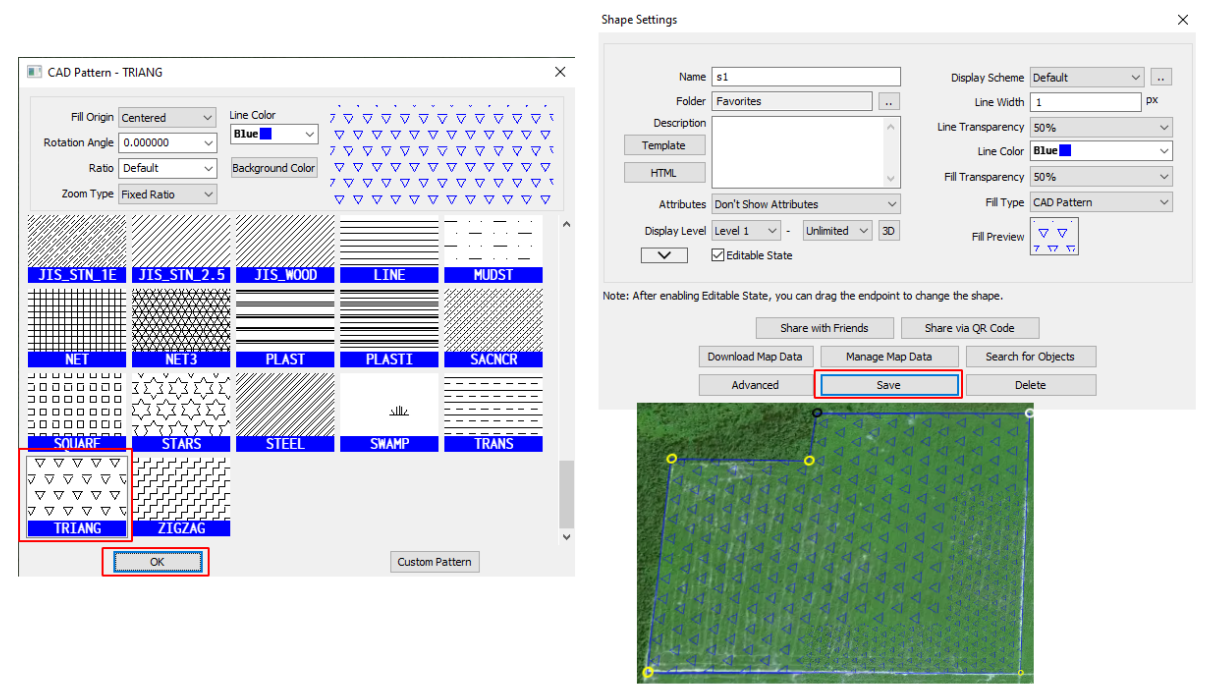
QubiMap provides commonly used patterns. You can select a CAD pattern and modify the attributes of the pattern as needed.

Fill Origin: The default value is [Centered]. You can also select [Custom] to set the origin.

Rotation Angle: After you set this value, the pattern on the right changes accordingly.

Zoom Type: The default value is [Fixed Ratio]. In this case, you can specify a zoom ratio. You can also select [Zoom with Map]. In this case, the zoom ratio changes automatically.

Line Color: Set the color of the lines in the pattern.

Background Color: You can select [Transparent] or specify a color as needed.

Then, click [OK] → [Save] to apply the settings.

image-20260616150505365

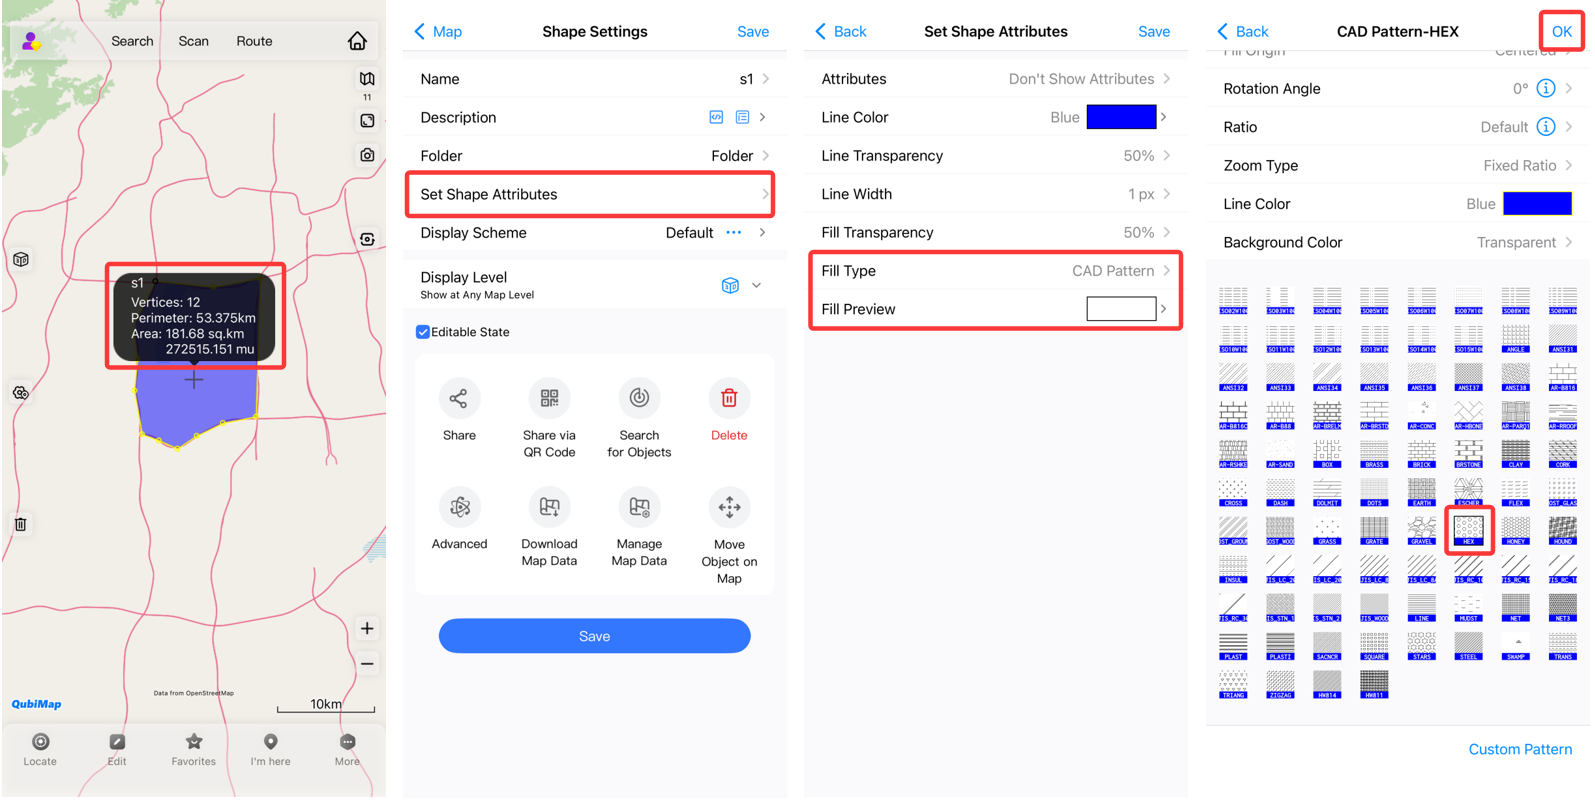
2) Mobile device

On the main UI, double-tap on the shape to go the [Shape Settings] page. On this page, tap [Set Shape Attributes].

Select [CAD Pattern] from the [Fill Type] drop-down list, and tap [Fill Preview].

You can select a CAD pattern and modify the attributes of the pattern as needed.

After setting the parameters, tap [OK].

image-20260901171403491

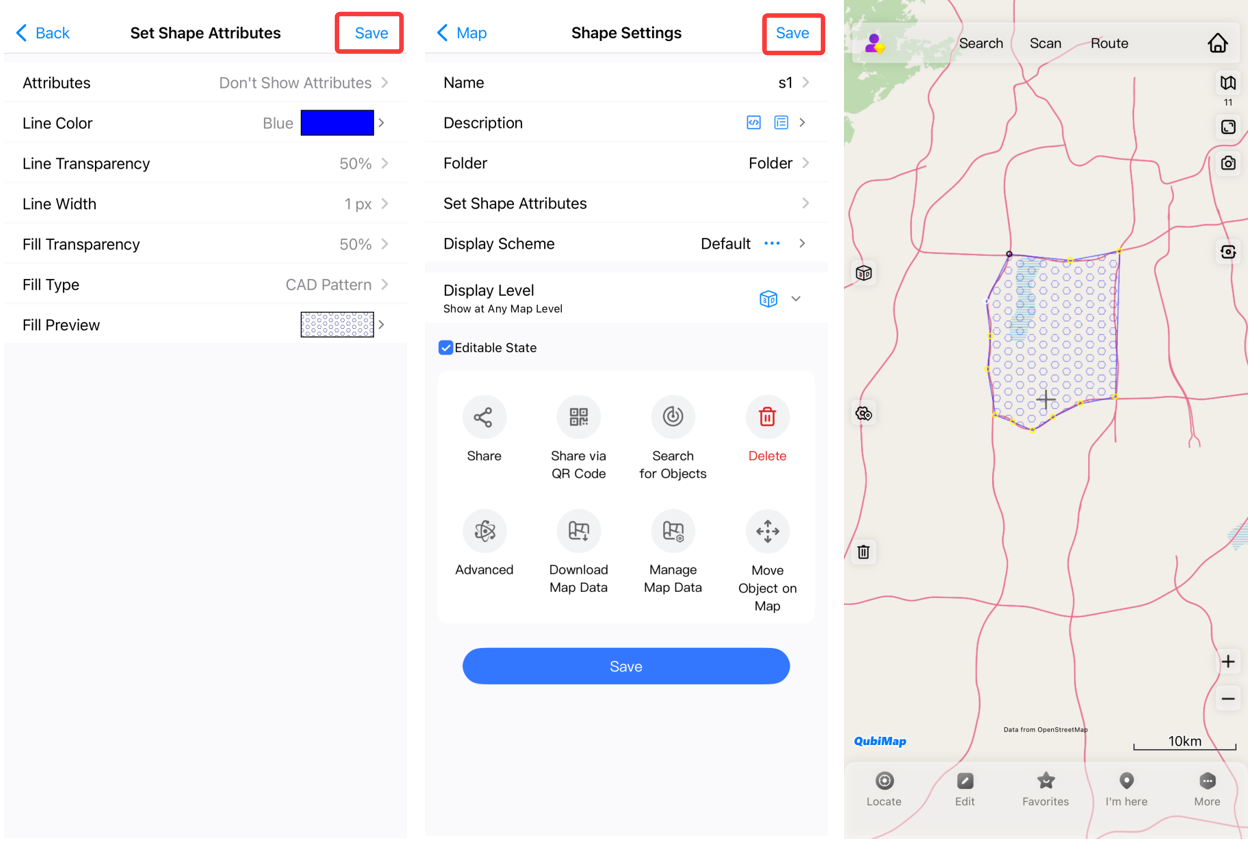
Tap [Save] → [Save] to apply the settings.

image-20260901171616620

2. Add a custom CAD pattern to fill a shape

You can add custom CAD patterns, whose attributes must comply with the format requirements defined by QubiMap.

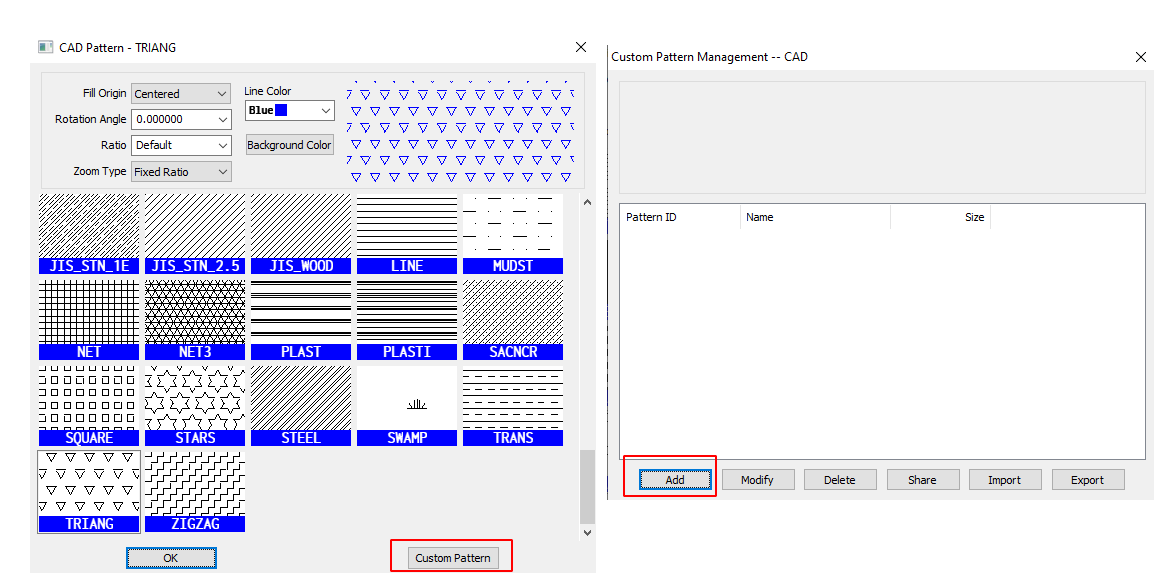
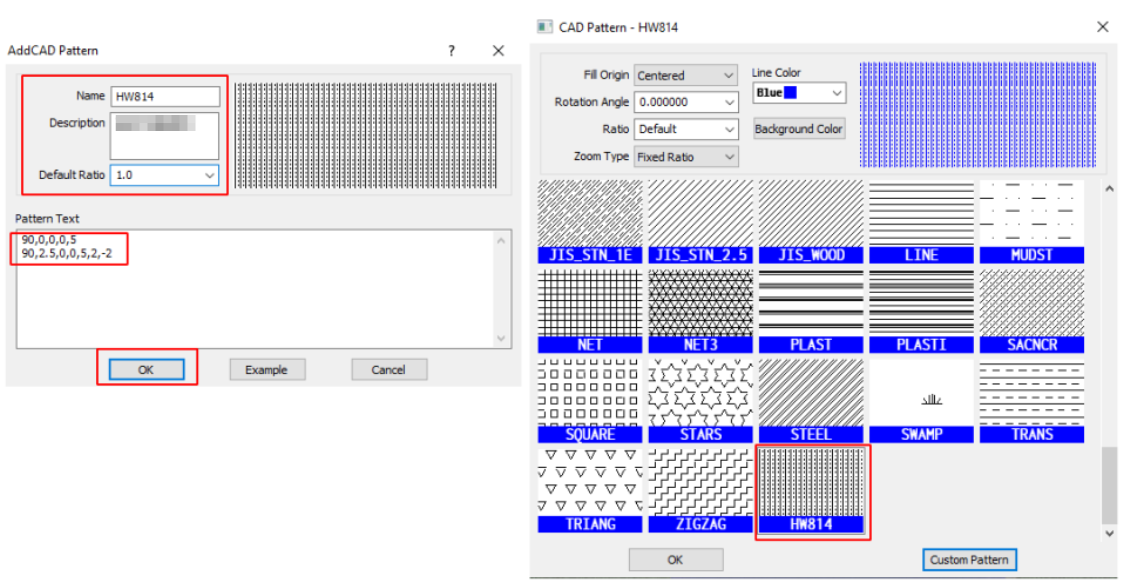
On your PC, go to the [CAD Pattern] dialog box, and then click [Custom Pattern]. In the [Custom Pattern Management–CAD] dialog box, click [Add].

image-20260616161905880

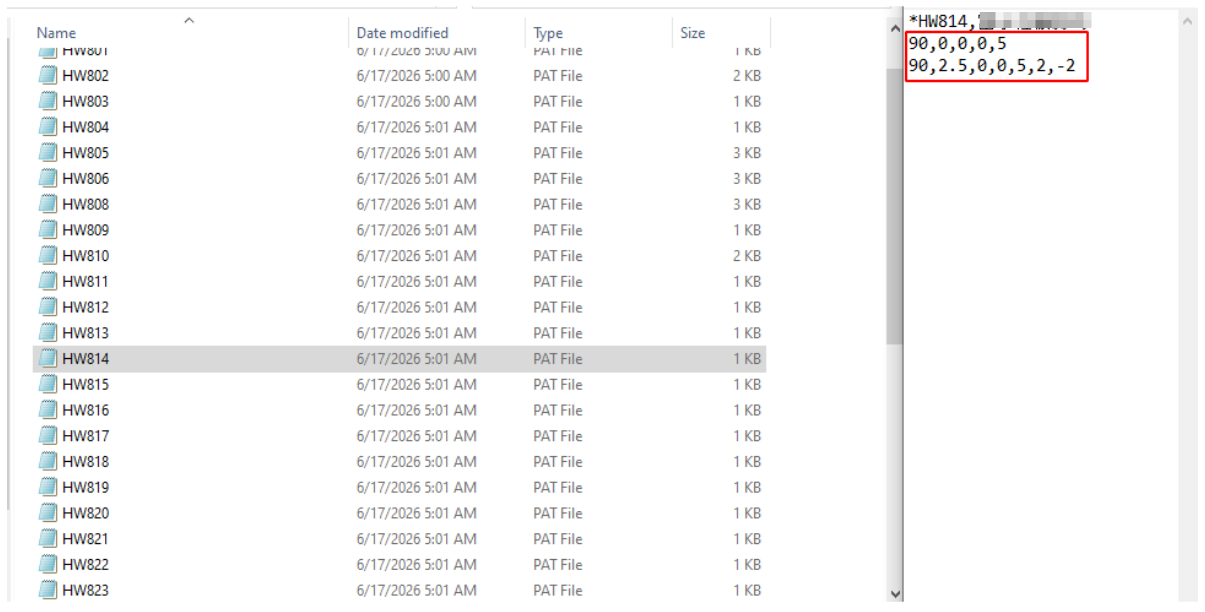
In the dialog box that appears, enter the standard code of the CAD pattern in the [Pattern Text] section.

You can open the required CAD pattern (.pat) file with Notepad, and then copy the pattern code to QubiMap.

image-20260622155130744

Set the other parameters such as [Name] and [Description], and click [OK]. Close the [Custom Pattern Management–CAD] dialog box.
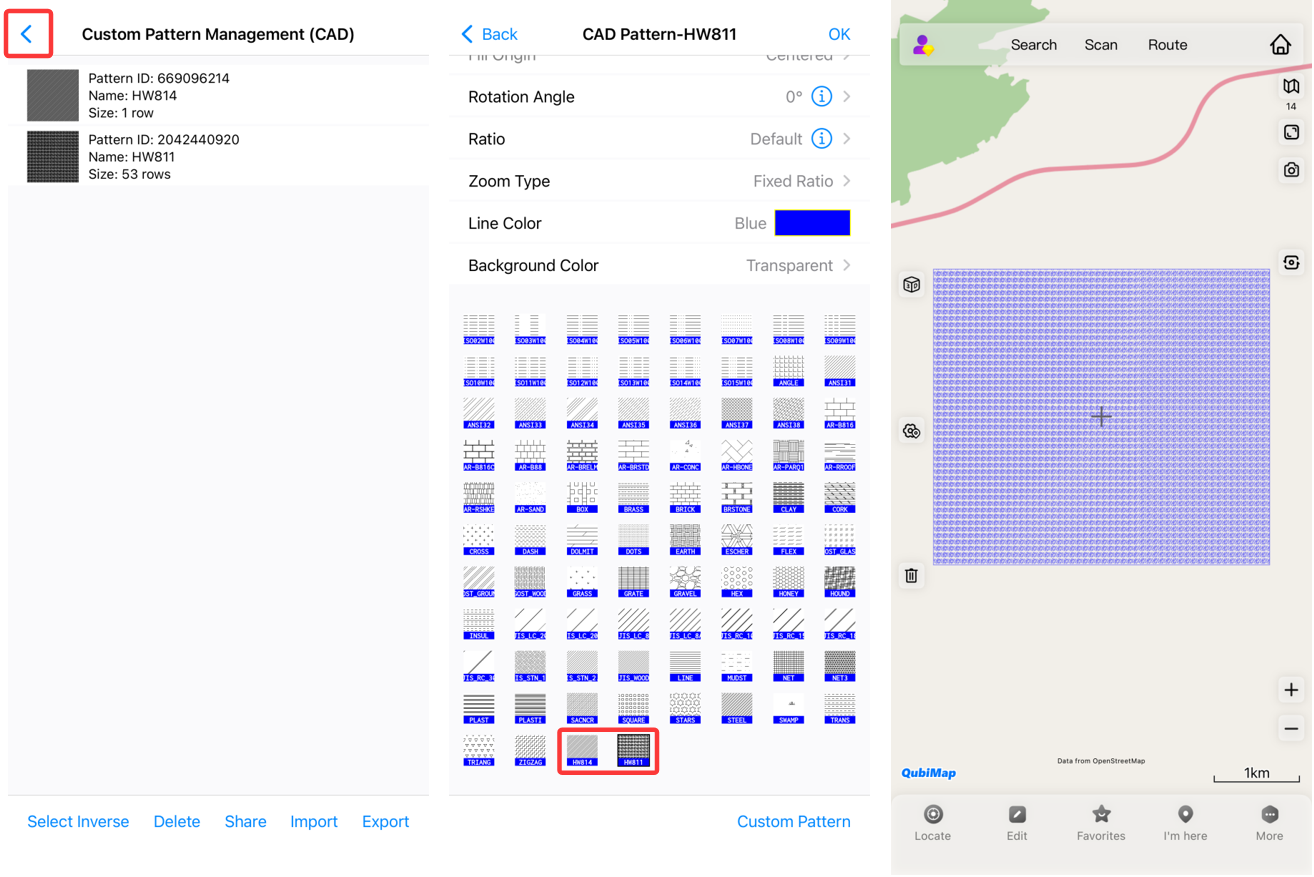
In the [CAD Pattern] dialog box, you can select the added custom CAD pattern. The attributes of the pattern can be modified as needed.

image-20260622155206797

Examples of CAD pattern text:

*Quartz sandstone:

0,0,0,0,2.4

0,-0.04,1.2,2,2.4,0.08,-0.992,0.08,-2.92

0,-0.04,1.25,2,2.4,0.08,-0.992,0.08,-2.92

*Diorite:

0,1,0.75,0,5,2,-3

90,2,0.75,0,5,2,-3

0,3.5,3.25,0,5,2,-3

90,4.5,3.25,0,5,2,-3

*Powdery clay:

45,0,0,0,3.5355

45,2.5,0,3.5355,3.5355,3.5355,-3.5355

*Pebble:

45,2.5,1.25,3.5355,3.5355,0.7071,-13.435

45,3,0.75,3.5355,3.5355,0.7071,-13.435

0,2.5,0.75,0,5,0.5,-9.5

0,3,1.75,0,5,0.5,-9.5

90,2.5,0.75,0,10,0.5,-4.5

90,3.5,1.25,0,10,0.5,-4.5

45,7.5,3.75,3.5355,3.5355,0.7071,-13.435

45,8,3.25,3.5355,3.5355,0.7071,-13.435

0,7.5,3.25,0,5,0.5,-9.5

0,8,4.25,0,5,0.5,-9.5

90,7.5,3.25,0,10,0.5,-4.5

90,8.5,3.75,0,10,0.5,-4.5

3. Send custom patterns to your mobile device

If you need to use custom CAD patterns on your mobile device, you can first add the patterns to your PC and then send them to your mobile device.

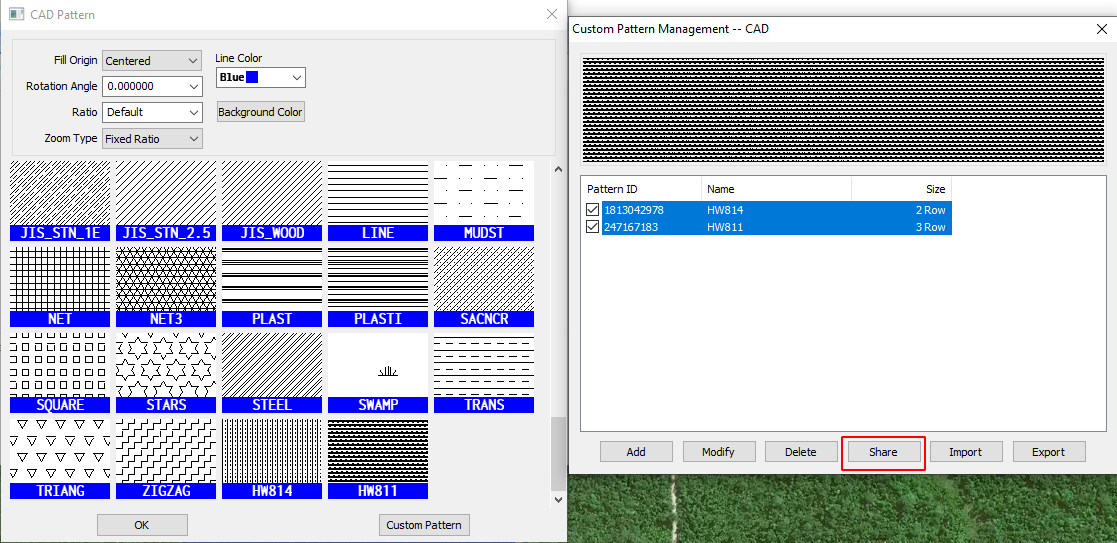
On your PC, go to the [Custom Pattern Management–CAD] dialog box, select the required CAD patterns, and then click [Share].

image-20260617144525713

In the message that appears, click [OK]. In the [Select Friend] list, select [My Mobile Phone], and then click [OK]. You can also select your friends to share the CAD patterns with.

image-20260618093217190

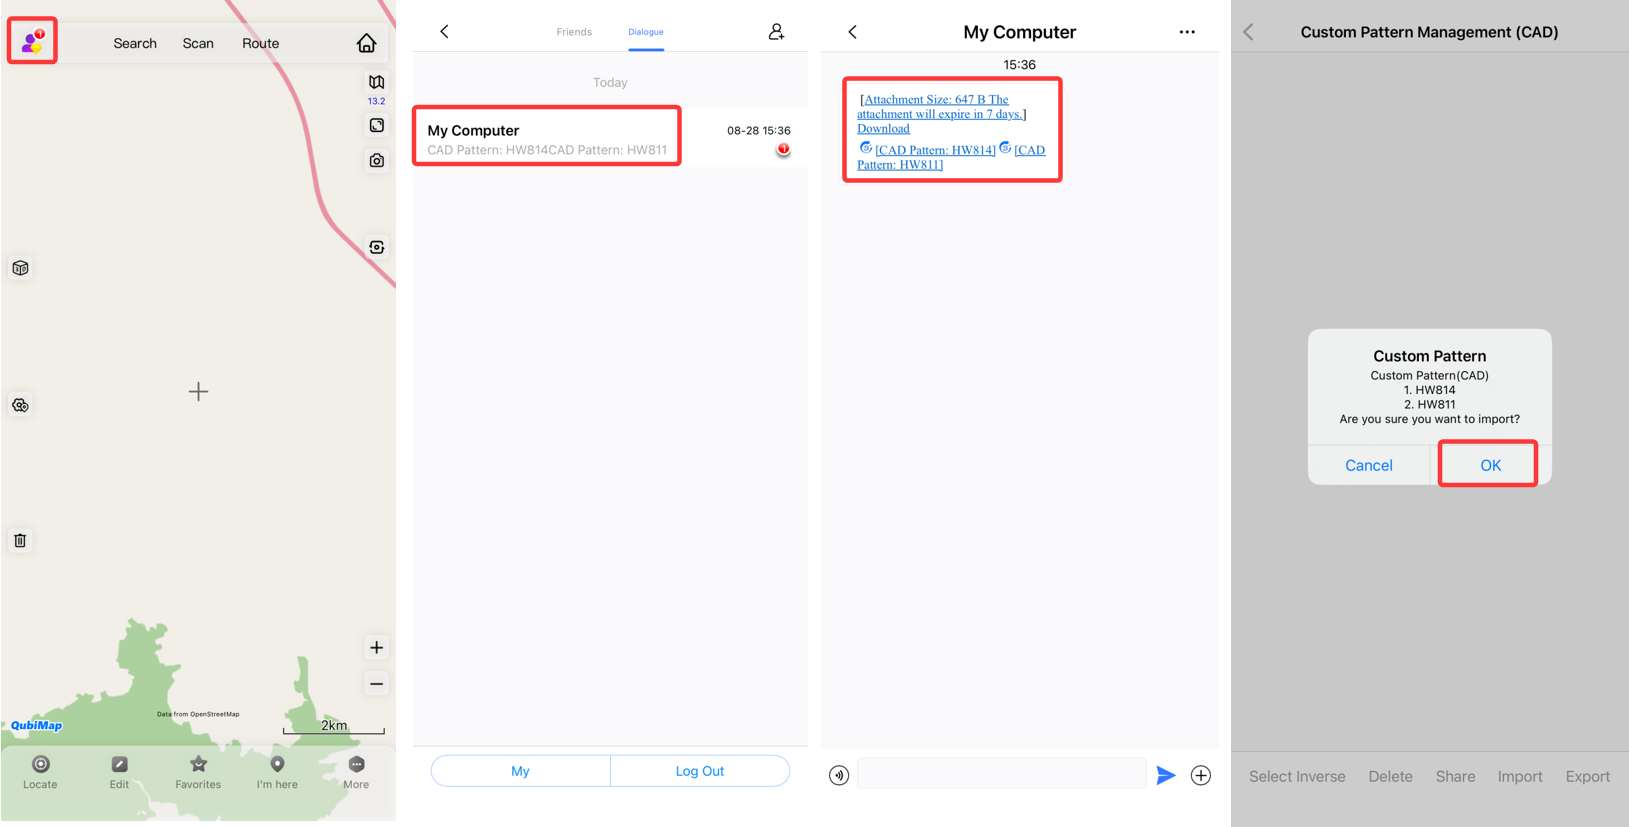
Log into your account on the mobile device, tap the profile icon in the upper-left corner, and switch to the [Dialogue] page. Tap [My Computer] to view the messages sent from your PC.

Download the CAD patterns you just sent, and then tap that message. In the system message that appears, tap [OK].

image-20260901141427080

Return to the main UI and go to the [CAD Pattern] page. You can view the patterns you just imported, and use them directly.

image-20260901141711291

You can add custom maps to QubiMap by using the WMTS service. Currently, only Lat-Long coordinates and transverse Mercator projection coordinates are supported; local coordinate systems are not supported.

This article describes how to add a custom map via the WMTS service.

1. Retrieve a WMTS URL

Prepare a valid WMTS URL supported by QubiMap. You can retrieve WMTS URLs from local map websites or geographic information websites.

2. Add a custom map via WMTS

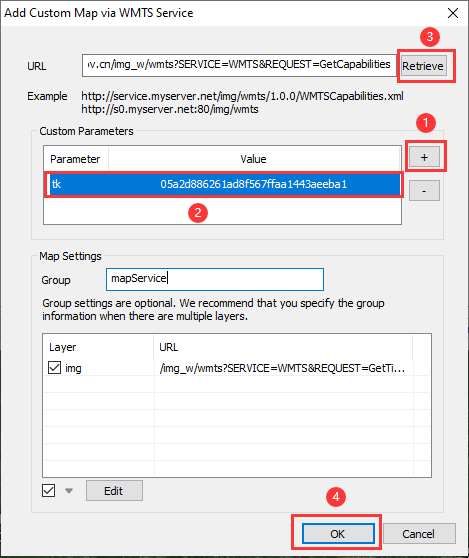
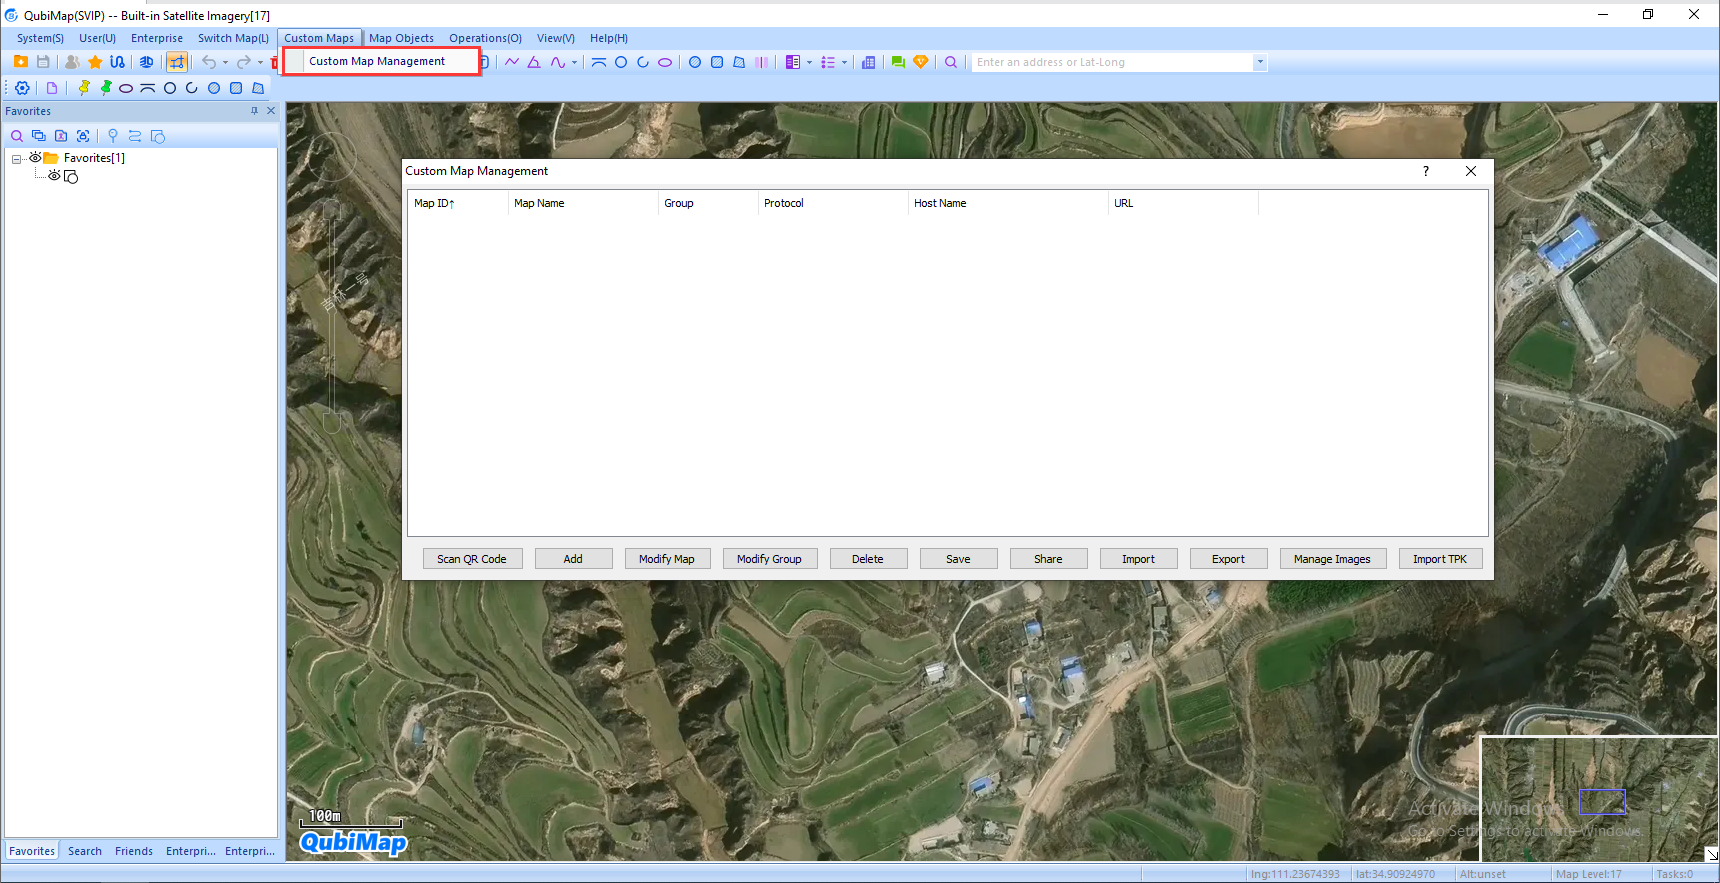
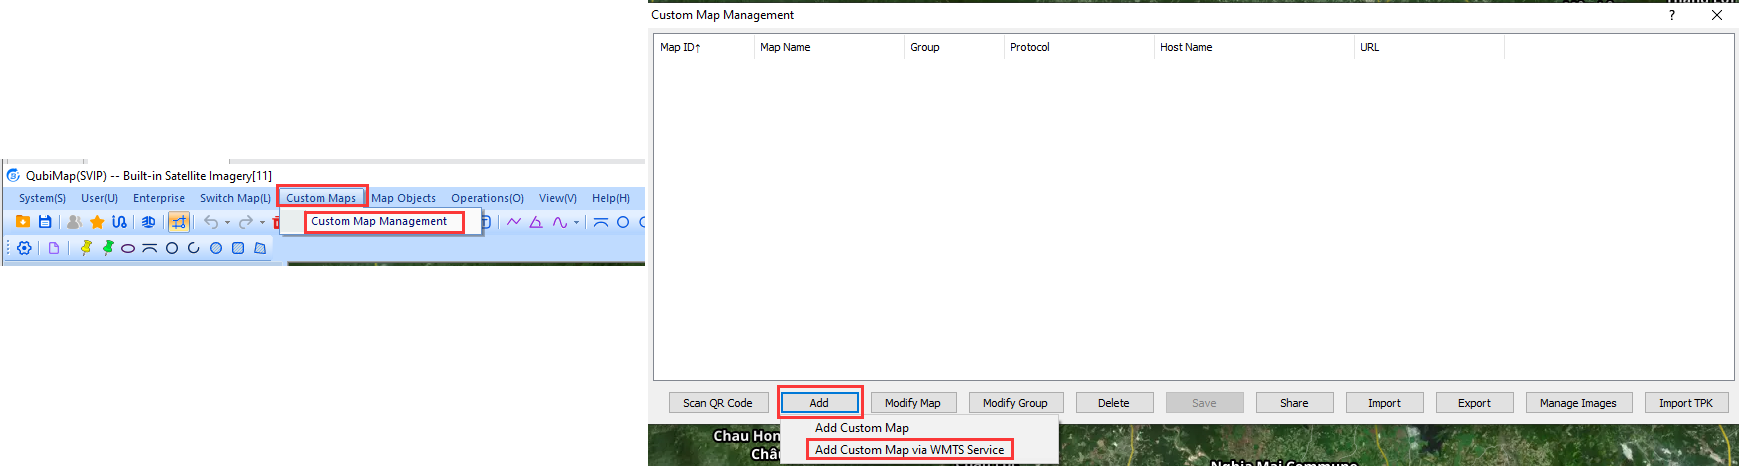
On the main UI of QubiMap, choose [Custom Maps] > [Custom Map Management]. In the [Custom Map Management] dialog box, click [Add] and select [Add Custom Map via WMTS Service].

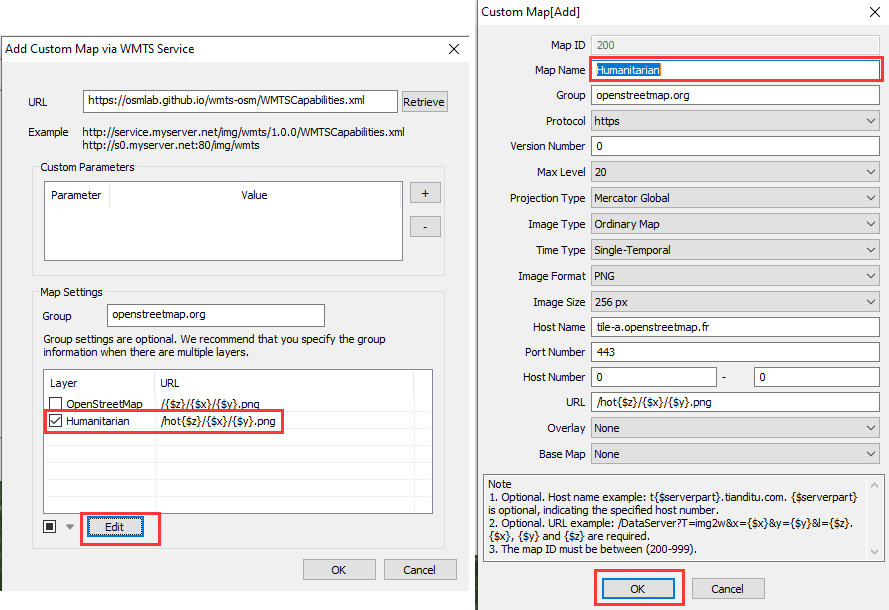
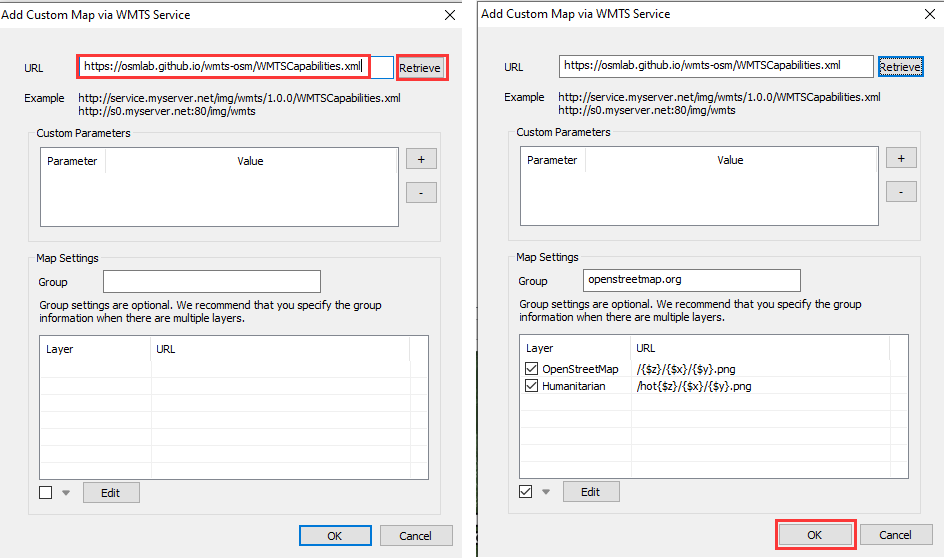
In the [Add Custom Map via WMTS Service] dialog box, enter a WMTS URL, and click [Retrieve]. Then, click [OK].

Note:

Custom Parameters: If the WMTS URL requires a token, you can click the [+] sign next to [Custom Parameters], and double-click the cells in the table to enter the corresponding parameter and value. Then, enter the URL, and click [Retrieve] → [OK] → [OK].

Layers: Select a layer and click [Edit] to edit the custom map layer. In the dialog box that appears, set the parameters such as [Map Name] and [Projection Type]. Then, click [OK] → [OK].

The added map layer is displayed in the custom map list.

3. View the map layer

On the main UI, switch to the custom map that is added, and you can view the added map layer.

You may want to demonstrate a large number of aerial images in QubiMap. To directly import and load these images, the system needs to process heavy data workloads, which requires high-performance computer hardware. In this case, you can publish the aerial images as a map service through ArcGIS and load them in QubiMap as an online custom map layer.

1. Publish a map service in ArcGIS

In ArcGIS, you can publish aerial images or vector graphics as map services.

(1) Load data

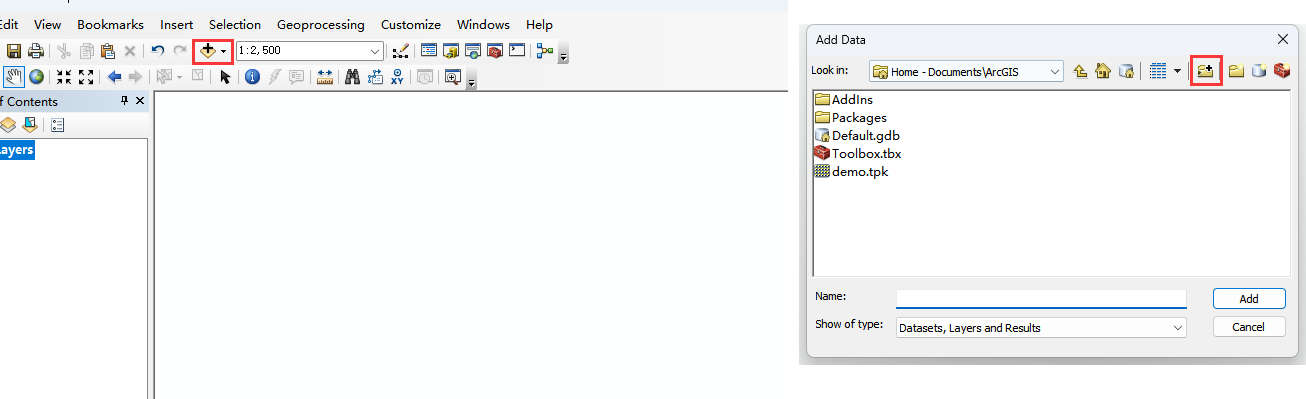
Open ArcMap, click the wps1 button in the toolbar, and then click the wps2 button.

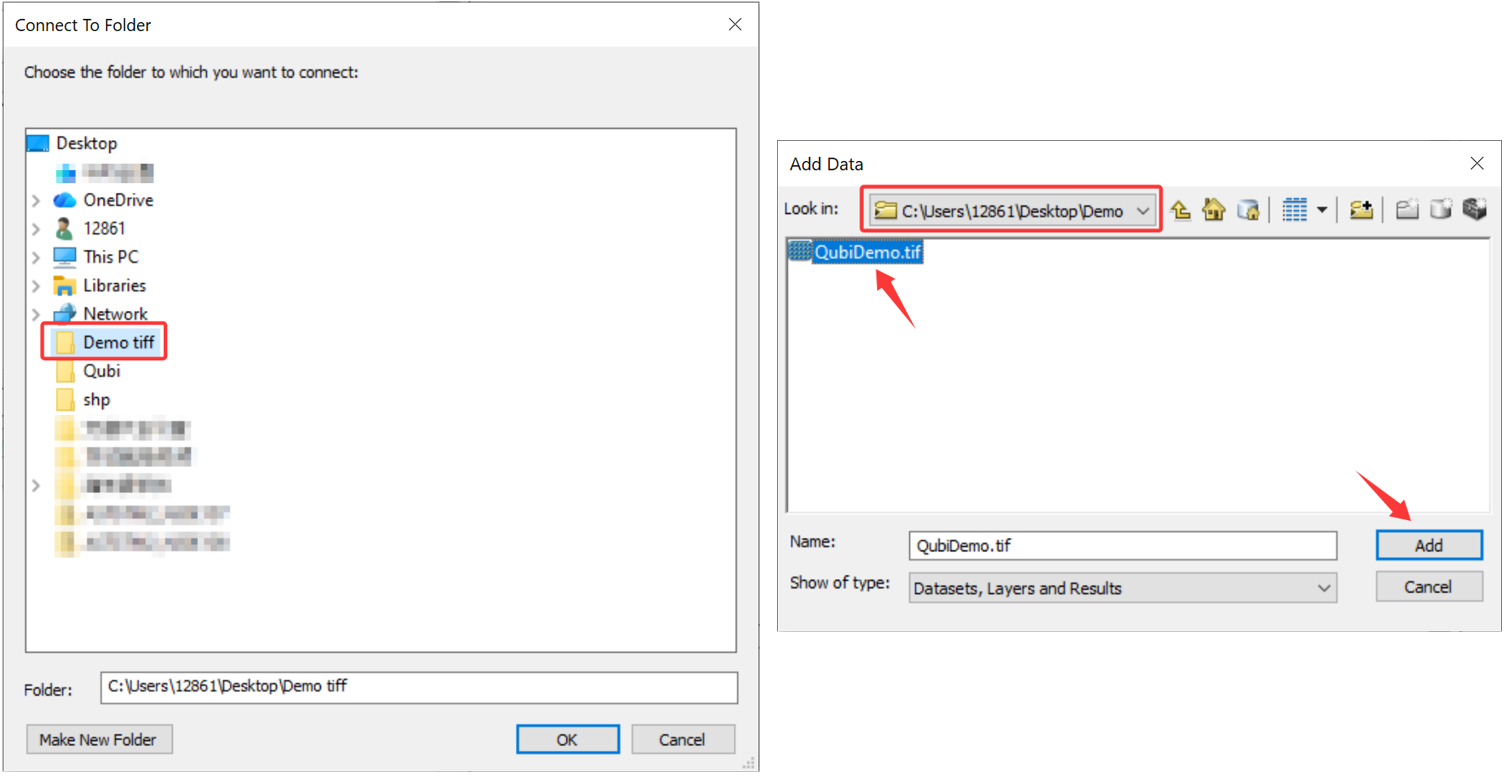
Select the folder where you save the map files and click [OK]. Select one or multiple aerial images you want to publish and click [Add].

image-20260803173319673

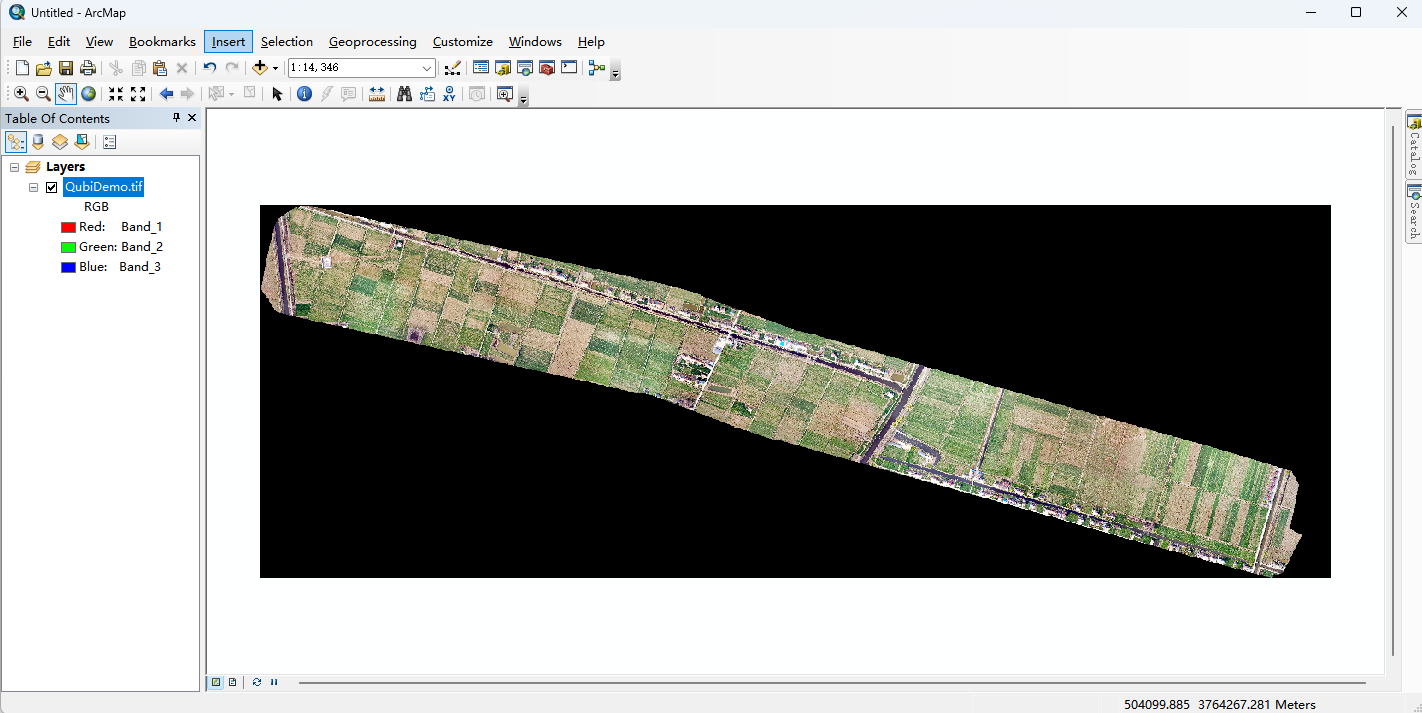
The added aerial images are displayed in the map window.

(2) Publish a map service

  • Connect to the ArcGIS server

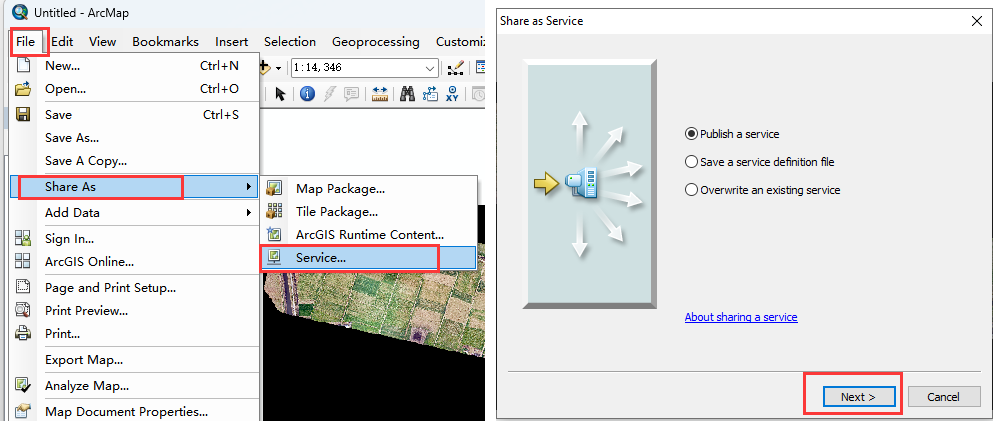
Choose [File] >[Share As] > [Service]. Select [Publish a service], and click [Next].

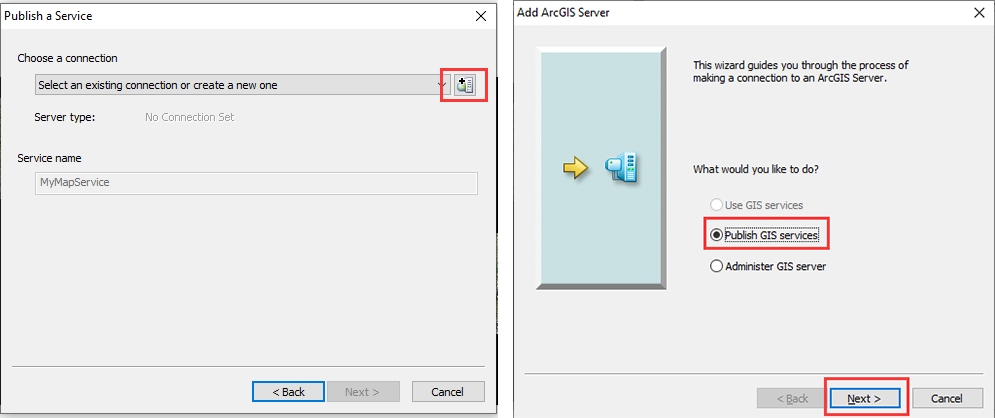
In the [Publish a Service] dialog box, click the image-20260717100234309 button. In the [Add ArcGIS Server] dialog box, select [Publish GIS services] and click [Next].

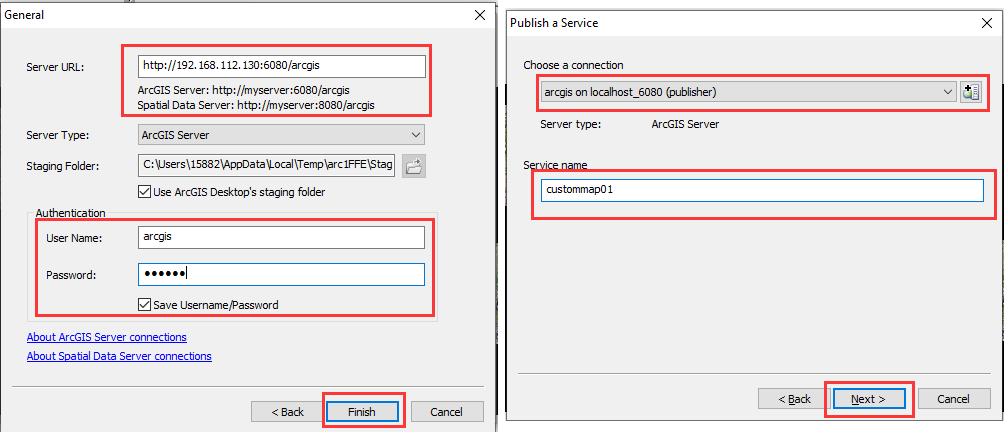
In the [General] dialog box, set the server URL, keep the server type and staging folder as default, enter the username and password, and click [Finish] to create a connection. and return to the [Publish Service] window.

Server URL: Replace “myserver” with the IP address of the host where the ArcGIS server is located. If ArcGIS Desktop and ArcGIS Server are deployed on the same device, you can replace “myserver” with “localhost”.

In the [Publish a Service] dialog box, select the connection you created, enter the service name, and click [Next].

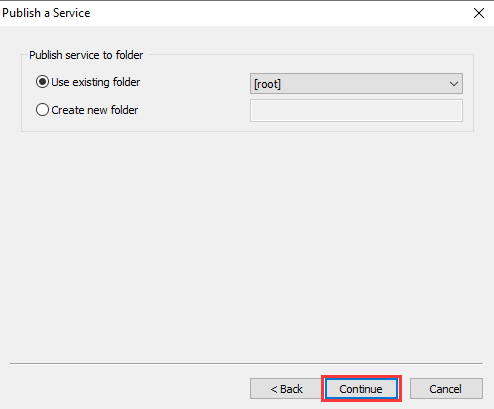
Click [Continue] to go to the [Service Editor] dialog box.
  • Set map tile attributes

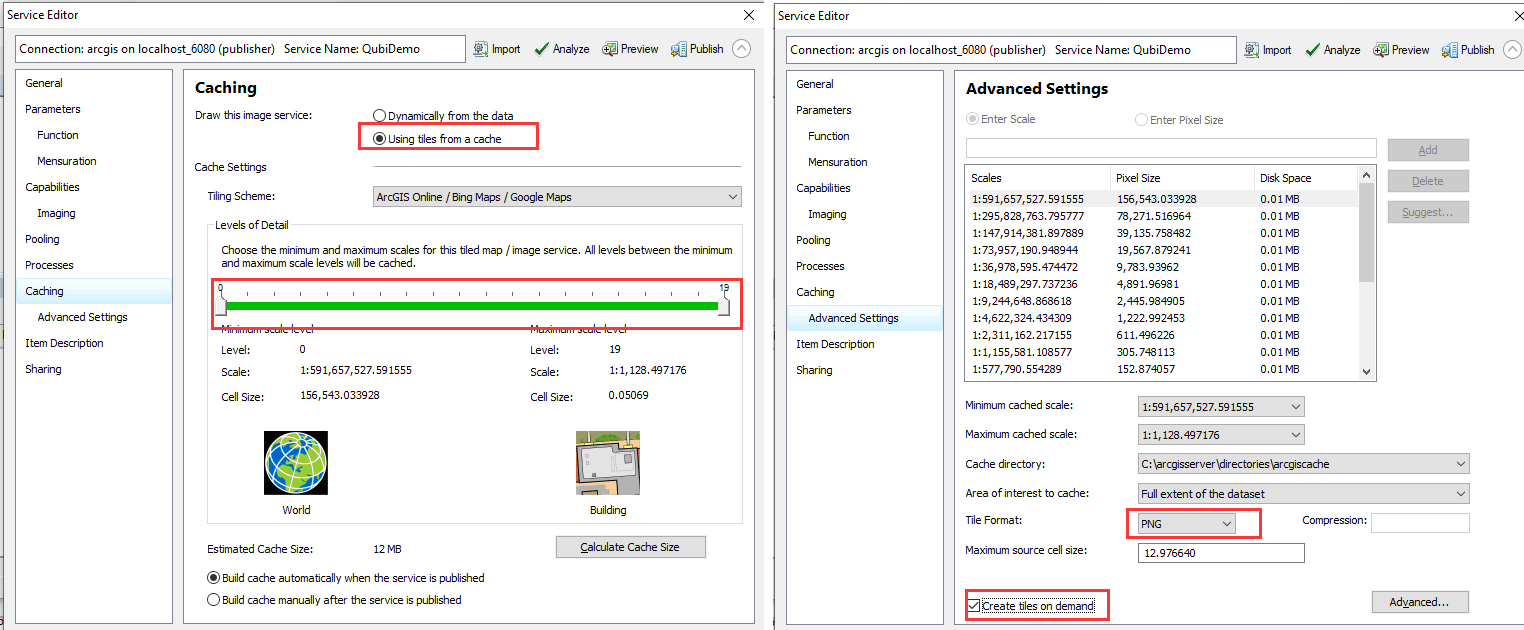
In the [Service Editor] dialog box, switch to [Caching] and set the following parameters:

① [Draw this image service]: Select [Using tiles from a cache].

② [Tiling Scheme]: Keep the default value. QubiMap only supports loading ArcGIS map services of the [ArcGIS Online/Bing Maps/Google Maps] tiling scheme, with the projection type as [Web Mercator].

③ [Levels of Detail]: Set an appropriate tile level range based on the resolution of the aerial images. Generally, the minimum level is set to “0”.

④ [Estimated Cache Size]: Keep the default value.

Switch to [Advanced Settings]. Set the following parameters and select [Create tiles on demand]:

① [Minimum cached scale]: Keep the default value.

② [Maximum cached scale]: Keep the default value.

③ [Tile Format]: Select a format, such as PNG. QubiMap only supports loading map tiles in PNG and JPG formats.

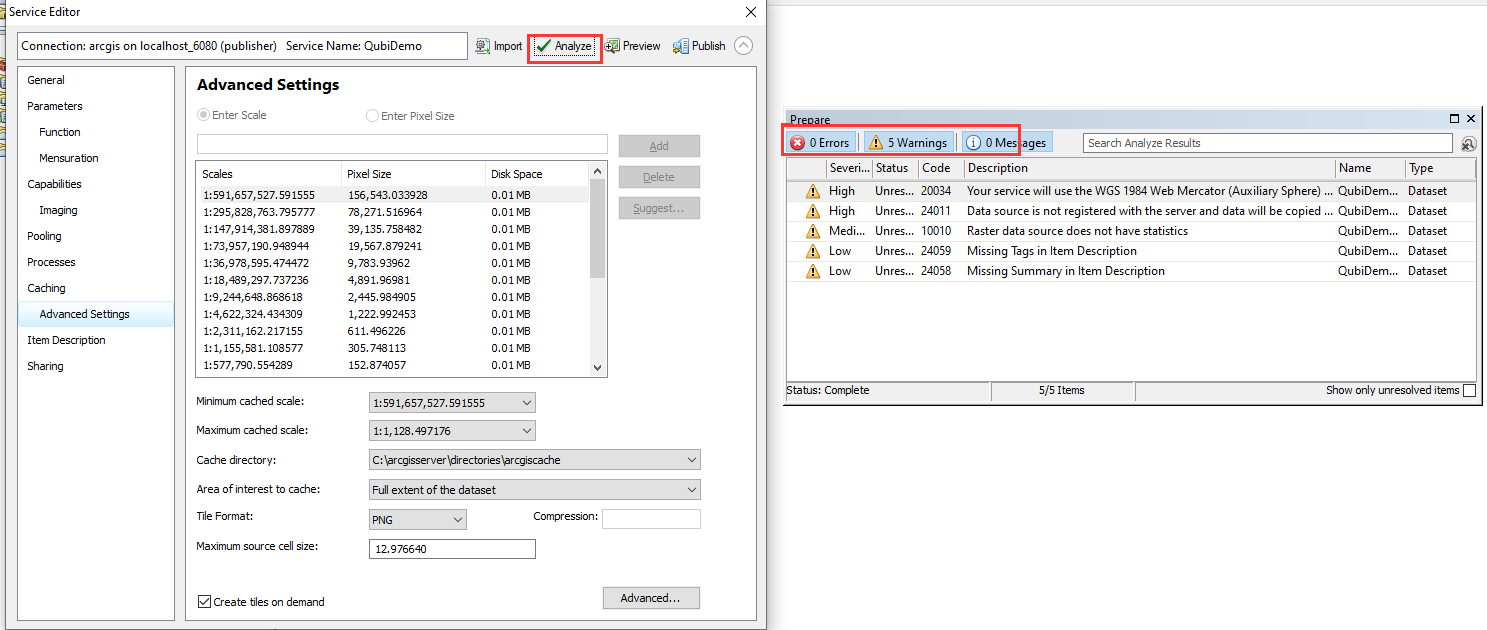
Click [Analyze]. In the [Prepare] dialog box, the errors, warnings, and messages are displayed.

If no errors occur, the map service can be published; otherwise, please modify according to the prompts.

Warnings and messages can be skipped.

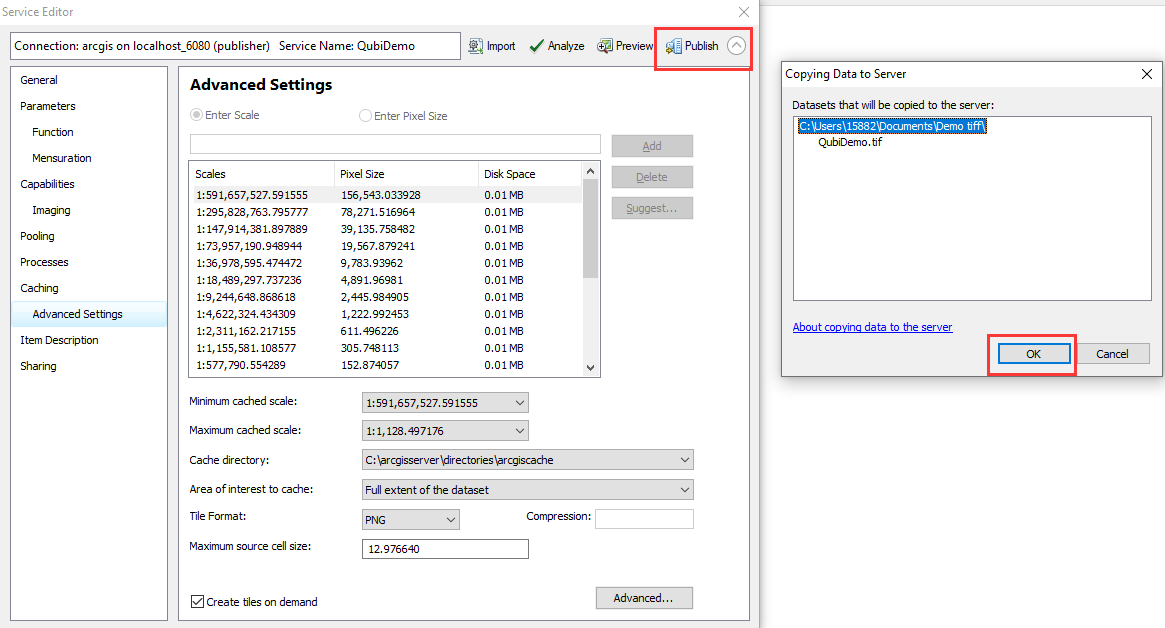
Click [Publish] → [OK].

In a message that appears, you can view the service publishing result. Click [OK].

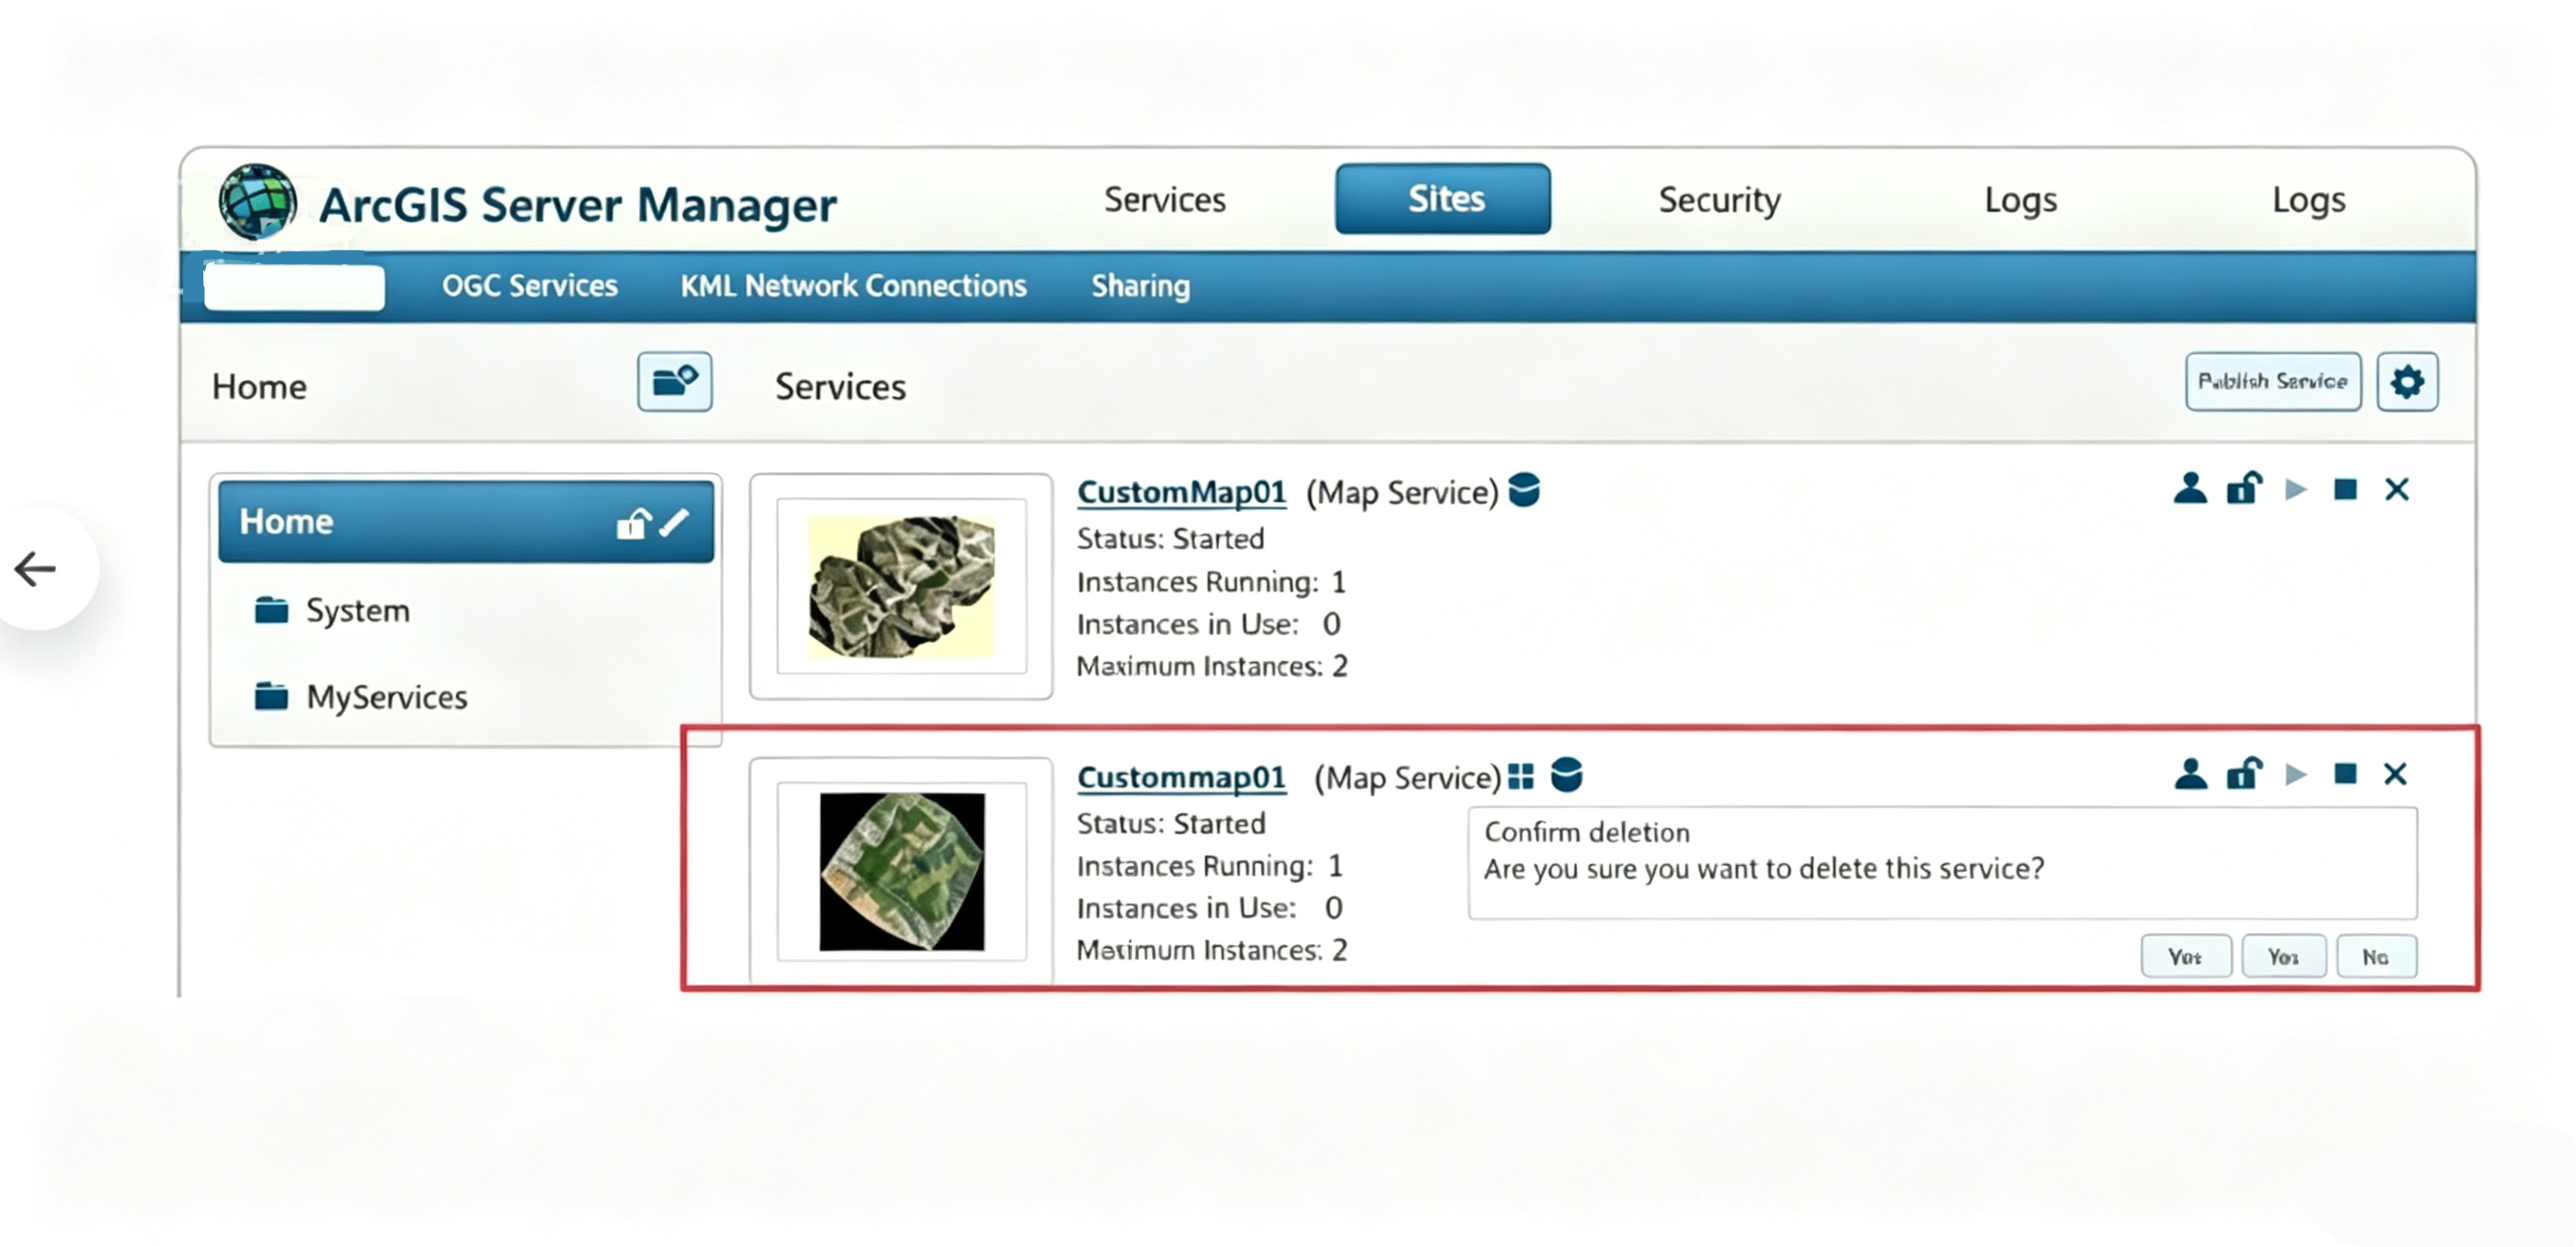
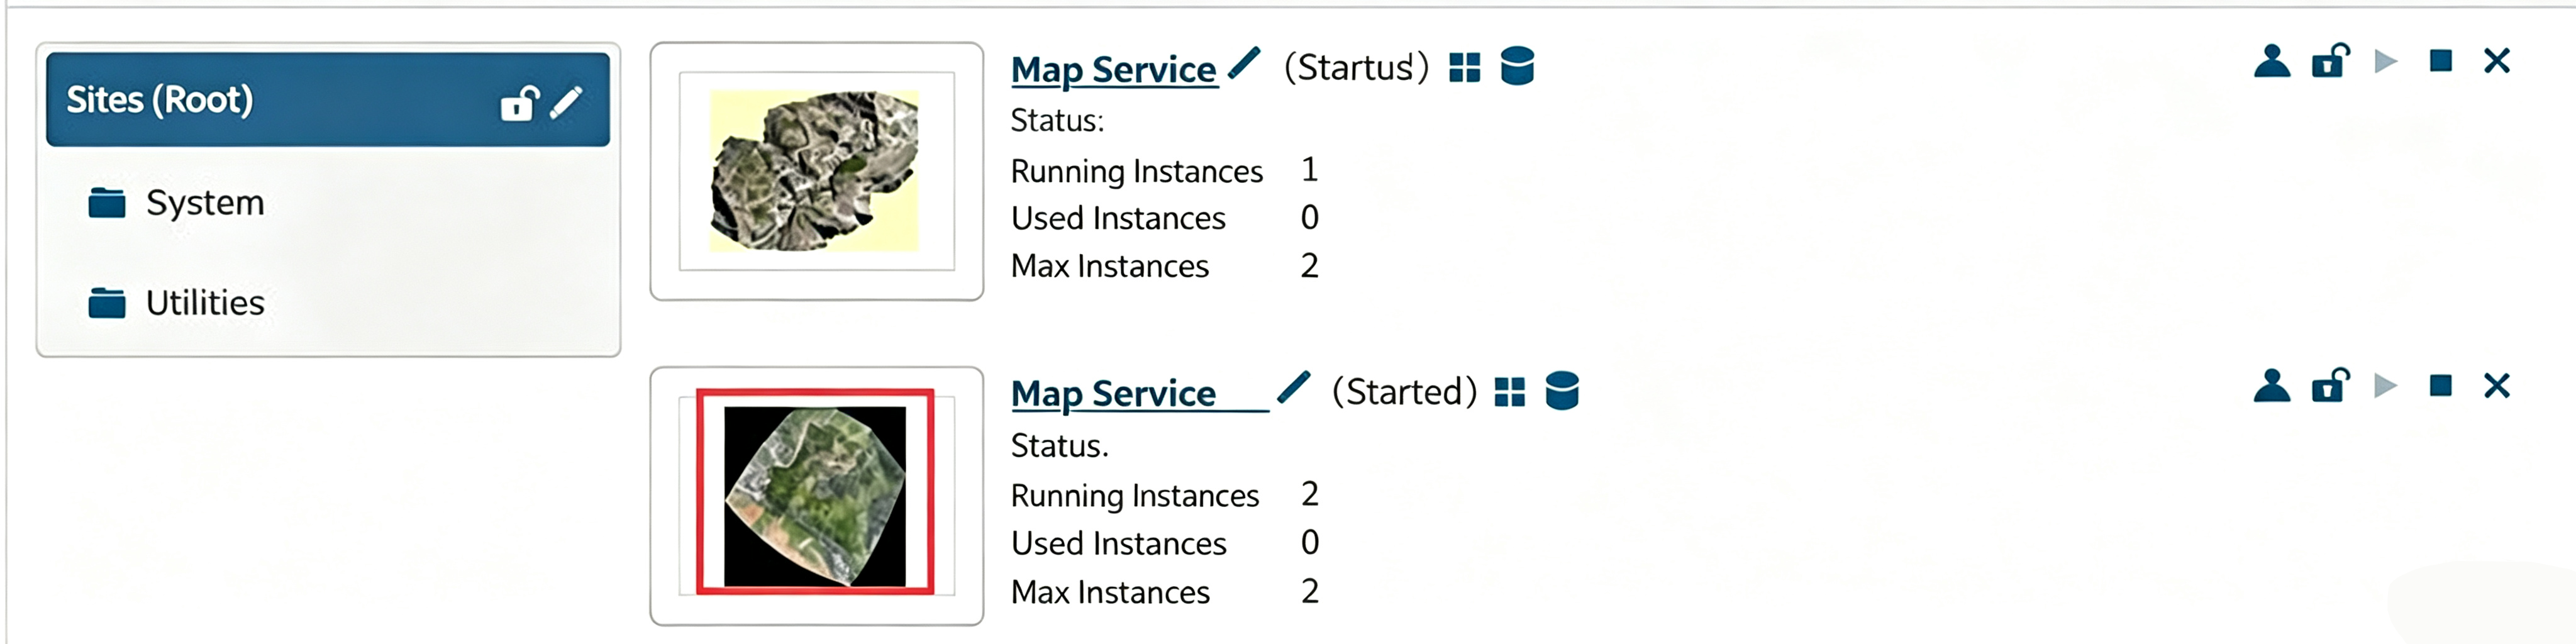
After the map service is published, you can view it in the ArcGIS Server Manager.

  • View the map service

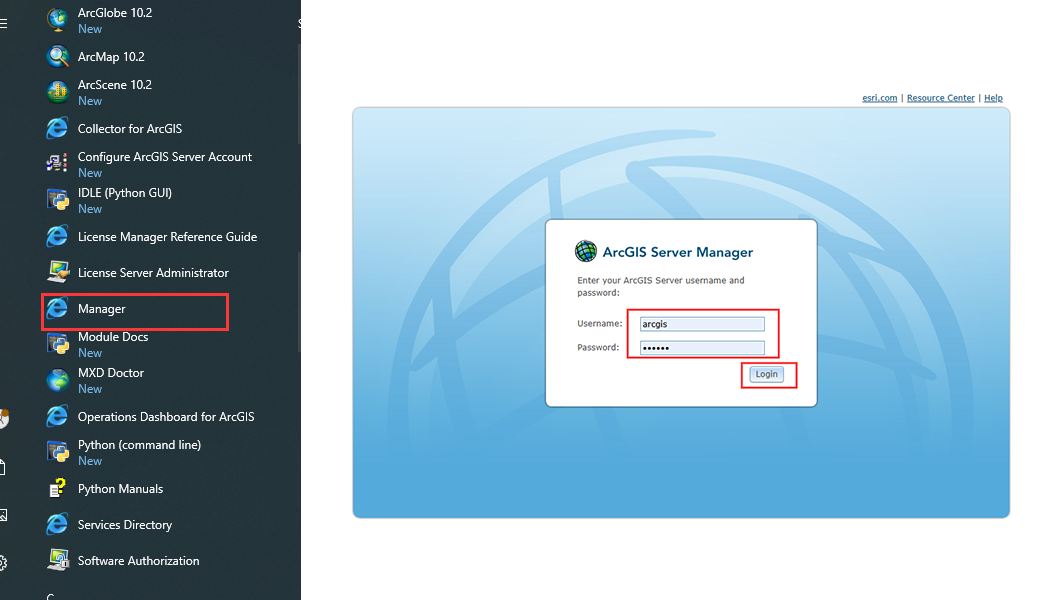
In the Windows Start menu, find the ArcGIS directory, select [Manager], enter your username and password, and click [Login].

After login, you can view the published map services on the [Services] tab.

2. Load the ArcGIS map service in QubiMap

You can load ArcGIS map services on both the mobile and PC clients of QubiMap.

(1) Retrieve the URL

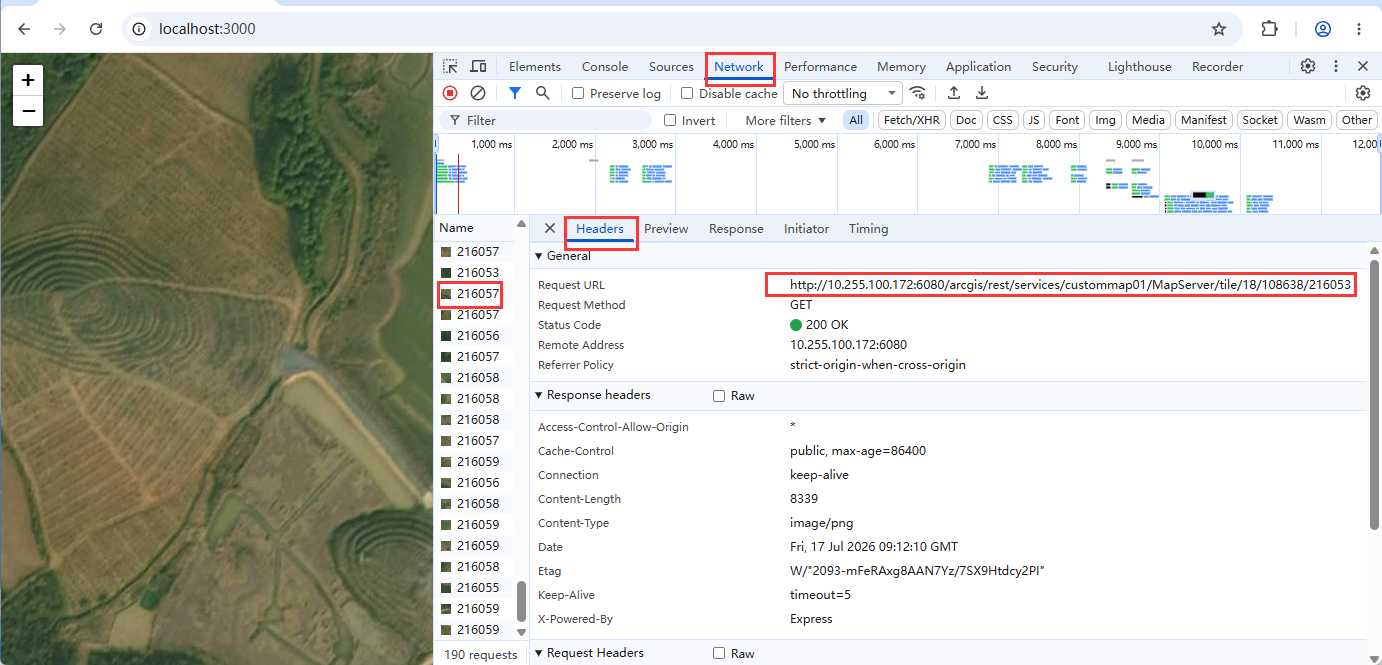
Find your service, and click its thumbnail to open it in the built‑in web viewer.

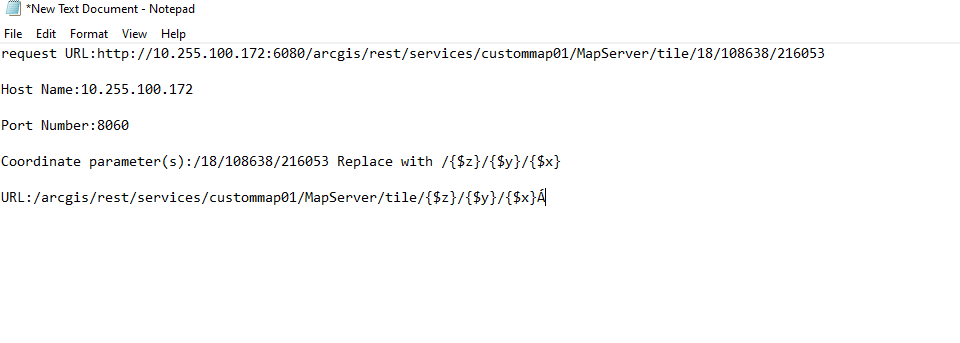
In the map viewer, press F12 on your keyboard, and click [Network]. Zoom in on the map on the left, and a list of images appear. Select an image, and you can view the request URL in the headers. Then, you can create a text document and copy the request URL into it.

Specify the information that are required for QubiMap in the text document by using the following format:

(2) Load the ArcGIS map service on a QubiMap PC client

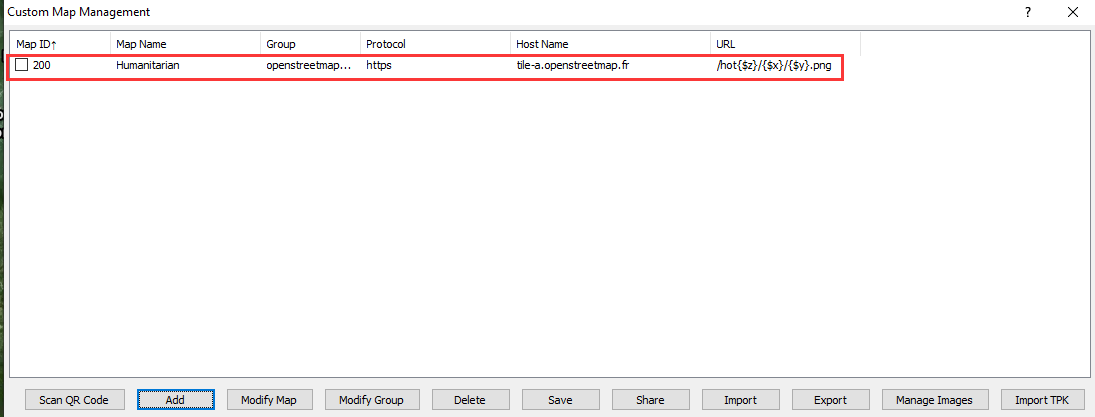
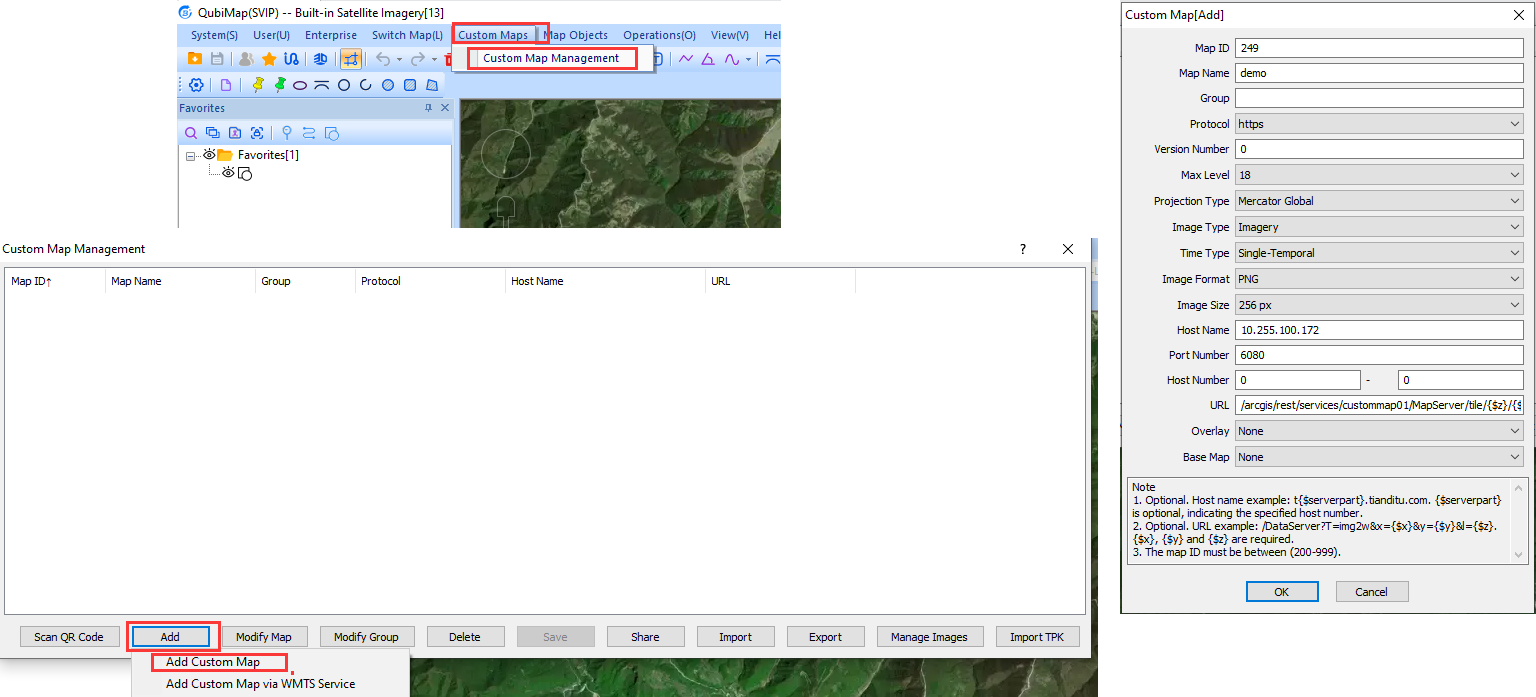
On the main UI, choose [Custom Maps] > [Custom Map Management]. Then, click [Add] and select [Add Custom Map].

In the dialog box that appears, set the parameters and click [OK] to add the map service.

☆ Parameters:

① [Map ID]: Keep the default value.

② [Map Name]: Set the name of the custom map.

③ [Max Level]: Set this value as the maximum cache level you set when publishing the map service in ArcGIS.

④ [Projection Type]: Select [Mercator Global].

⑤ [Image Type]: For aerial images, select [Imagery].

⑥[Image Format]: Set this value as the tile format you set when publishing the map service.

⑦ [Image Size]: Select [256 px].

⑧ [Host Name]: Enter the IP address or domain name of the device where the ArcGIS Server is located.

⑨ [Port Number]: Enter the port number. In this example, set the value to 6080.

⑩ [URL]: Enter the part after the port number. In this example, enter “/arcgis/rest/services/custommap01/MapServer/tile/{$z}/{$y}/{$x}”.

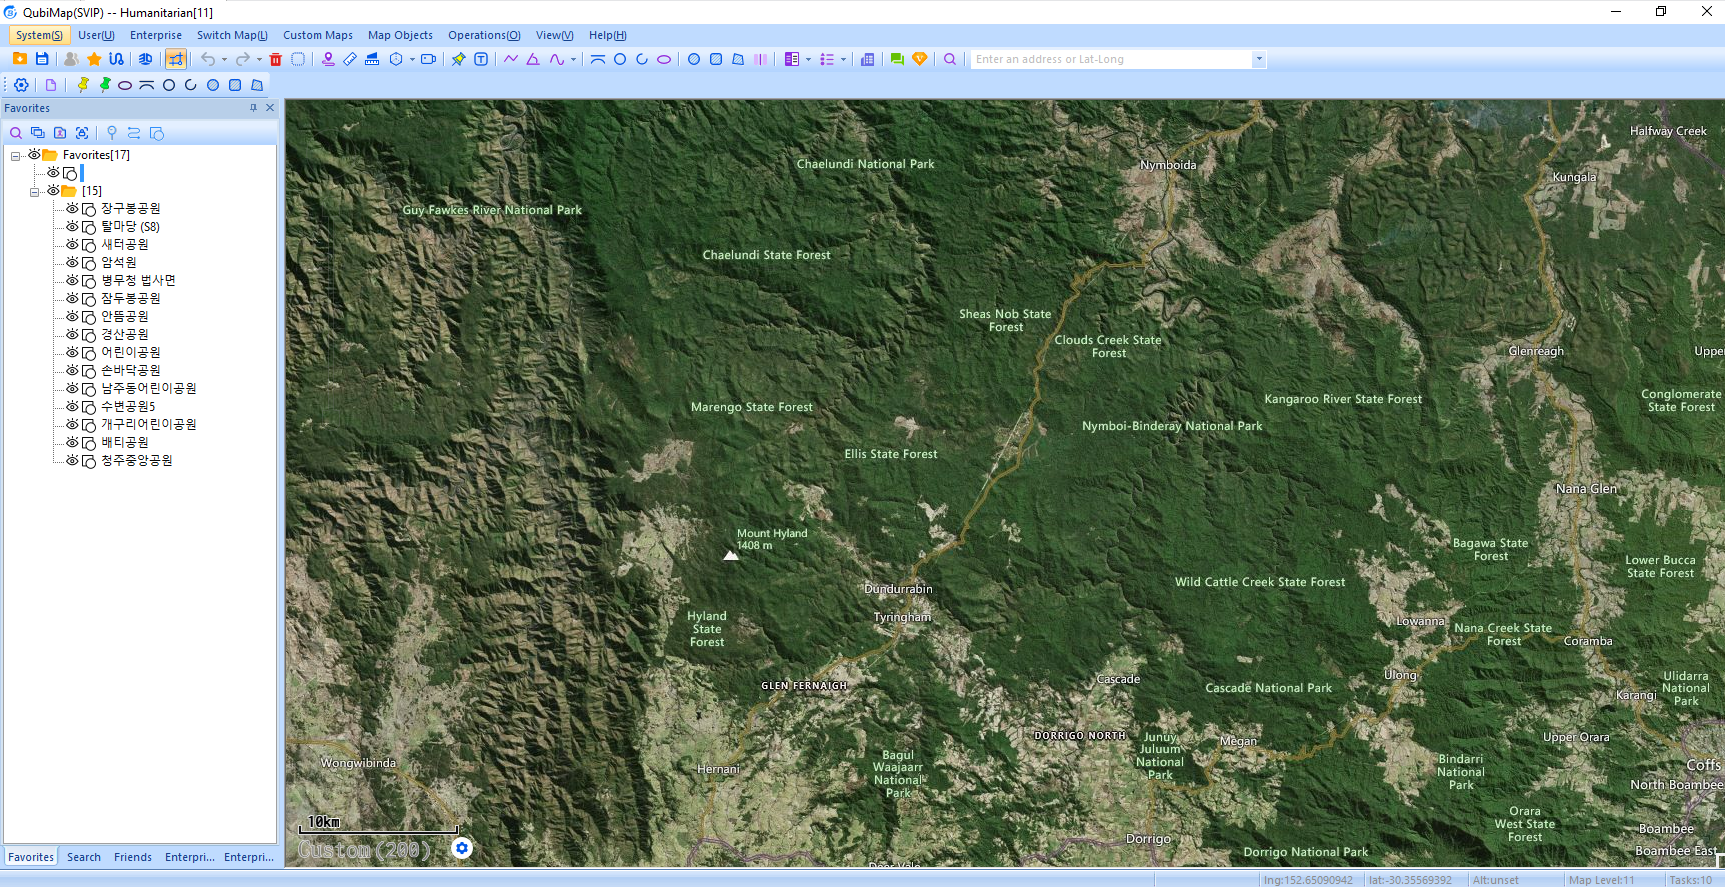
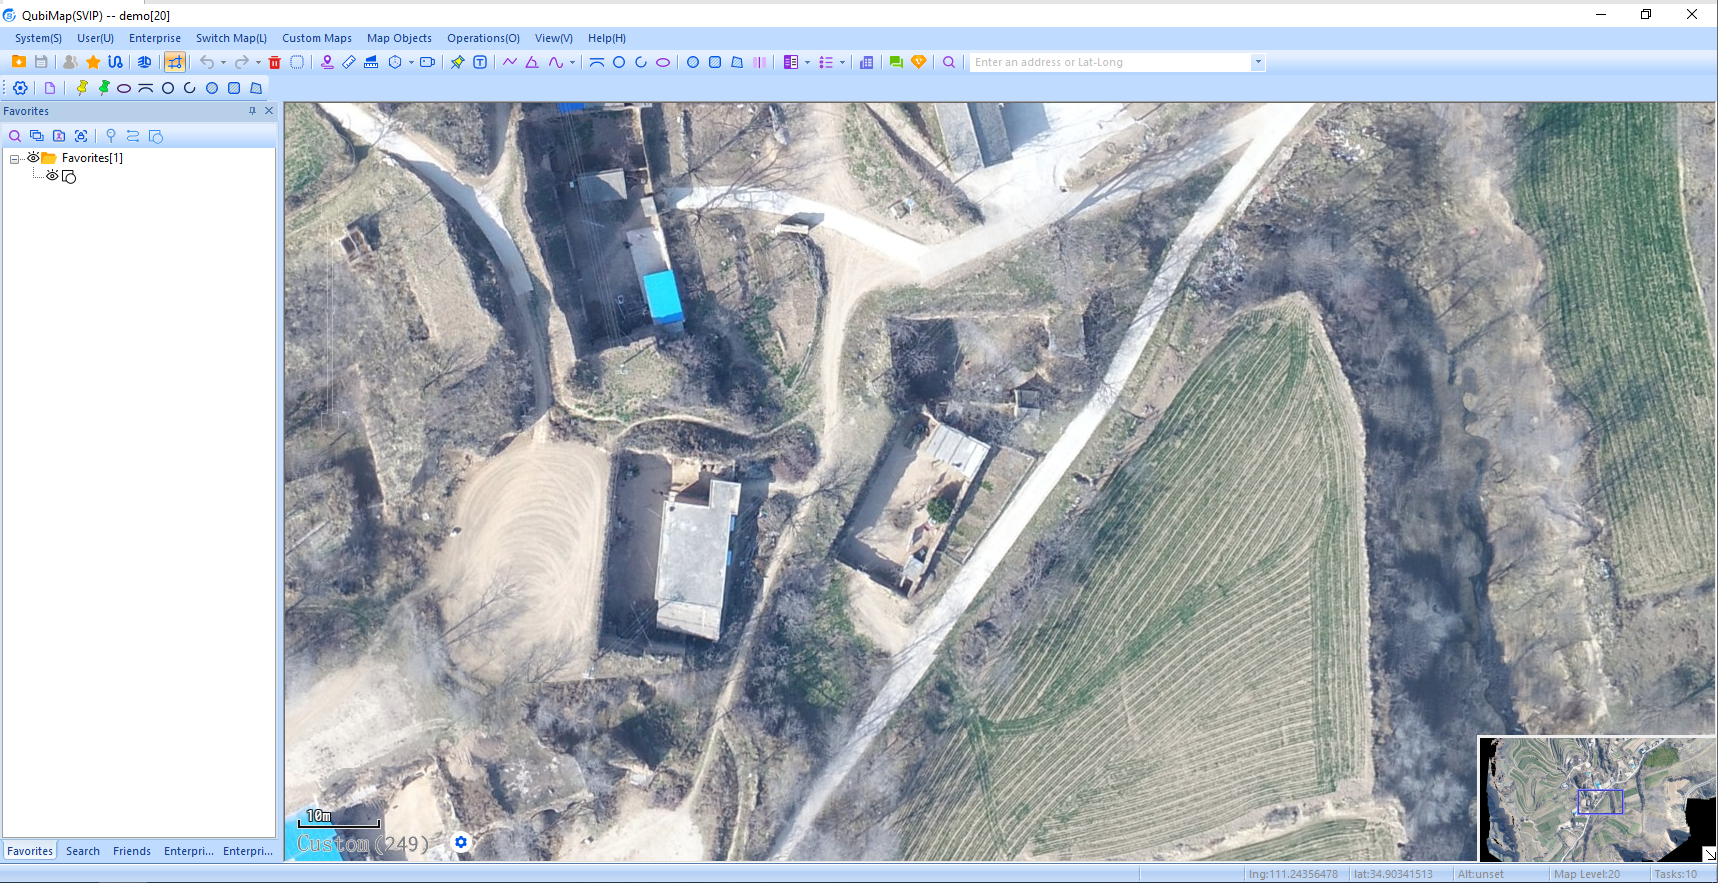
After the custom map is added, you can select the map from the [Custom Maps] list to view it.

(3) Load the ArcGIS map service on a QubiMap mobile client

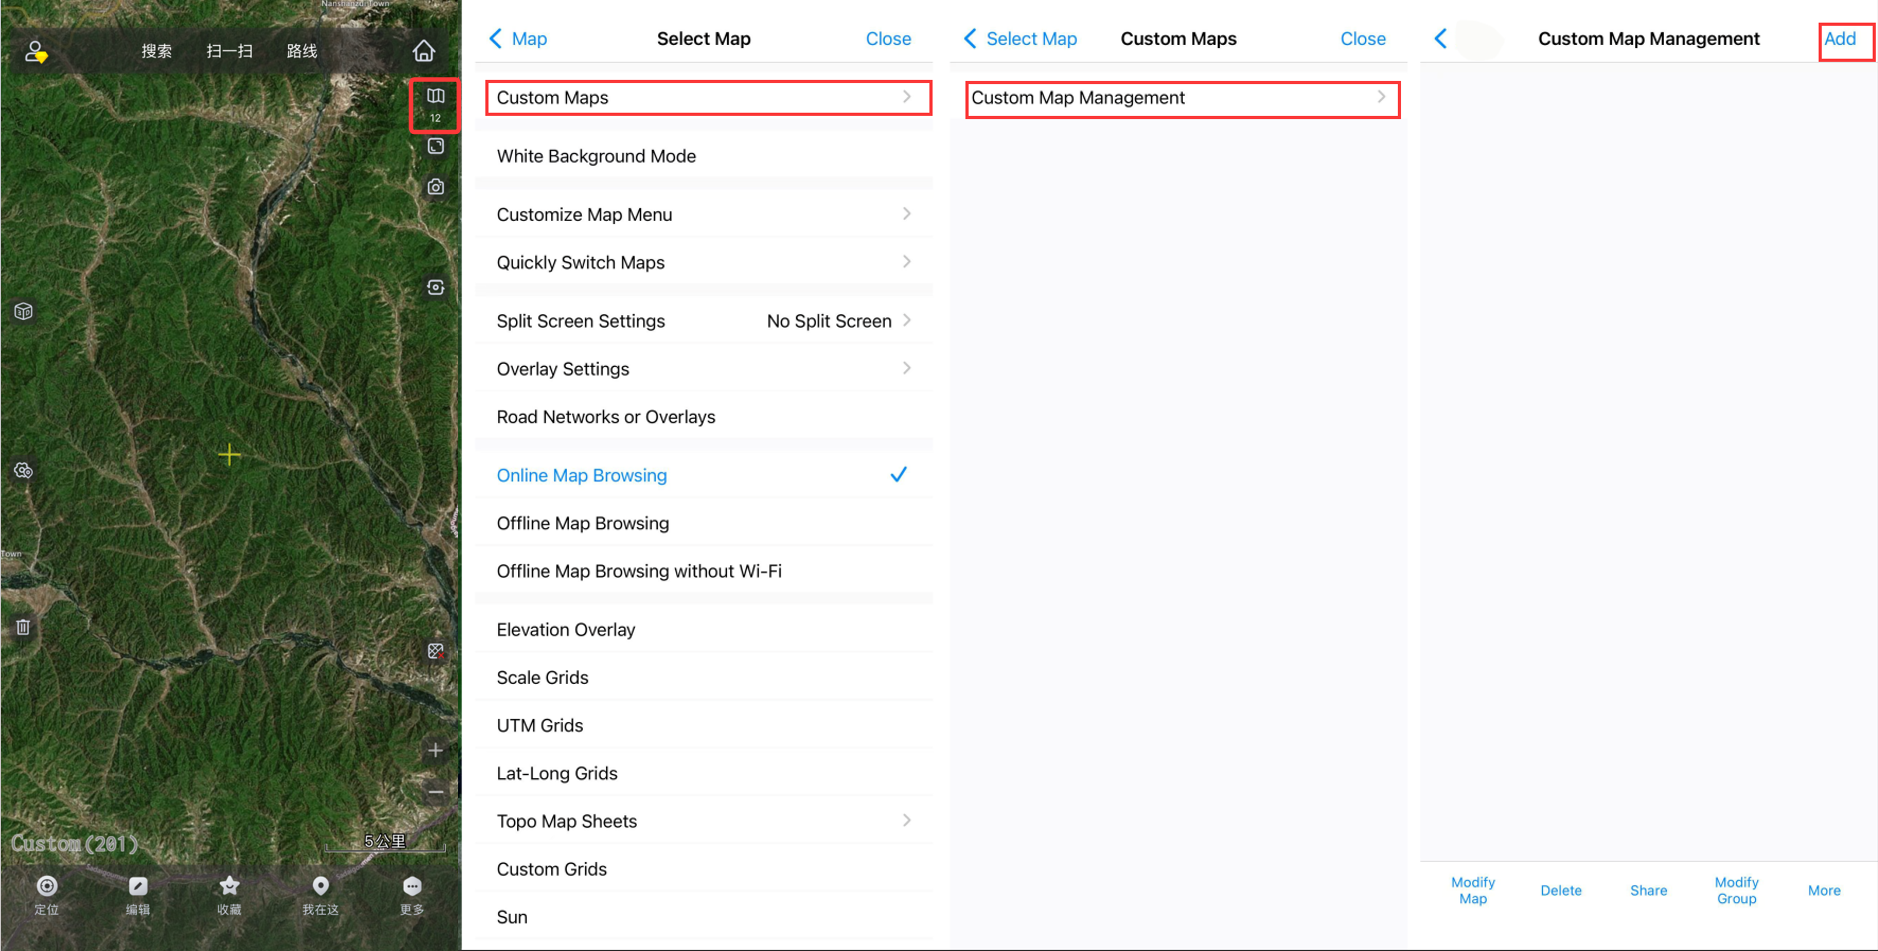
On the main UI, tap the image-20260720103846703 button, then tap [Custom Maps] → [Custom Map Management] → [Add].

image-20260724162943640

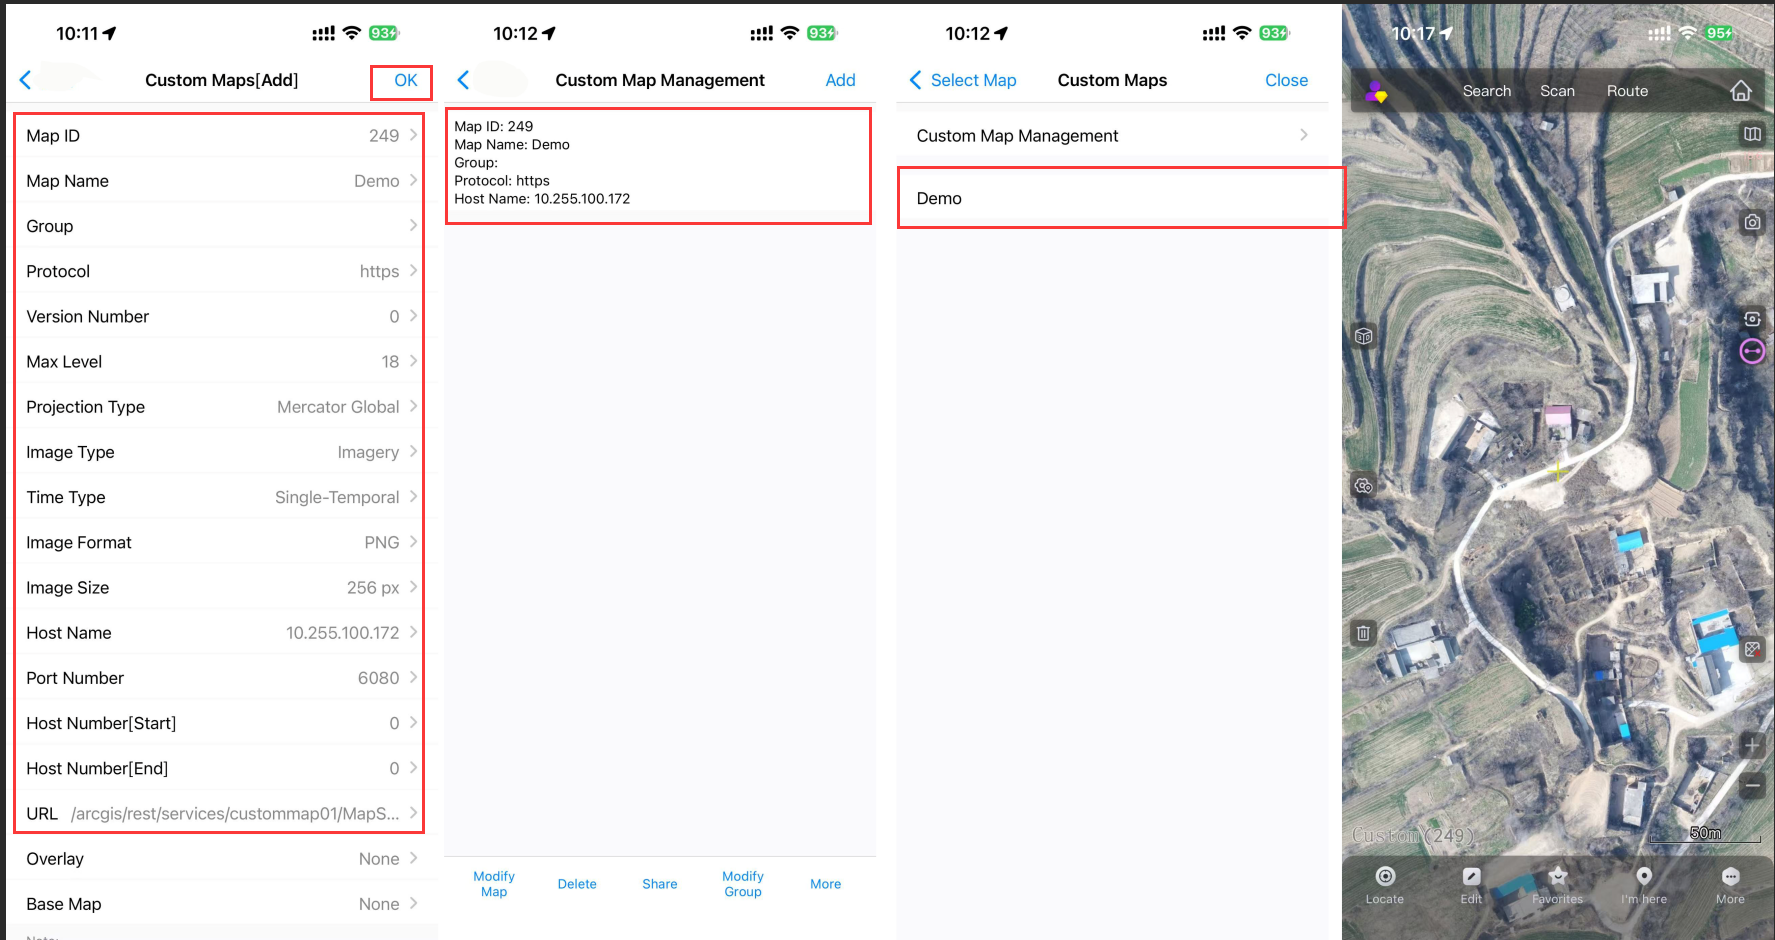
Set the parameters as needed, and tap [OK]. For more information, see the preceding section “(2) Load the ArcGIS map service on a QubiMap PC client”.

After the custom map is added, you can select the map from the [Custom Maps] list to view it.

image-20260720104816599

1. Import instructions

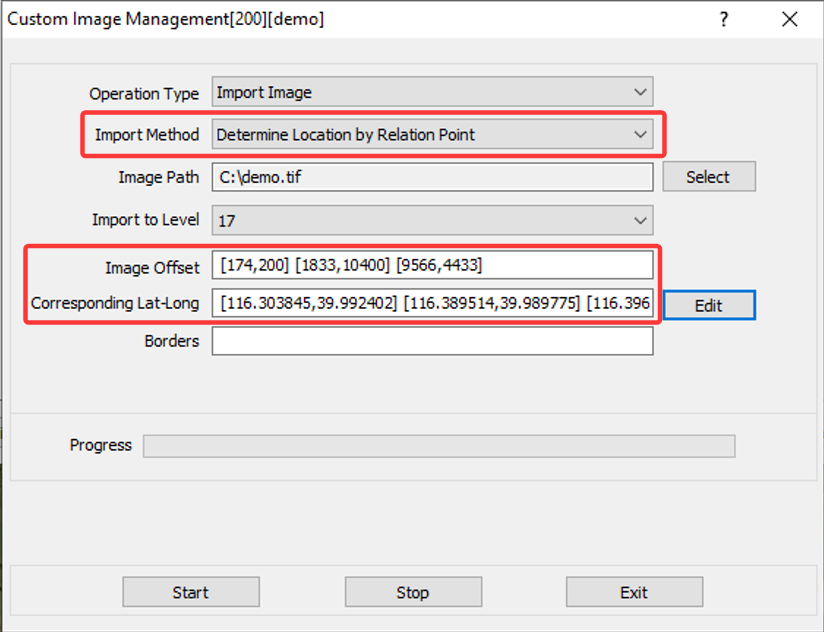
If an image to be imported does not contain the Lat-Long information in the upper-left and lower-right corners, but the image’s position on the map can be retrieved, you can use this method. At least three relation points are required.

image-20260724163400164

2. Procedure

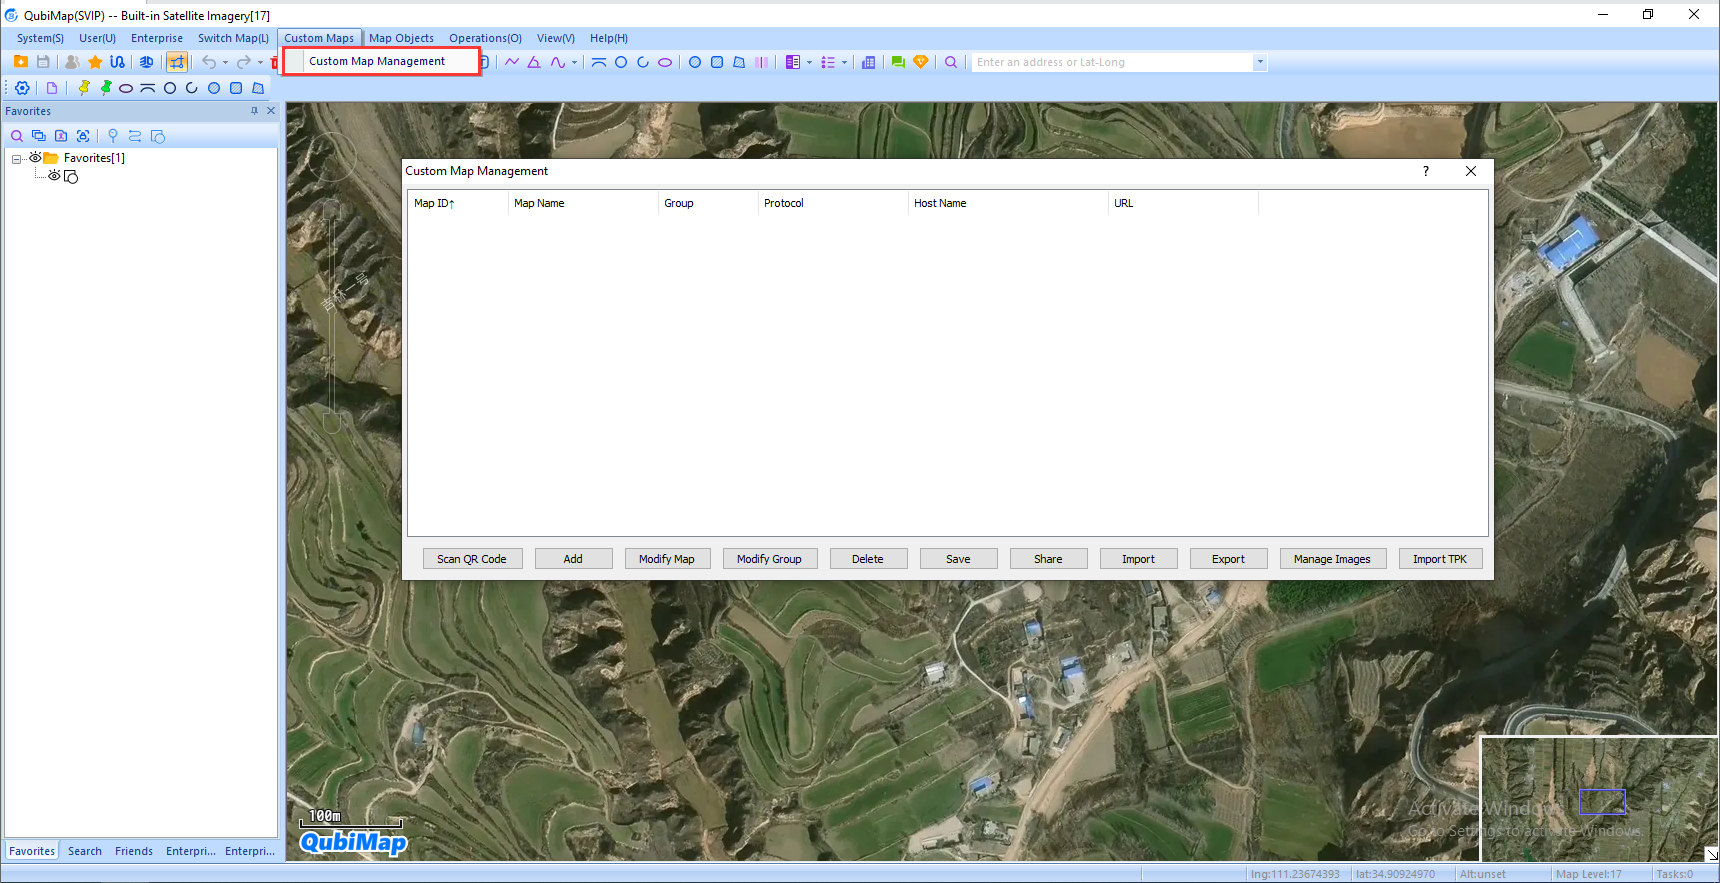
On the main UI of QubiMap on your PC, choose [Custom Maps] > [Custom Map Management].

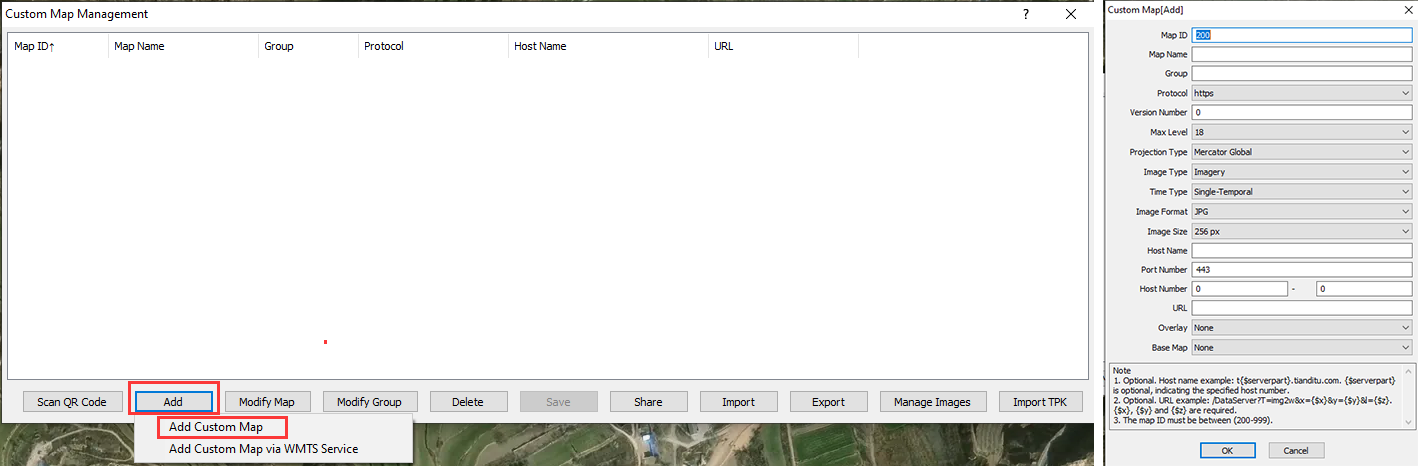
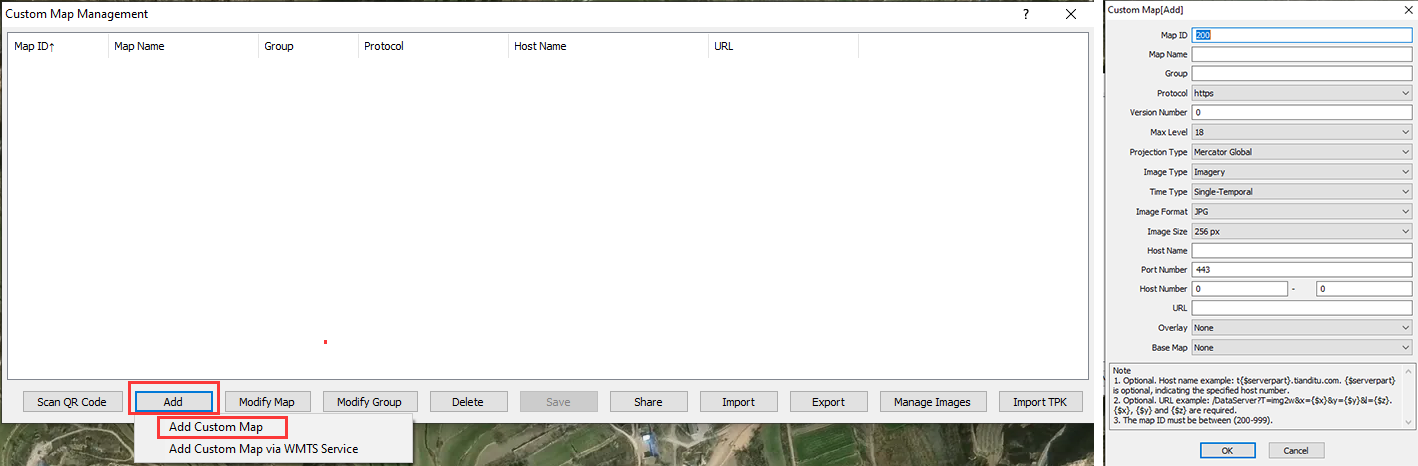
In the [Custom Map Management] dialog box, click [Add] and select [Add Custom Map] from the drop-down list.

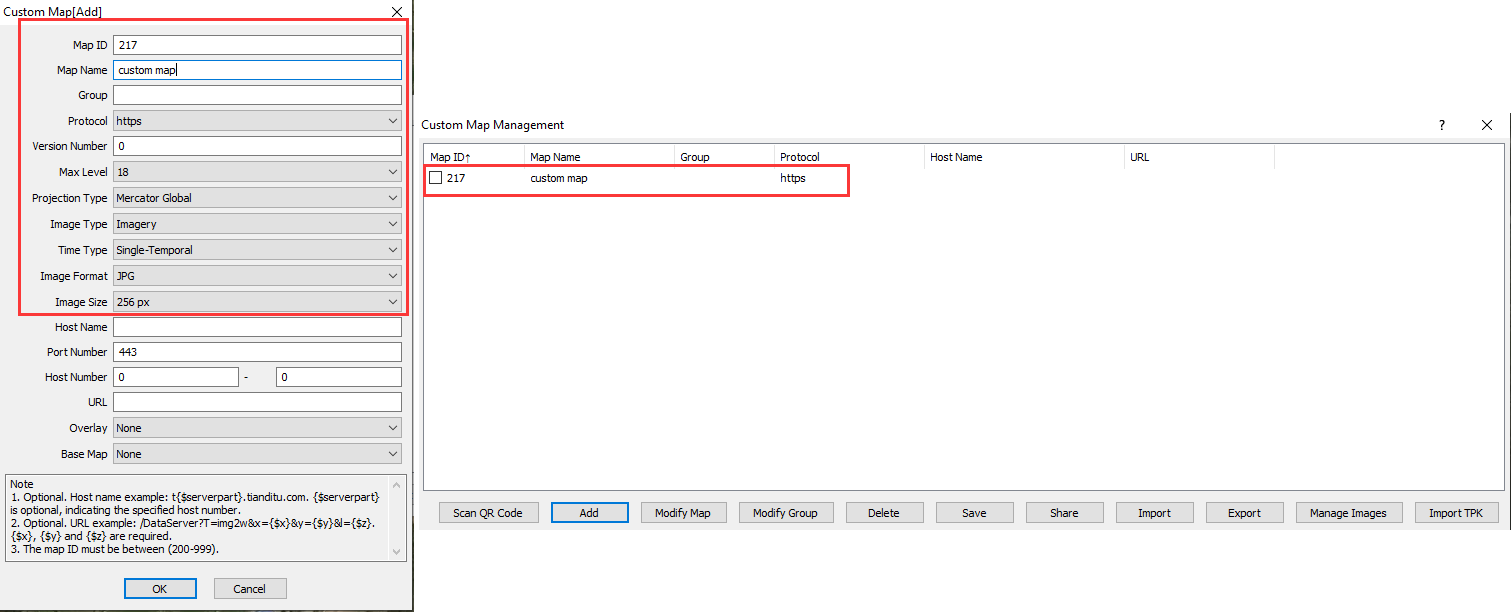
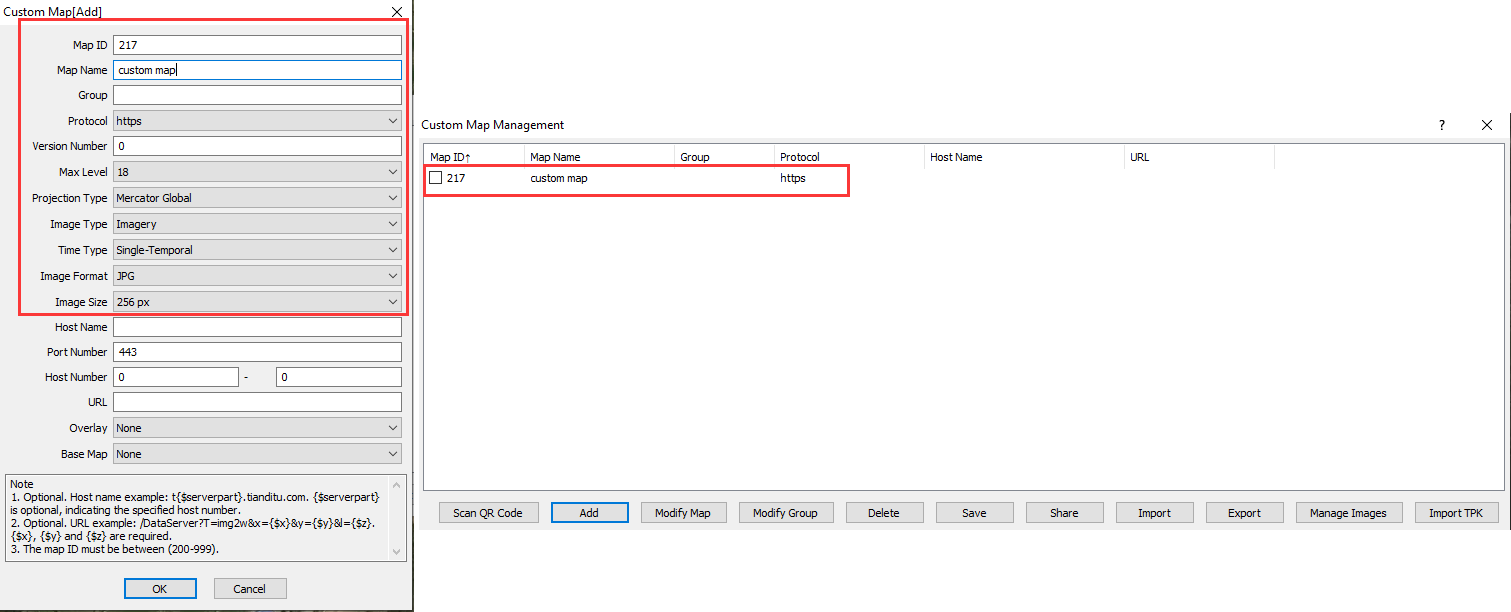
In the dialog box that appears, set the parameters and click [OK]. The added map layer is displayed in the custom map list.

★ Parameters:

① Map ID: a unique ID number assigned to each custom map, ranging from 200 to 999.

② Map Name: the name of the map displayed in the custom map list.

③ Max Level: the highest display level of this map.

④ Projection Type: Select [Mercator Global].

⑤ Time Type: Select [Single-Temporal] or [Multi-Temporal (Historical Images)] as needed. For more information about multi-temporal images, see the help document “How to add multi-temporal (historical) images to a custom map”.

⑥ For other parameters, you can keep the default values.

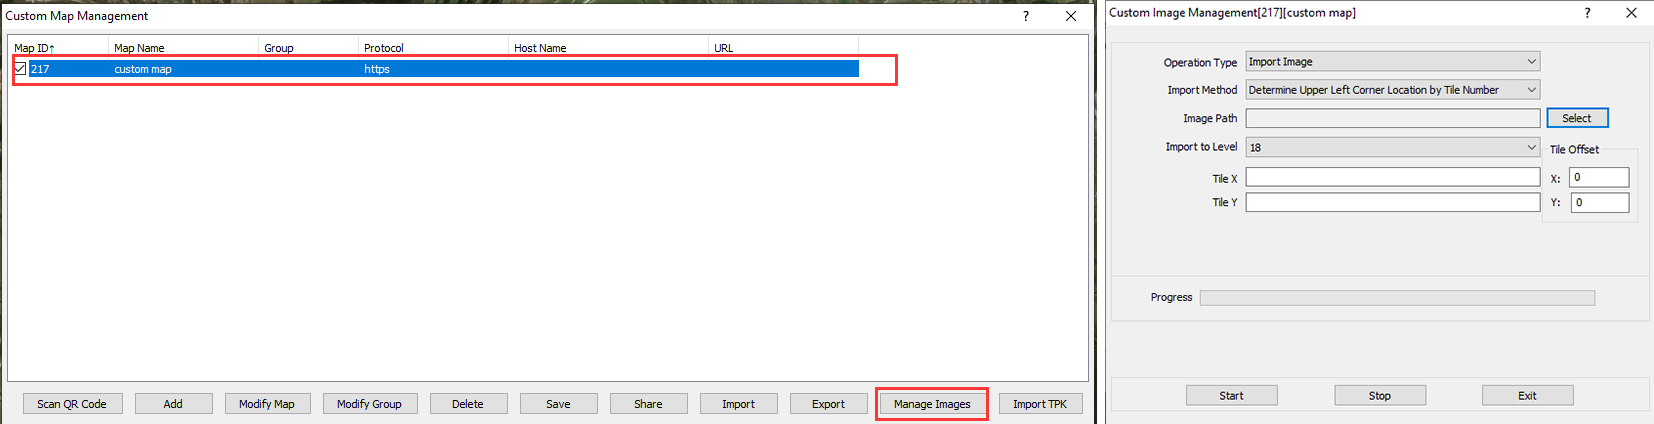
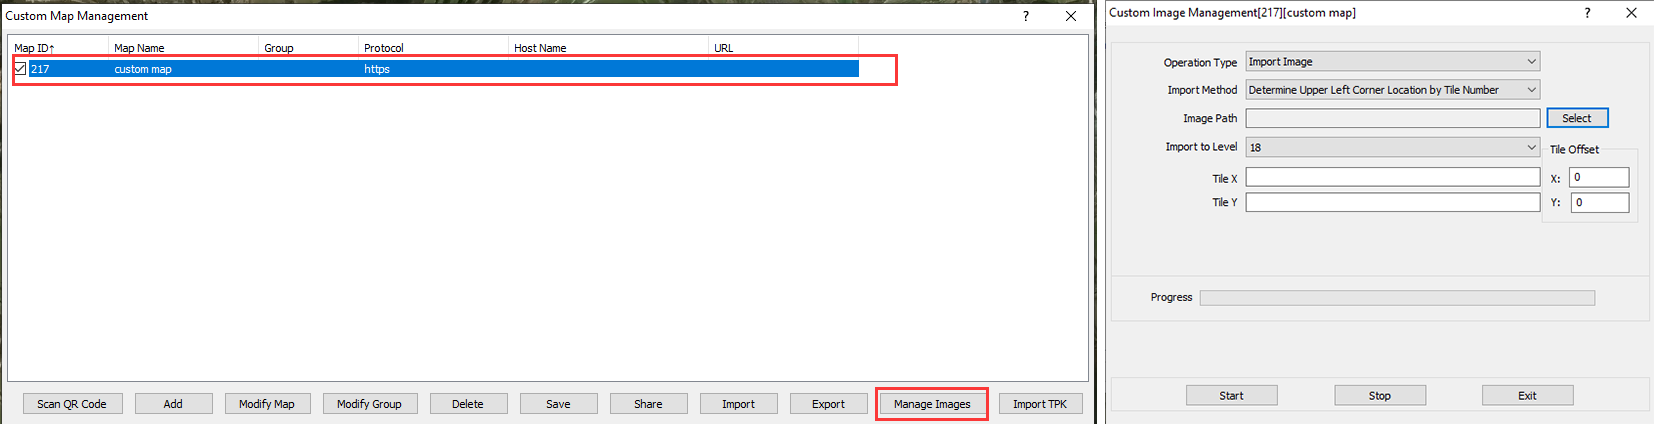
In the [Custom Map Management] dialog box, select the custom map and click [Manage Images].

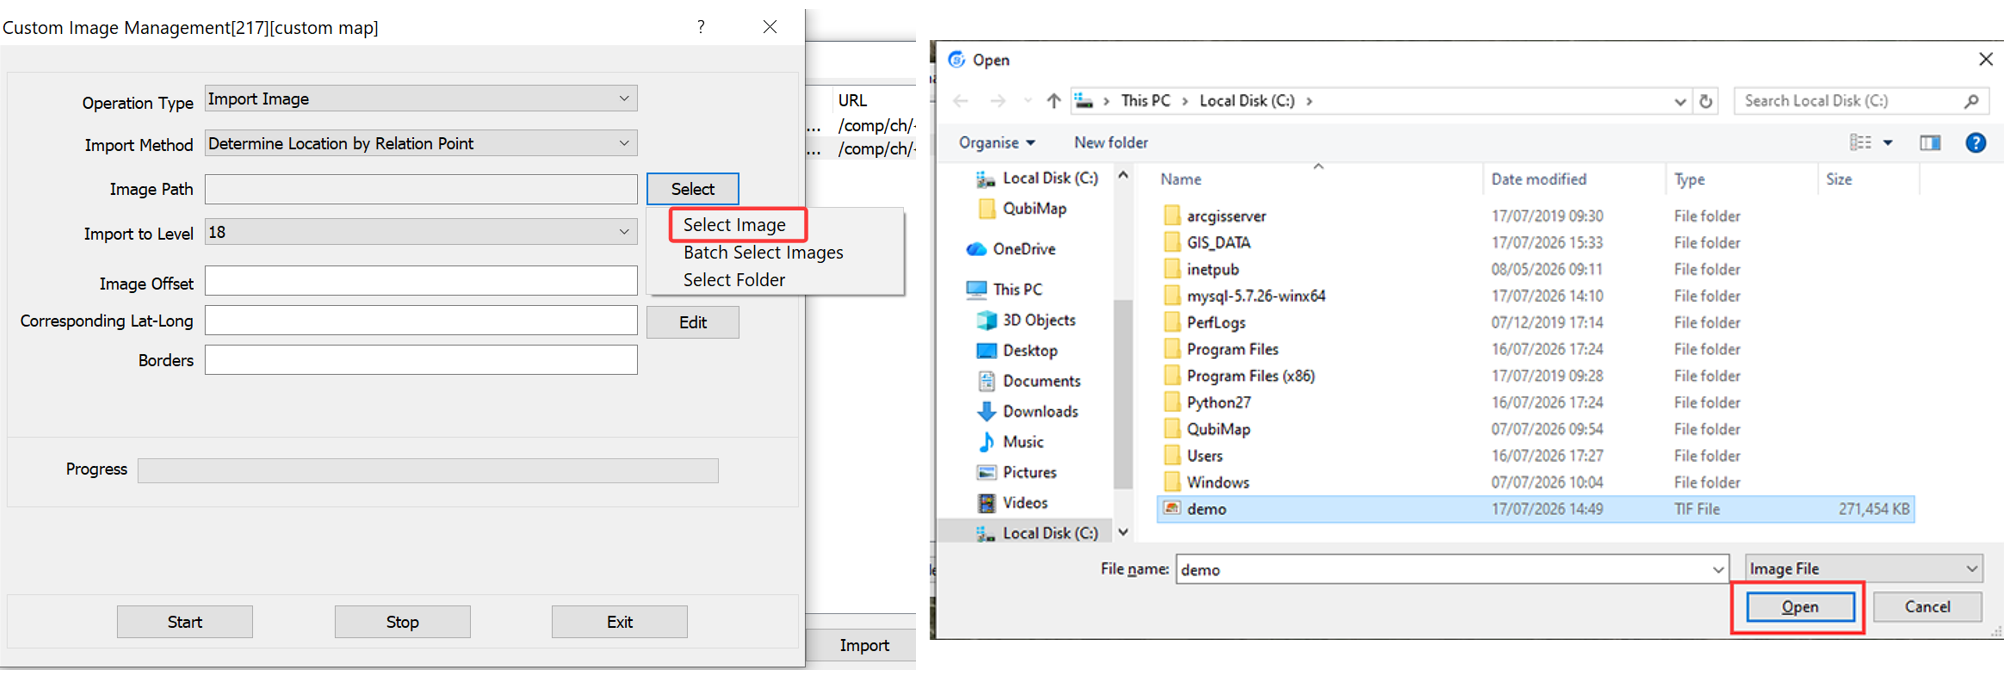
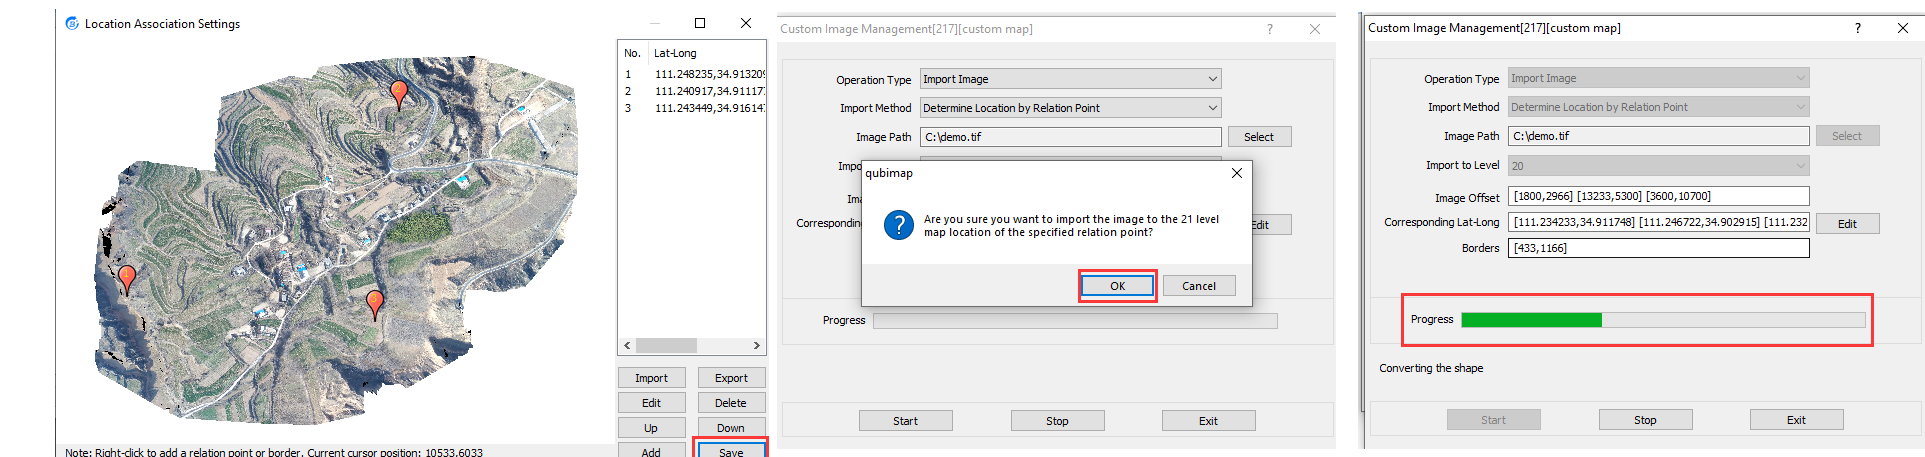
In the [Custom Image Management] dialog box, select [Import Image] for the [Operation Type] parameter, select [Determine Location by Relation Point] for the [Import Method] parameter, and then click [Select] next to [Image Path]. Select the required image and click [Open].

image-20260729103625370

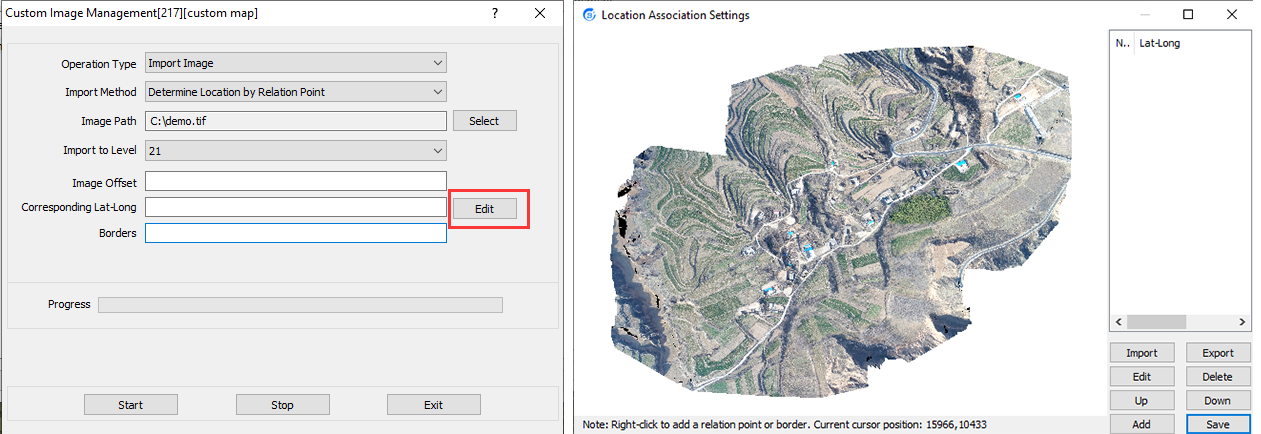
Click [Edit] to go to the [Location Association Settings] dialog box.
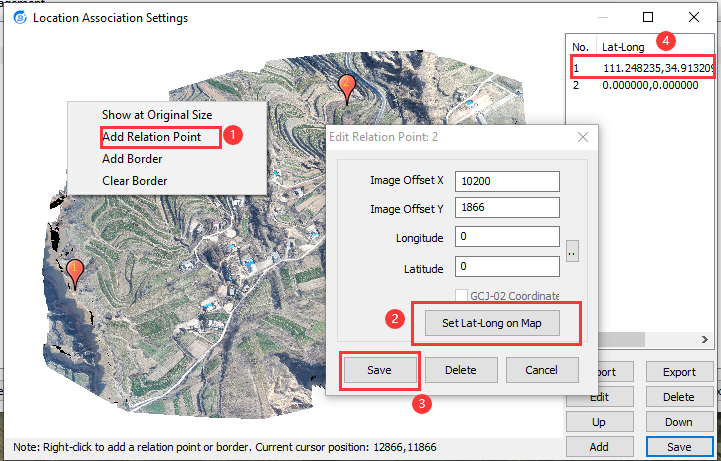
In this dialog box, right-click on the image and select [Add Relation Point]. In the [Edit Relation Point] dialog box, click [Set Lat-Long on Map] to select the corresponding location of the relation point on the map, and right-click to obtain the latitude and longitude. Then, click [Save] to add the relation point. At least three relation points are required.
In the [Location Association Settings] dialog box, click [Save] to save all the relation points that are added. In the [Custom Image Management] dialog box, set the [Import to Level] parameter and click [Start] to start importing.

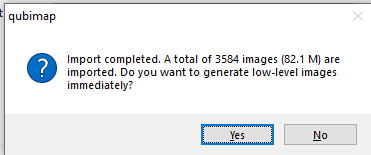
After the import is completed, click [Yes].

image-20260720145010524

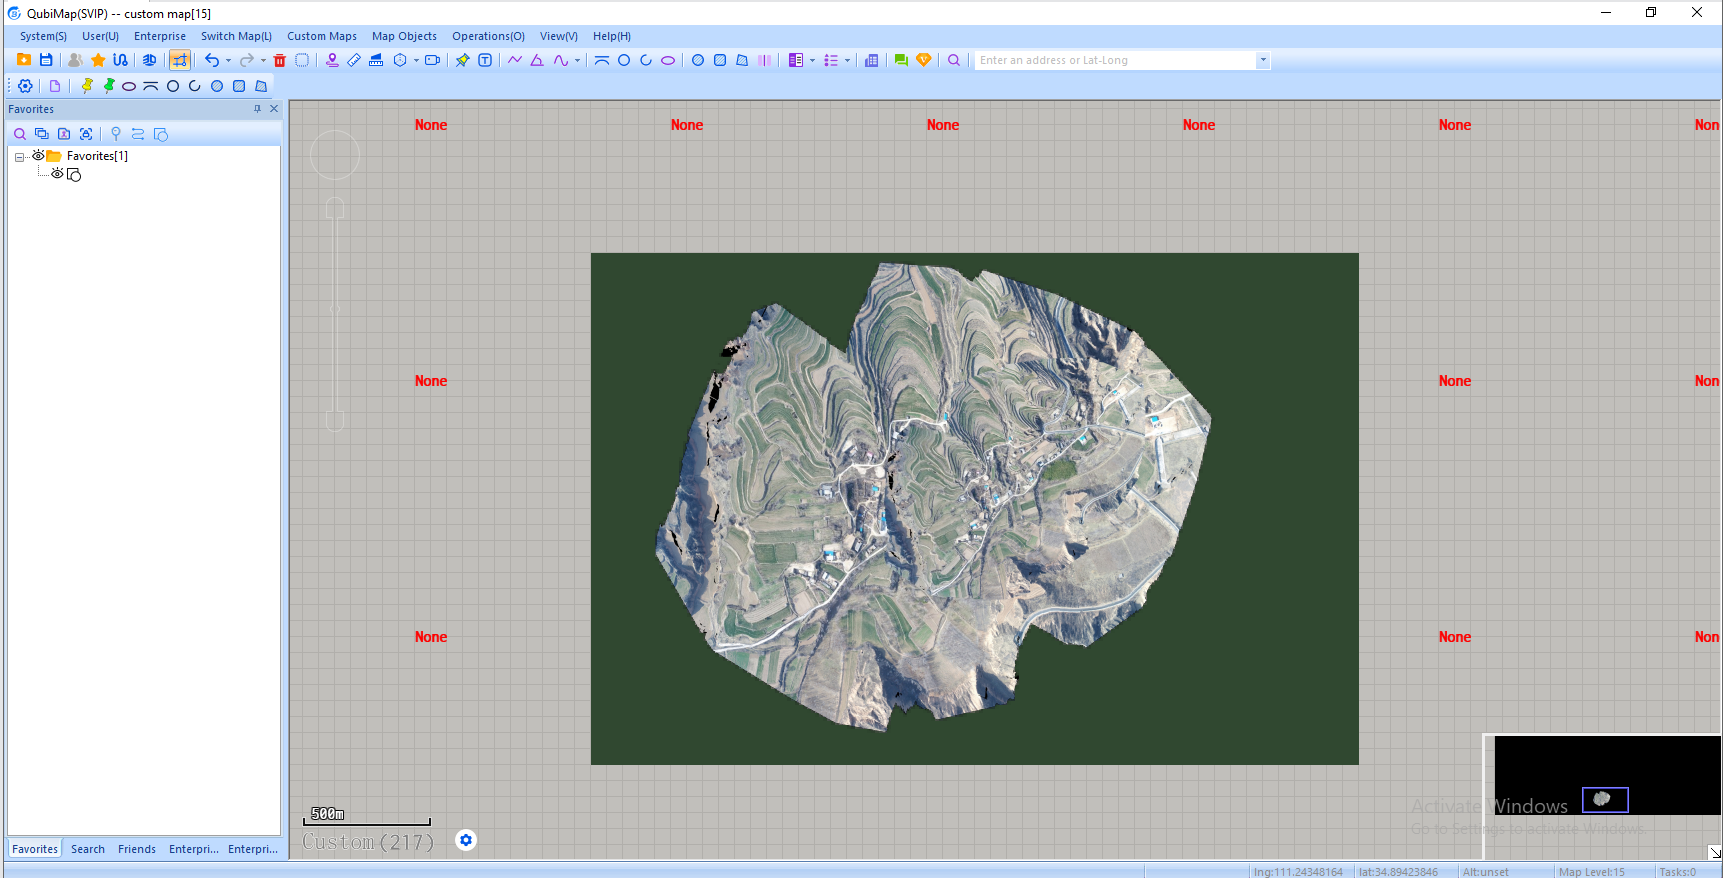
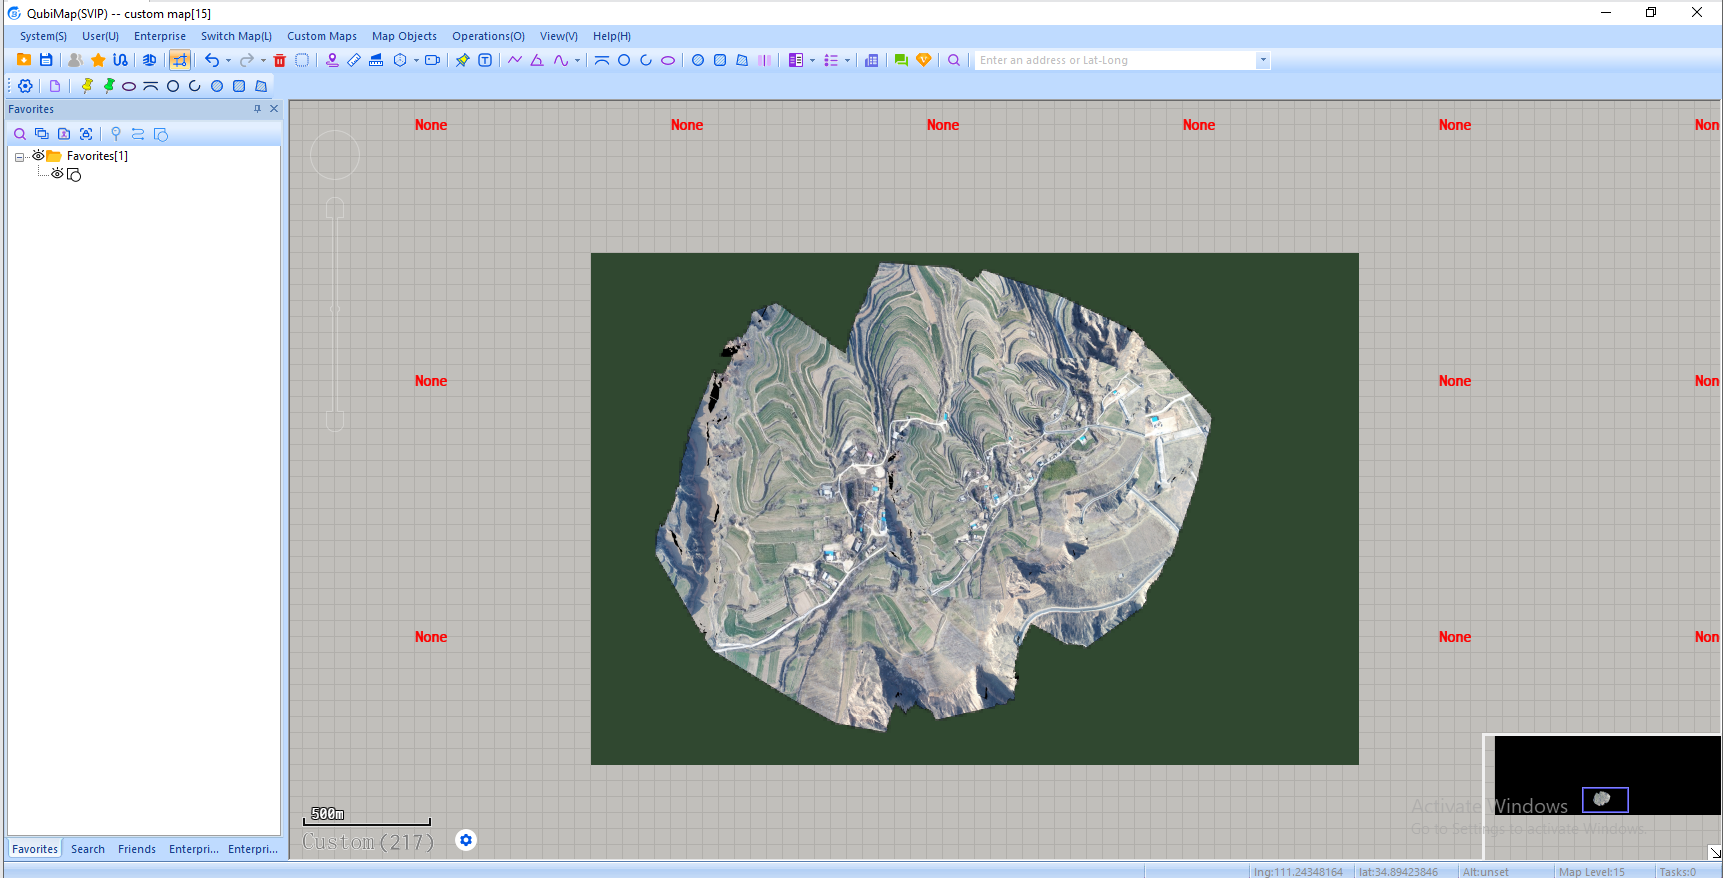
On the main UI, switch to the custom map that is added, and you can view the imported image.

image-20260720145157742

For information about how to set map overlays, see the help document “How to import aerial images and set map overlays“.

1. Import instructions

If images to be imported contain the Lat-Long information of the upper-left and lower-right corners, you can use this method, which ensures precise alignment with the actual locations on the map.

The system automatically detects the display level based on the image resolution and Lat-Long information of the upper-left and lower-right corners. You do not need to set the [Import to Level], [Upper Left Lat-Long], and [Lower Right Lat-Long] parameters.

image-20260720150711809

2. Procedure

On the main UI of QubiMap on your PC, choose [Custom Maps] > [Custom Map Management].

In the [Custom Map Management] dialog box, click [Add] and select [Add Custom Map] from the drop-down list.
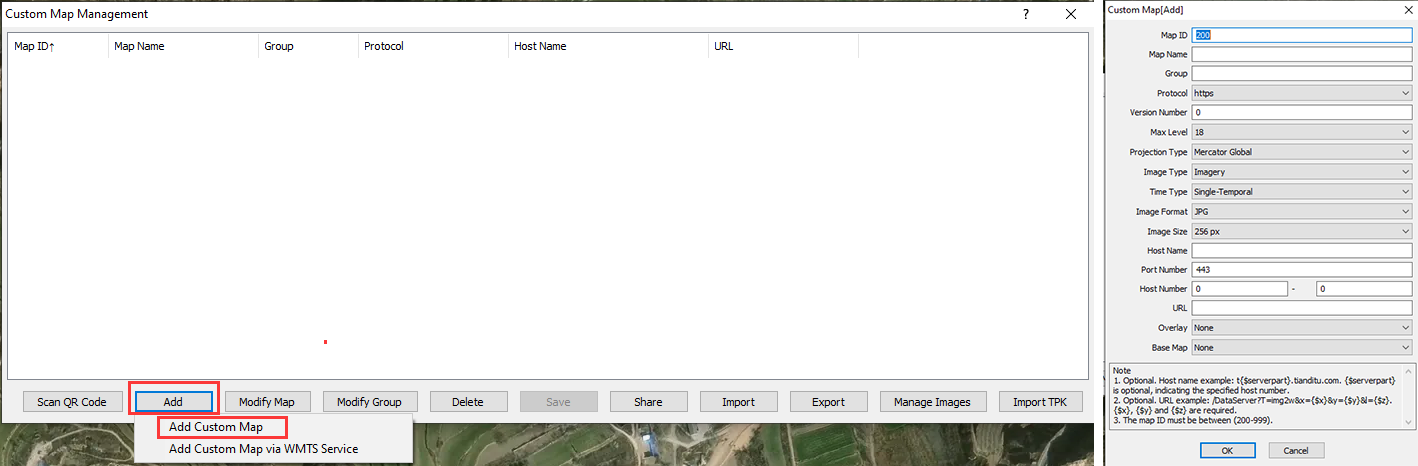
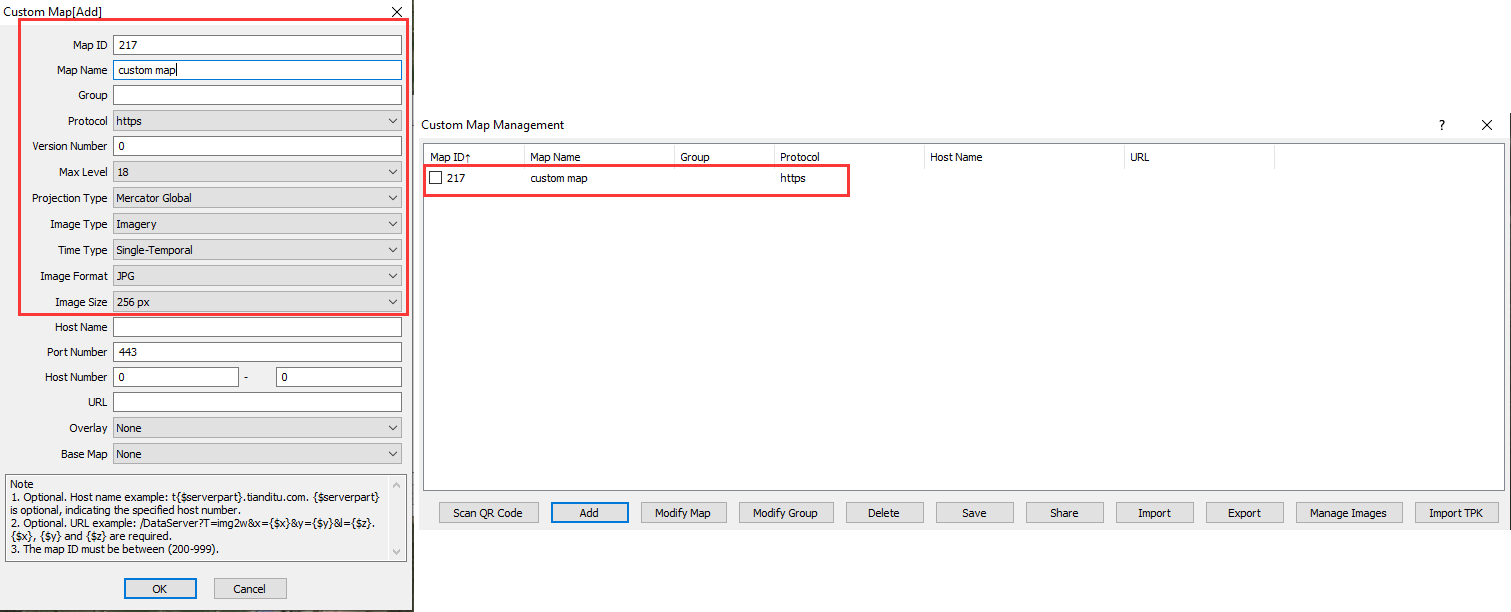
In the dialog box that appears, set the parameters and click [OK]. The added map layer is displayed in the custom map list.

★ Parameters:

① Map ID: a unique ID number assigned to each custom map, ranging from 200 to 999.

② Map Name: the name of the map displayed in the custom map list.

③ Max Level: the highest display level of this map.

④ Projection Type: Select [Mercator Global].

⑤ Time Type: Select [Single-Temporal] or [Multi-Temporal (Historical Images)] as needed. For more information about multi-temporal images, see the help document “How to add multi-temporal (historical) images to a custom map”.

⑥ For other parameters, you can keep the default values.

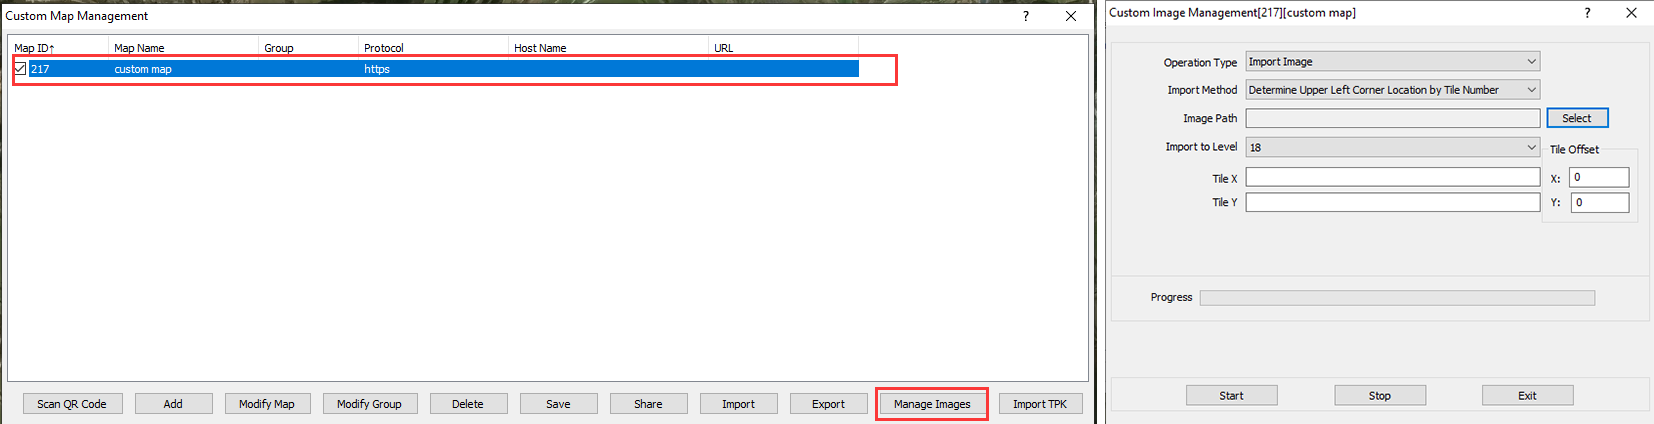
In the [Custom Map Management] dialog box, select the custom map and click [Manage Images].

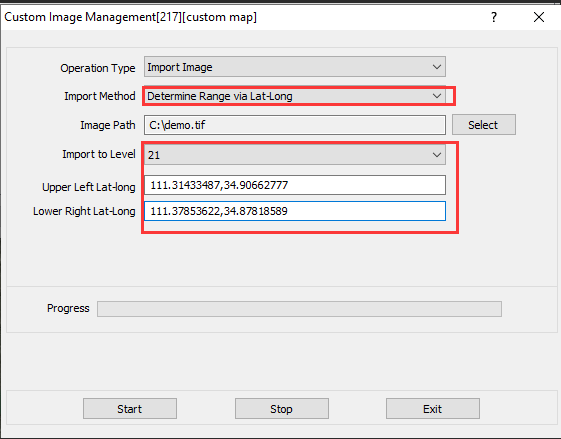
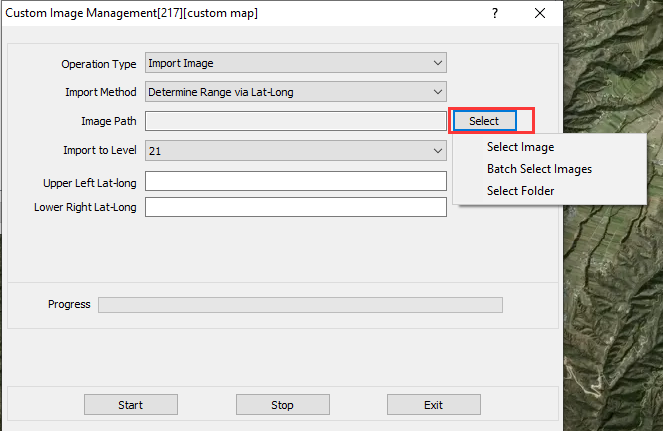
In the [Custom Image Management] dialog box, select [Import Image] for the [Operation Type] parameter, select [Determine Range via Lat-Long] for the [Import Method] parameter, and then click [Select] next to [Image Path].

image-20260720150142886

The following options are available:

Select Image: Select a single image to import.

Batch Select Images: Select multiple images to import at a time.

Select Folder: Select all images from an entire folder to import.

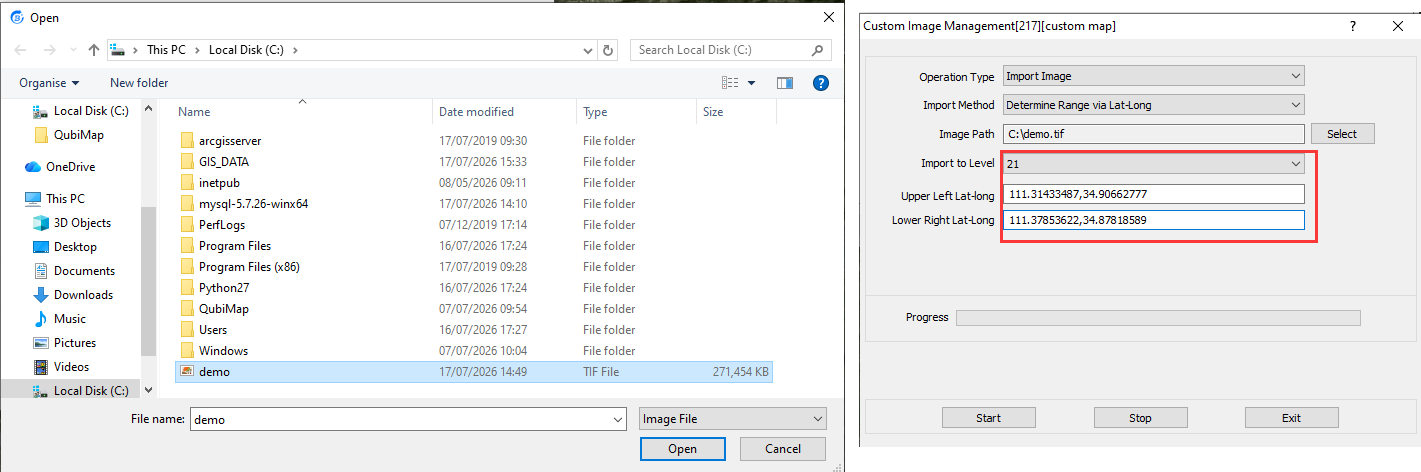
In this example, Select [Select Image]. Select the image you want to import and click [Open].

The system automatically detects the image information and auto-fills the values of the [Import to Level], [Upper Left Lat-Long], and [Lower Right Lat-Long] parameters.

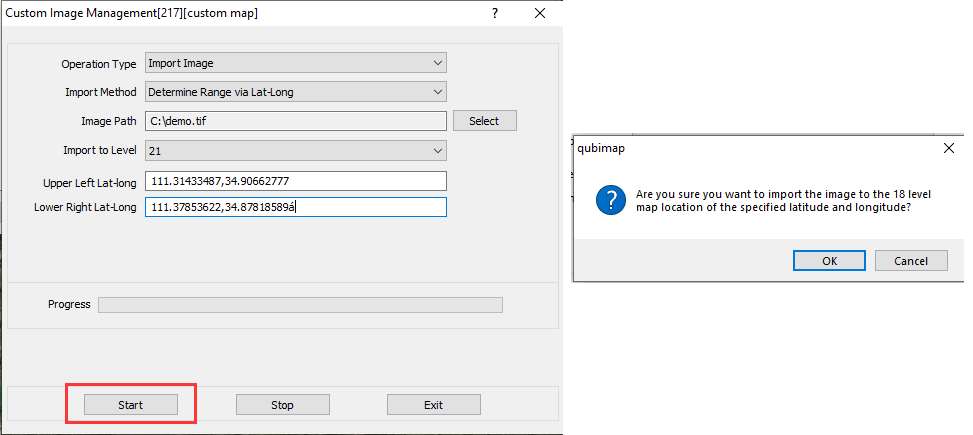
Click [Start] to start importing.

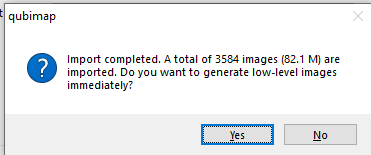
After the import is completed, click [Yes].

image-20260720145010524

On the main UI, switch to the custom map that is added, and you can view the imported image.

image-20260720145157742

For information about how to set map overlays, see the help document “How to import aerial images and set map overlays“.

1. Import instructions

To import an image with the information including the display level, X-value, and Y-value, you can use the tile ID to determine the upper-left corner position.

2. Procedure

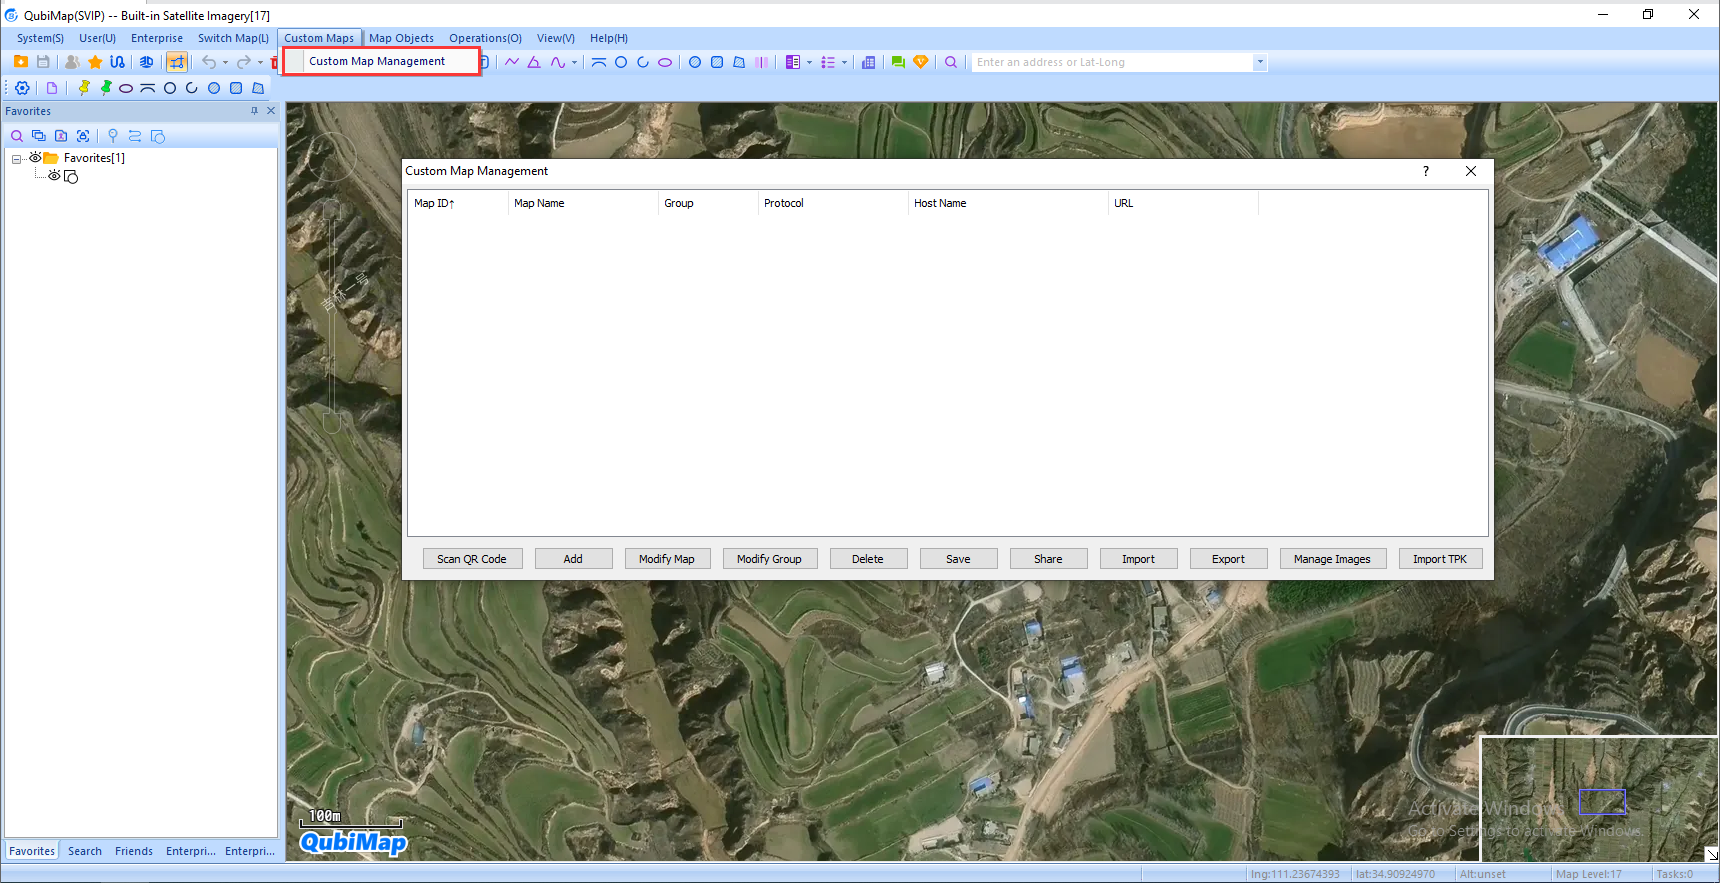
On the main UI of QubiMap on your PC, choose [Custom Maps] > [Custom Map Management].

In the [Custom Map Management] dialog box, click [Add] and select [Add Custom Map] from the drop-down list.
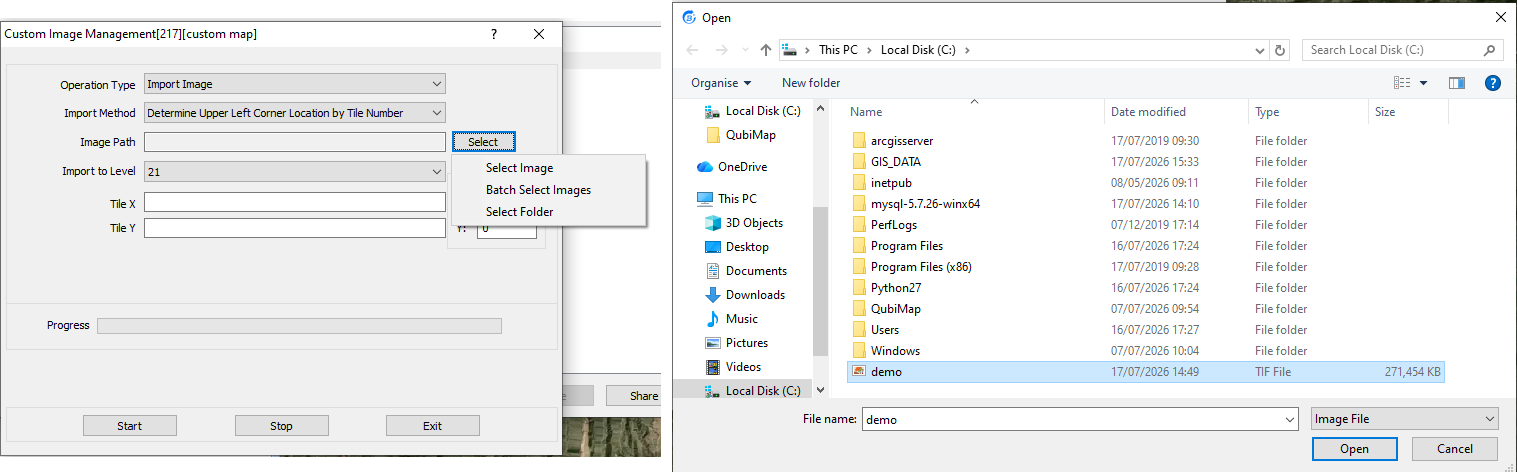
In the dialog box that appears, set the parameters and click [OK]. The added map layer is displayed in the custom map list.

★ Parameters:

① Map ID: a unique ID number assigned to each custom map, ranging from 200 to 999.

② Map Name: the name of the map displayed in the custom map list.

③ Max Level: the highest display level of this map.

④ Projection Type: Select [Mercator Global].

⑤ Time Type: Select [Single-Temporal] or [Multi-Temporal (Historical Images)] as needed. For more information about multi-temporal images, see the help document “How to add multi-temporal (historical) images to a custom map”.

⑥ For other parameters, you can keep the default values.

In the [Custom Map Management] dialog box, select the custom map and click [Manage Images].

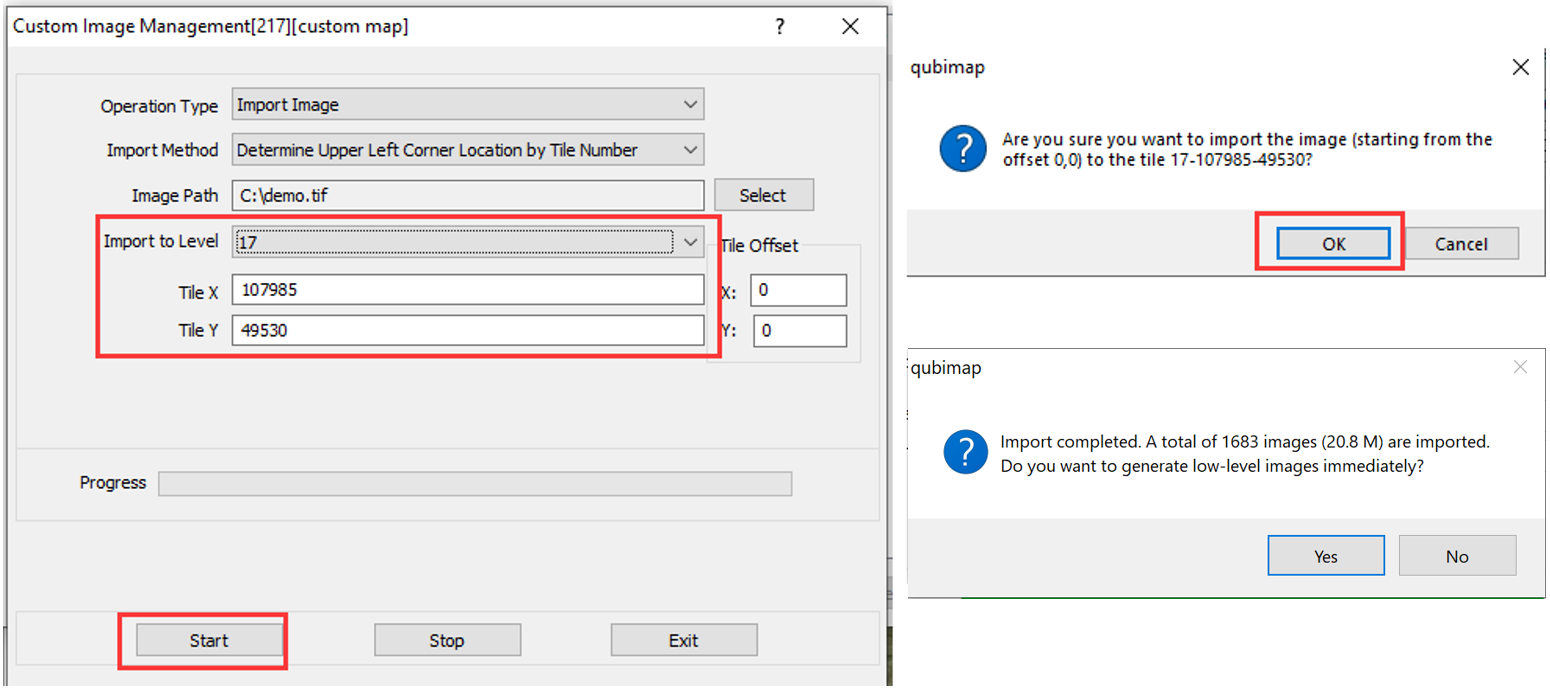
In the [Custom Image Management] dialog box, select [Import Image] for the [Operation Type] parameter, select [Determine Upper Left Corner Location by Tile Number] for the [Import Method] parameter, and then click [Select] next to [Image Path]. Select the image you want to import and click [Open].

Set the [Import to Level], [Tile X], and [Tile Y] parameters, and click [Start] to start importing. After the import is completed, click [Yes].

image-20260729151921905

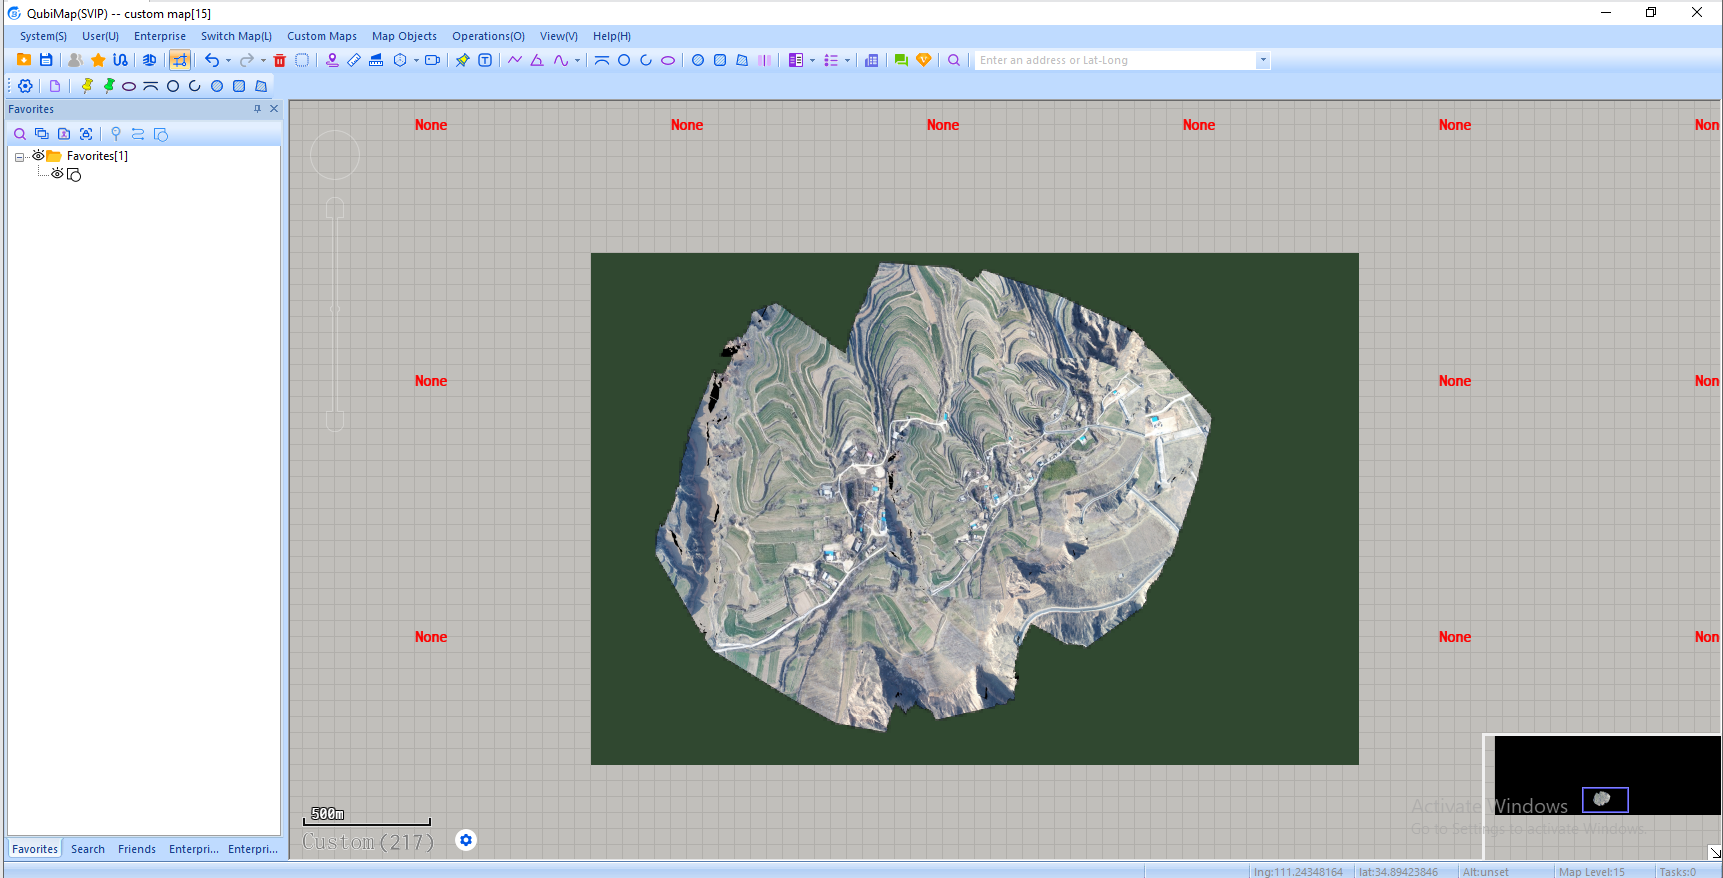
On the main UI, switch to the custom map that is added, and you can view the imported image.

image-20260720145157742

For information about how to set map overlays, see the help document “How to import aerial images and set map overlays“.

Get ready to try QubiMap

Sign up for free trail and get started with QubiMap

Try Now