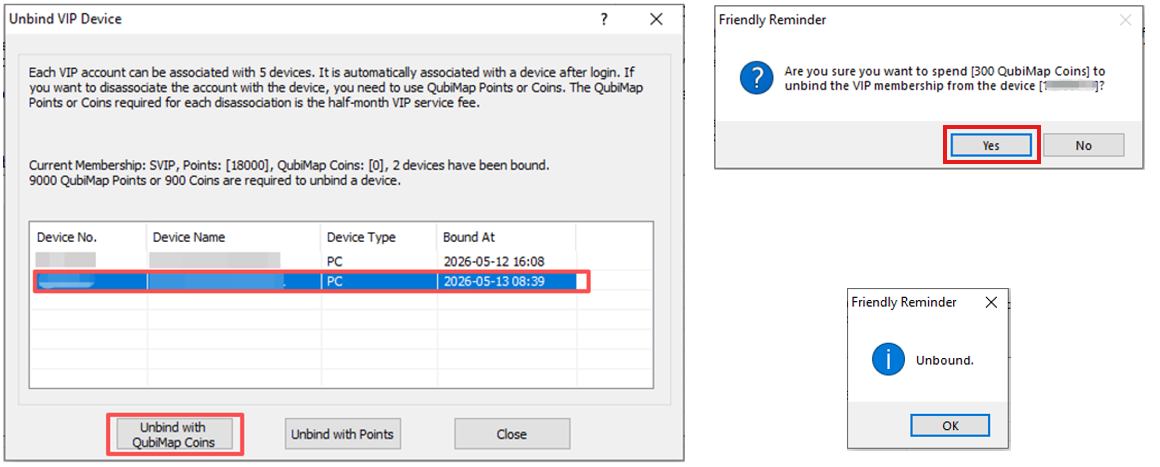
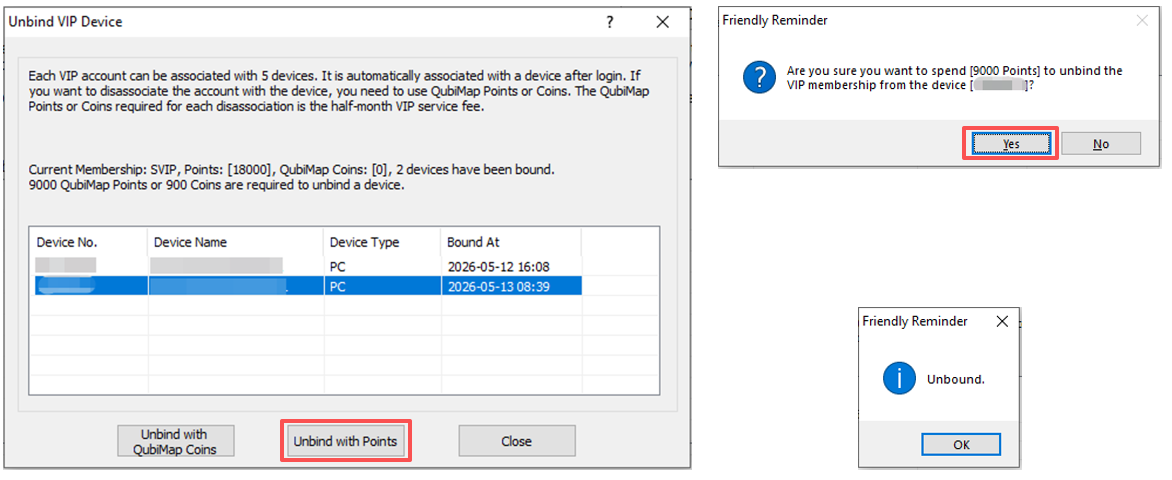
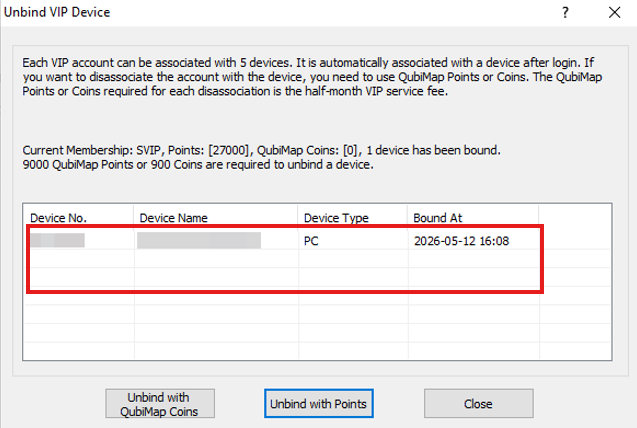
You can associate placemark icons with third-party applications, enabling the management of location information for these applications by using QubiMap. This feature also allows users to view and edit the description information of placemarks by calling third-party applications.
Typical scenarios:
(1) Video surveillance: First, create placemarks for all monitoring points on the map and specify the parameters of each monitoring point in the placemark description. Then, configure icon association for each placemark so that QubiMap can directly open the monitoring program and retrieve the camera’s location. You can record the camera’s information such as IP address and port number in the placemark description.
(2) Placemark description customization
Some enterprise users may need to specify placemark description in various forms. In this case, you can customize the description information by using the icon association feature. After a third-party program is opened by reading the description content, you can modify the content in the third-party program as needed. The modified data is automatically saved back to the placemark description.
For more information about applications, see the section “5. Examples” in this article.
Procedure:
On the map, find the required placemark, click it, and then click the  button. In the [Placemark Settings] dialog box, click the icon.
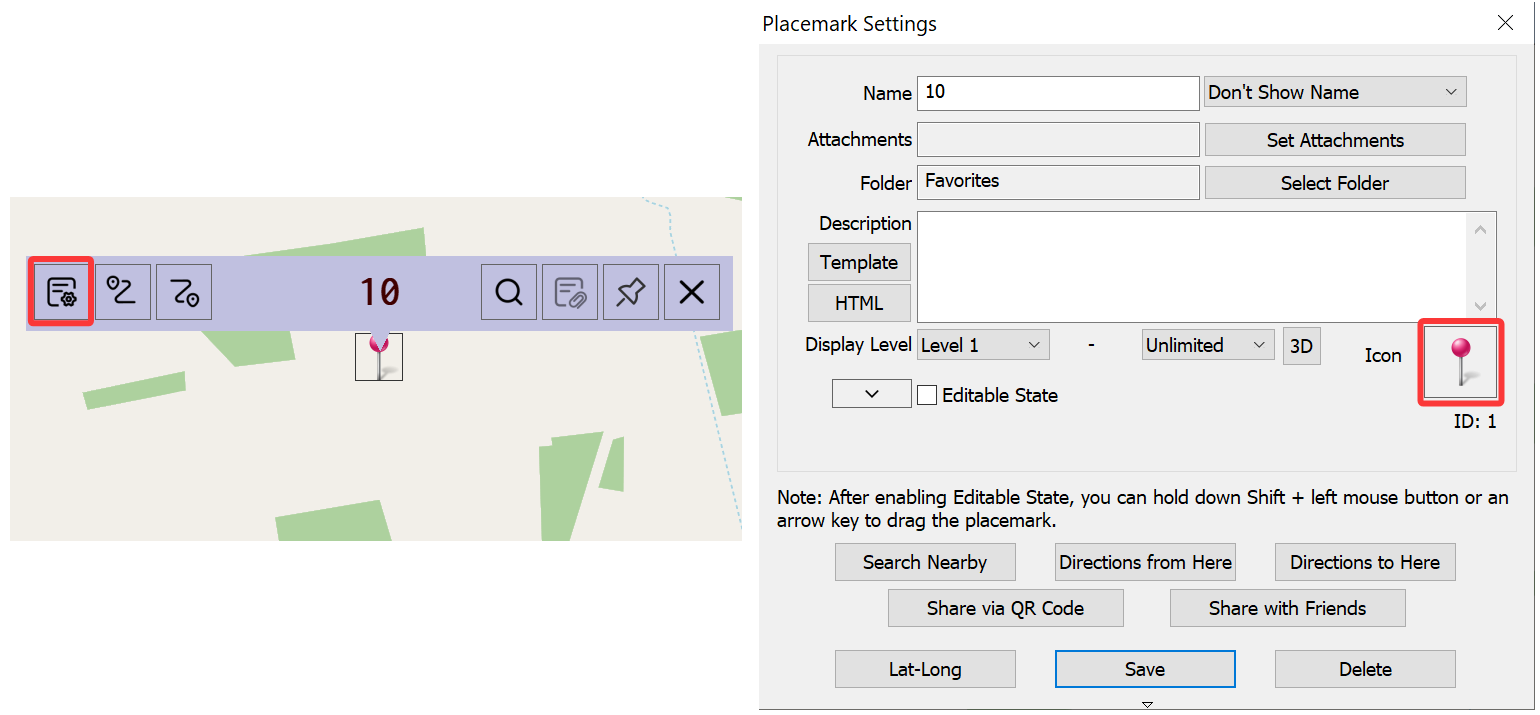
In the [Select Placemark Image] dialog box, click [Icon Association]. In the [Icon Association Management] dialog box, you can add, delete, modify, and save icon association items.
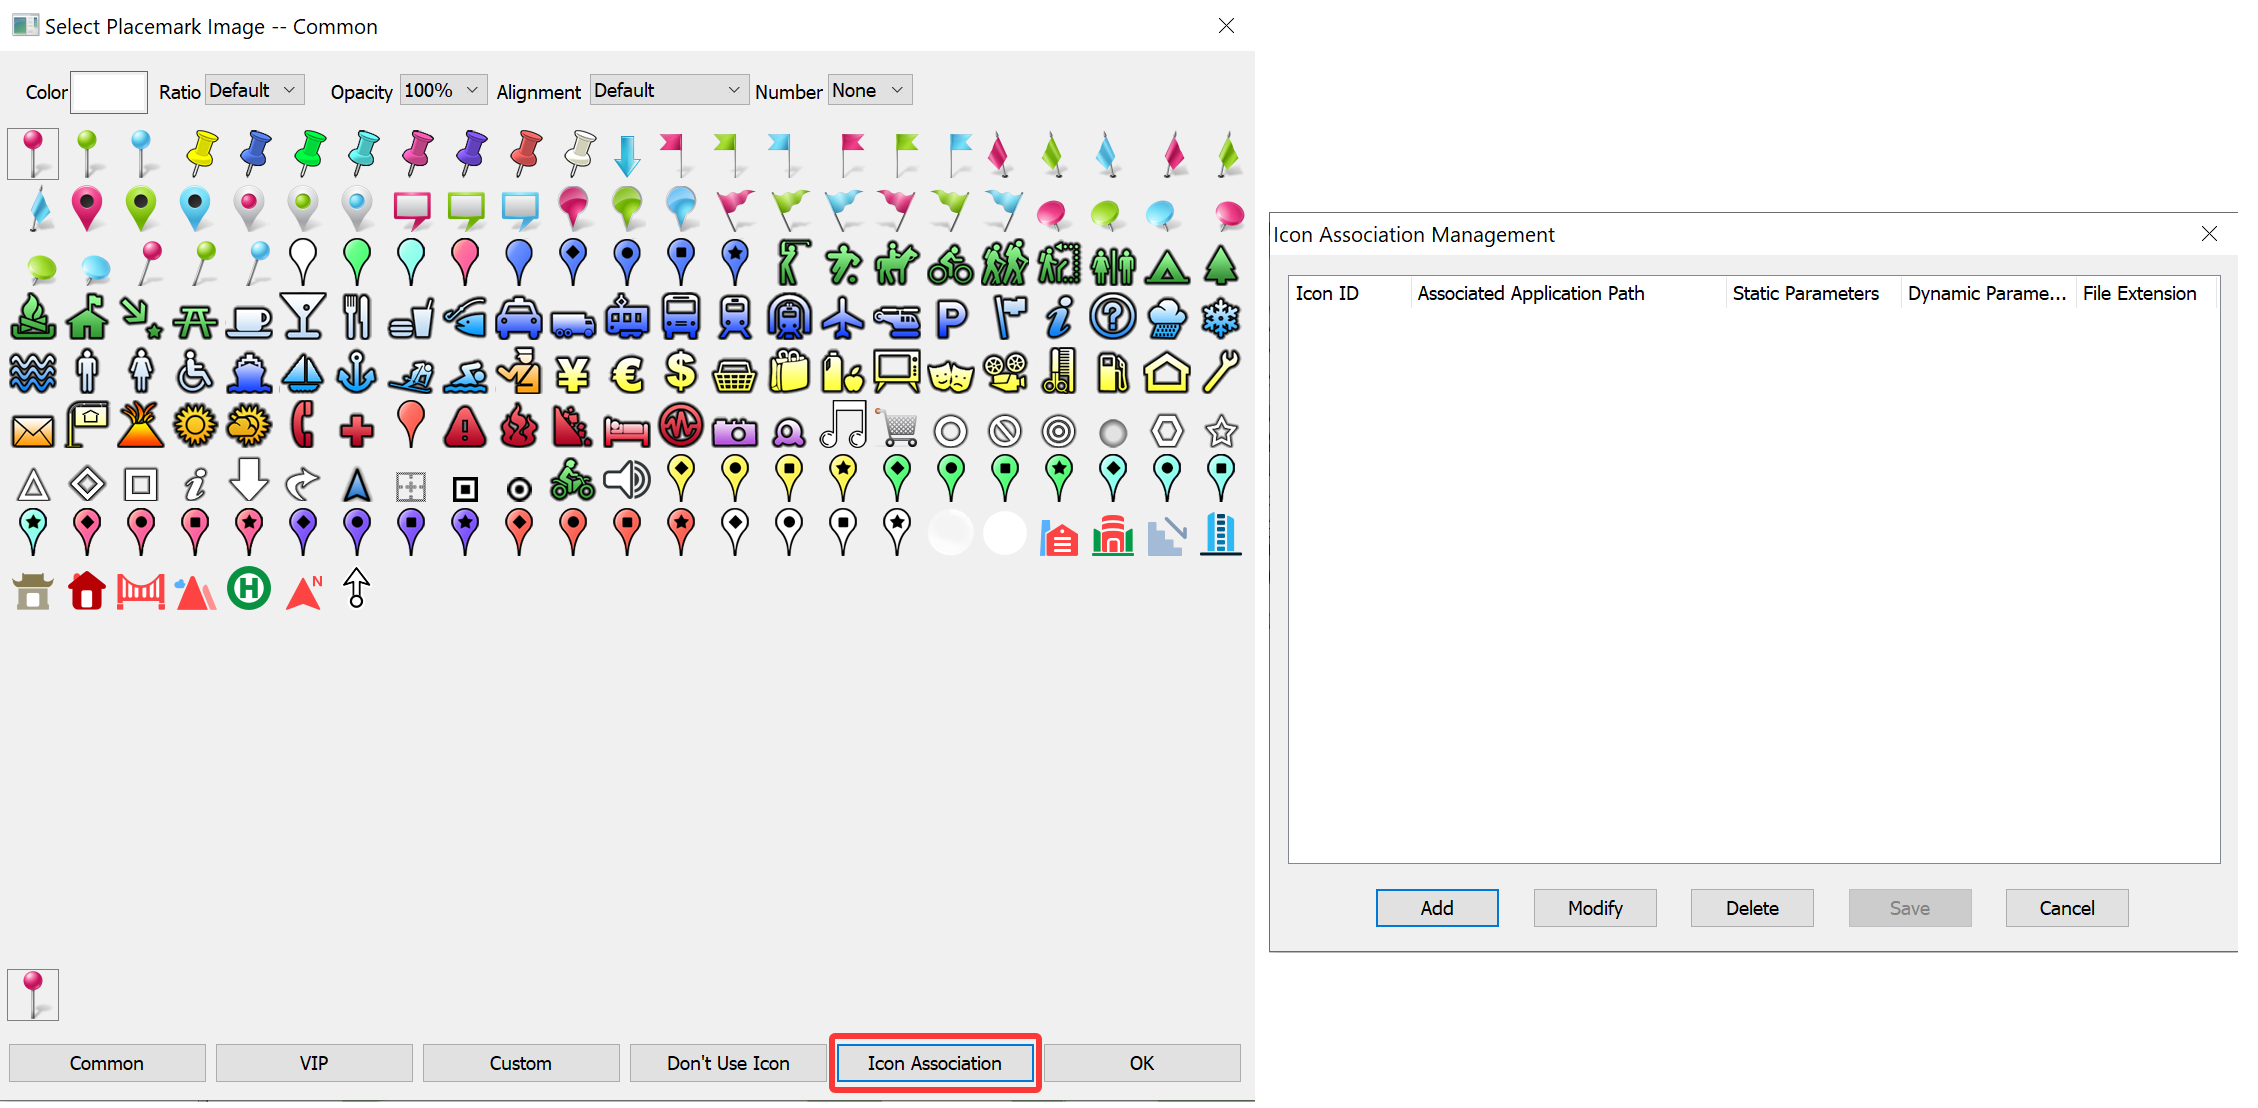
1. Add
Click [Add] to add an icon association. In the [Icon Association Options] dialog box, set the icon, application file path, static parameter, and dynamic parameter, and then click [OK].
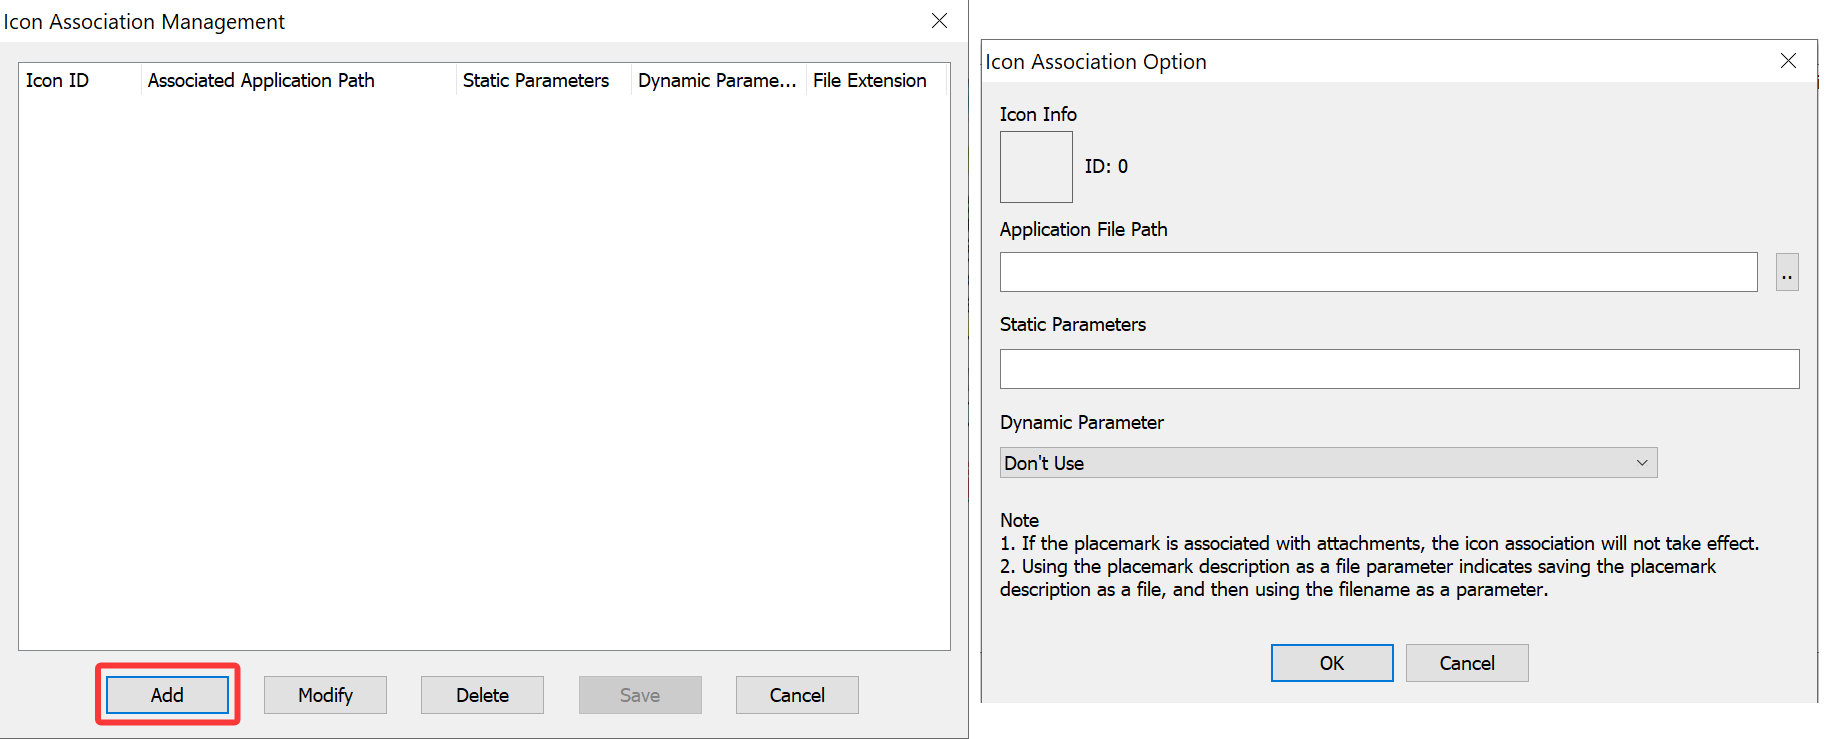
Parameters:
a. Icon Info
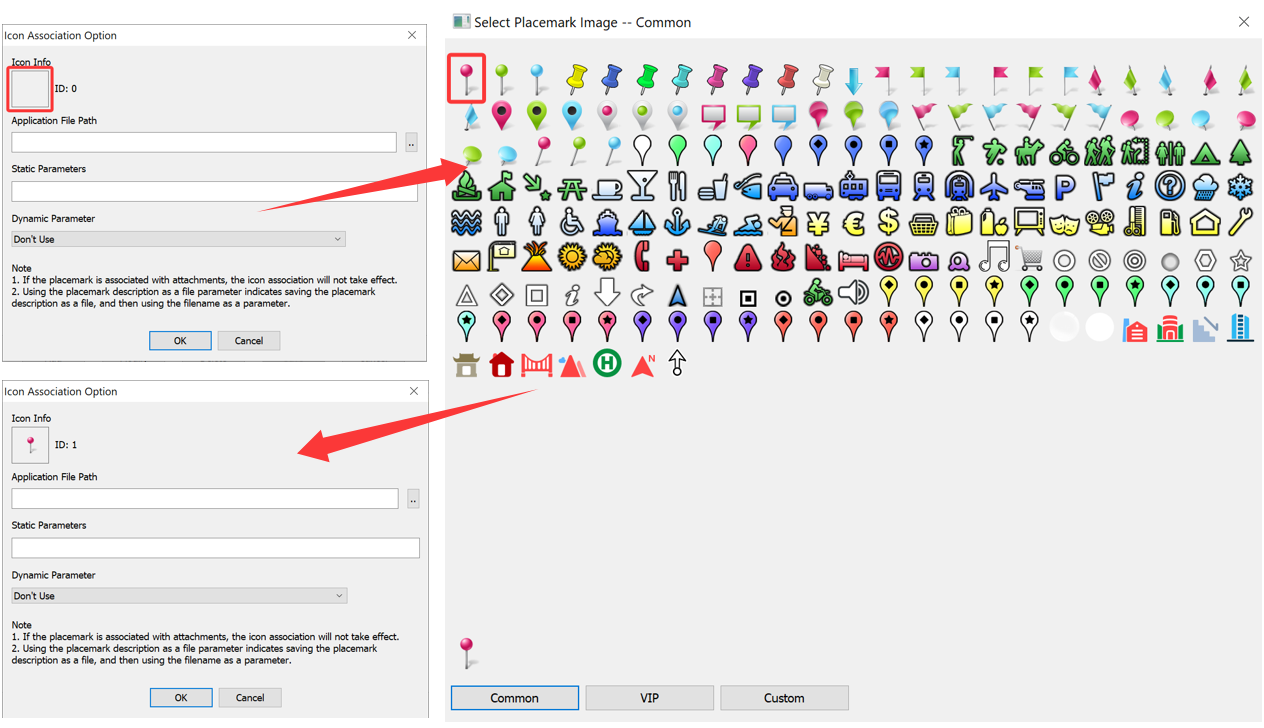
Set the placemark icon to be associated with the application.
In the [Icon Association Options] dialog box, click the icon box under [Icon Info]. In the [Select Placemark Image] dialog box, select the required icon. The icons include common icons, VIP icons, and custom icons.
b. Application File Path
Set the file path of the third-party application. For example, the file paths of some commonly used applications in the Windows operating system are as follows:
IE browser: C:\Program Files (x86)\Internet Explorer\iexplore.exe
Google Chrome: C:\Users\18408\AppData\Local\Google\Chrome\Application\chrome.exe (This varies depending on the user’s computer. You can find it in the installation directory)
Notepad: C:\Windows\System32\notepad.exe
Calculator: C:\Windows\System32\calc.exe
c. Static Parameter
Set a static parameter for the application.
You may need to set this parameter in the following scenarios:
-
You need to open a specific file by using the third-party application. That is, when you click all placemarks with the same icon, the same file is opened. In this case, enter a file path, such as E:\File\ovital.txt. For more information, see Example 1.
-
You need to open a specific IP address or URL by using the third-party application. That is, when you click all placemarks with the same icon, the same IP address or URL is opened. In this case, enter an IP address or URL, such as http://190.222.1.10, and http://www.qubimap.com. For more information, see Example 2.
-
Some third-party applications themselves require static parameters. In this case, enter them directly.
You do not need to set this parameter in the following scenarios:
-
You only need to open the third-party application. No parameters are required.
-
You can set either of the static or dynamic parameter. If you set the dynamic parameter, the static parameter cannot be set.
d. Dynamic Parameter
Optional values: [Don’t Use], [Use All Contents in Placemark Description as Parameter], [Use Placemark Description as File Parameter], [Use Placemark Description as File Parameter and Write Back When Modified], and [Use ov_argv in Placemark Description as Parameter].
① [Don’t Use]:
-
You only need to open the third-party application. No parameters are required.
-
You can set either of the static or dynamic parameter. If you set the static parameter, the dynamic parameter cannot be set.
② [Use All Contents in Placemark Description as Parameter]: Use the placemark description content as the parameter for the program. You can enter the information such as file paths, IP addresses, and domain names in the placemark description. The description of each placemark can be different. For more information, see Example 1 and 2. You can use this feature to achieve video monitoring if cameras support calling parameters.
③ [Use Placemark Description as File Parameter]: Open the placemark description as a file by using the third-party program (such as Notepad). The description of each placemark can be different. For more information, see Example 3.
④ [Use Placemark Description as File Parameter and Write Back When Modified]: Open the placemark description as a file by using the third-party program and write the result back to the placemark description when you modify the file. The description of each placemark can be different. For more information, see Example 4.
⑤ [Use ov_argv in Placemark Description as Parameter]: Add ov_argv as a dynamic parameter to the placemark description. When you click the placemark on the map for preview, the <ov_argv:{parameter list}> in the description is skipped and not displayed. The {parameter list} section must be in JSON format, and currently only supports the icon_argv parameter. For more information, see Example 5.
2. Save
In the [Icon Association Management] dialog box, after you add an icon association, click [Save] to apply the changes.
3. Modify
In the [Icon Association Management] dialog box, select an icon association and click [Modify]. You can modify the parameters such as application file path, static parameter, and dynamic parameter.
4. Delete
In the [Icon Association Management] dialog box, select the icon association that you want to delete and click [Delete].
5. Examples
(1) Example 1: Open a file (such as Word/TXT/Excel/PDF) by using a third-party program
In this example, TXT files are used to compare the static and dynamic parameters.
If you use the static parameter, the same file is opened when you click different placemarks of the same icon. That is, different placemarks of the same icon can be associated with only one file.
If you use the dynamic parameter, however, different placemarks of the same icon can be associated with different files.
① Static Parameter
Find the placemark on the map, click it, and then click the  button. In the [Placemark Settings] dialog box, click the icon. In the [Select Placemark Image] dialog box, click [Icon Association]. In the [Icon Association Management] dialog box, click [Add].
In the [Icon Association Options] dialog box, click the box under [Icon Info] to select the required icon. In the [Application File Path] field, enter the file path of Notepad, C:\Windows\System32\notepad.exe. In the [Static Parameter] field, enter the path of the TXT file to be associated, C:\folder\ovital.txt. Then, click [OK]. In the [Icon Association Management] dialog box, click [save].
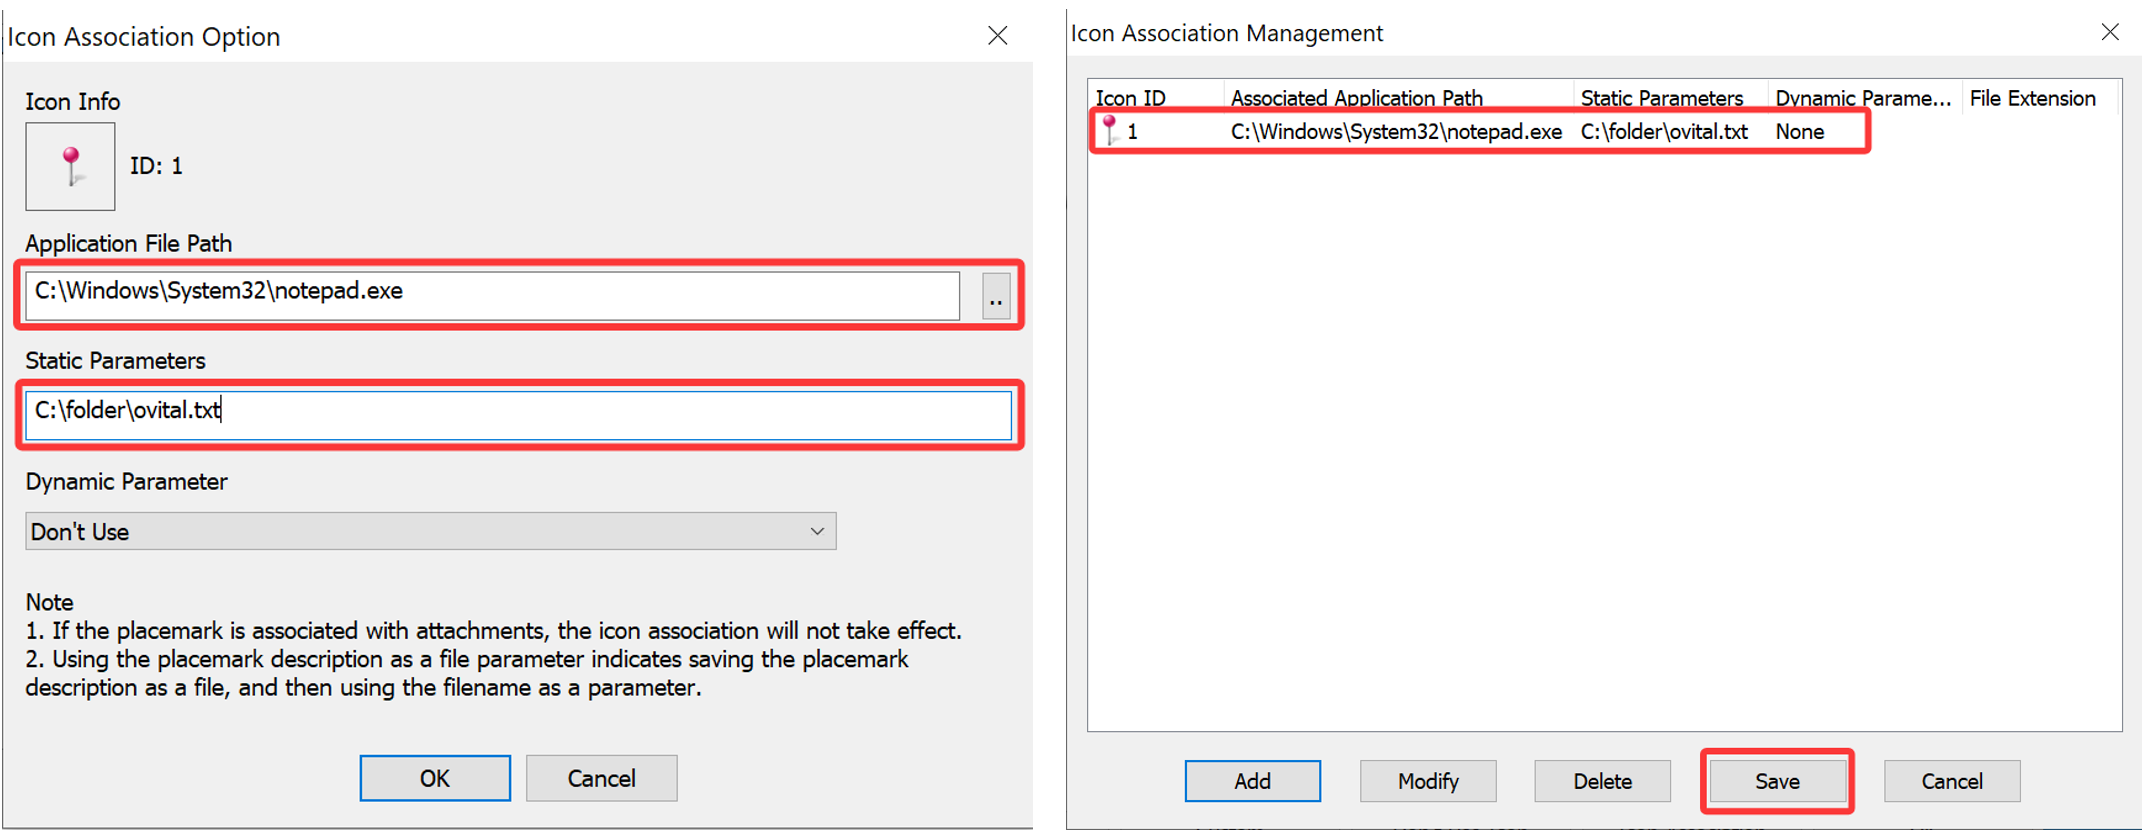
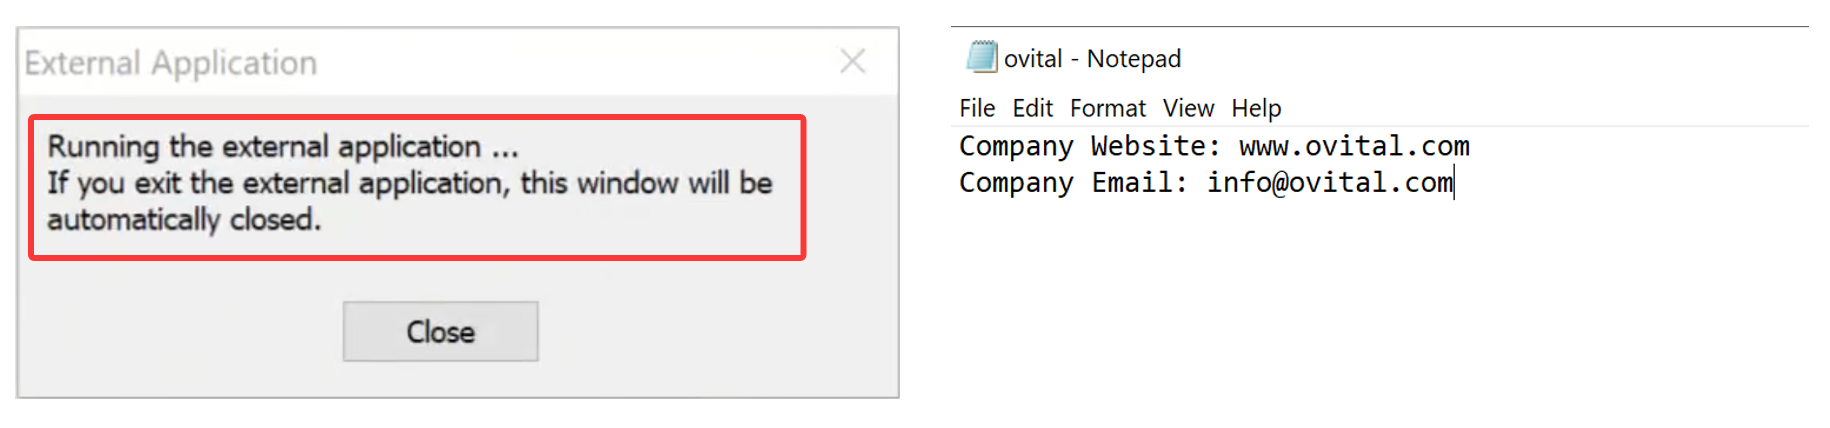
On the map, hold down the Ctrl key and click the placemark icon to open the TXT file by using Notepad. After you close the TXT file, the [External Application] window is automatically closed.
② Dynamic Parameter
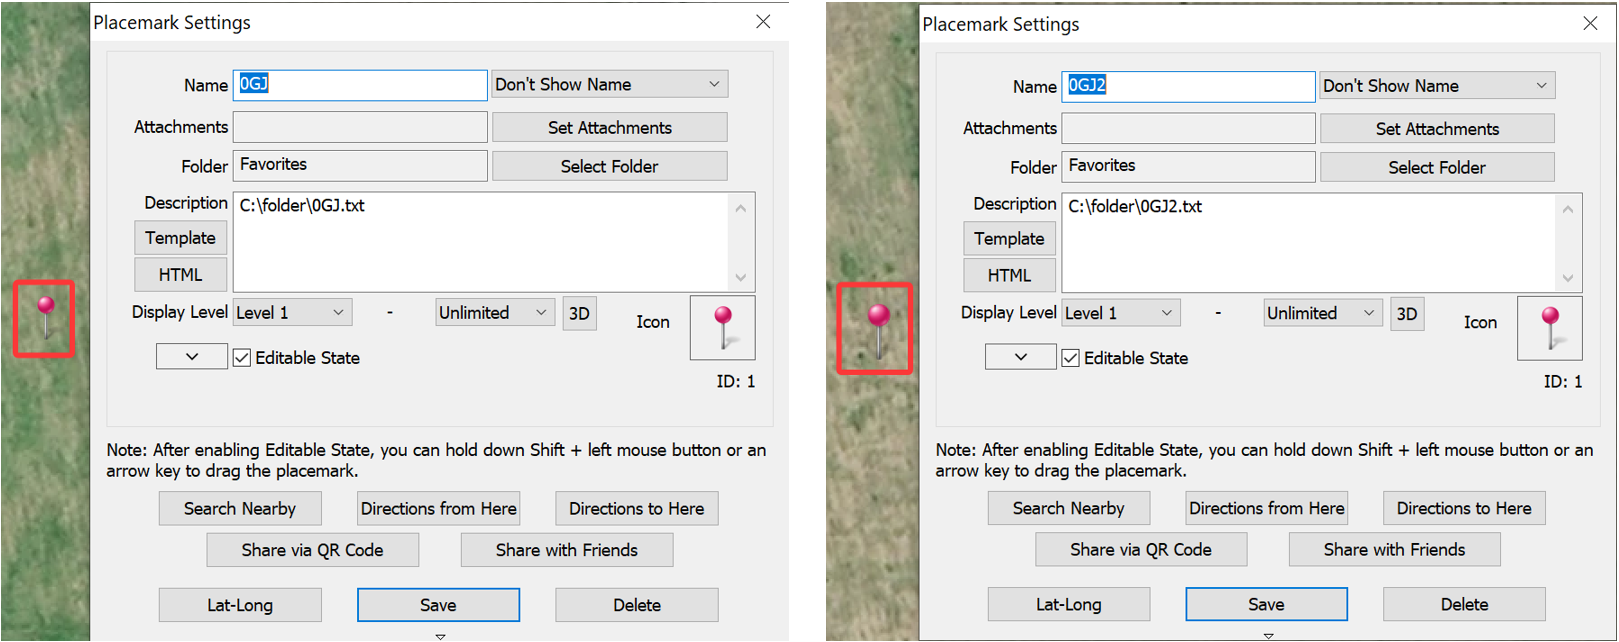
Find the placemark on the map, click it, and then click the button. In the [Placemark Settings] dialog box, enter a TXT file path in the [Description] field.
In this example, two TXT file paths are entered for two placemarks with the same icon, as shown in the following figure:
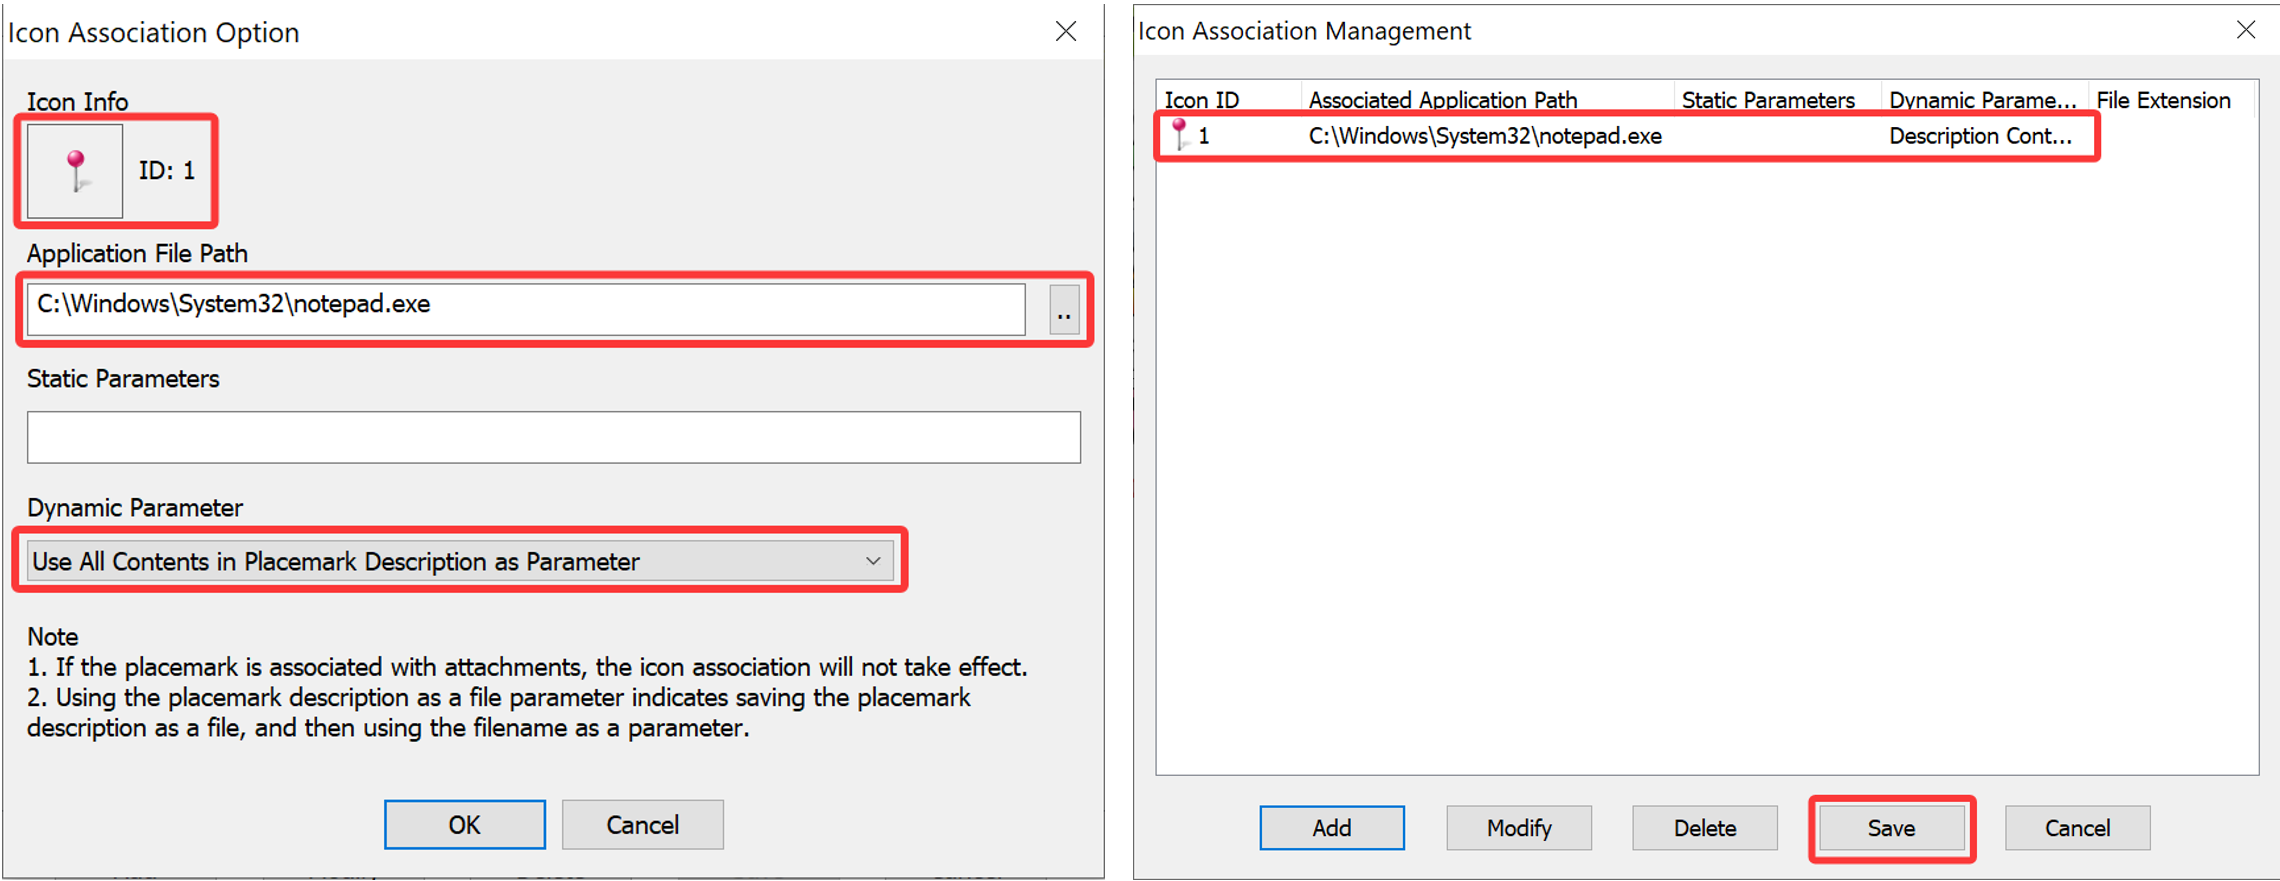
In the [Placemark Settings] dialog box, click the icon. In the [Select Placemark Image] dialog box, click [Icon Association]. In the [Icon Association Management] dialog box, click [Add]. In the [Icon Association Options] dialog box, click the box under [Icon Info] to select the required icon. In the [Application File Path] field, enter the file path of Notepad, C:\Windows\System32\notepad.exe. In the [Dynamic Parameter] field, select [Use All Contents in Placemark Description as Parameter]. Then, click [OK]. In the [Icon Association Management] dialog box, click [save].
You only need to set one association for the same icon (in other words, placemark icons with the same icon ID).
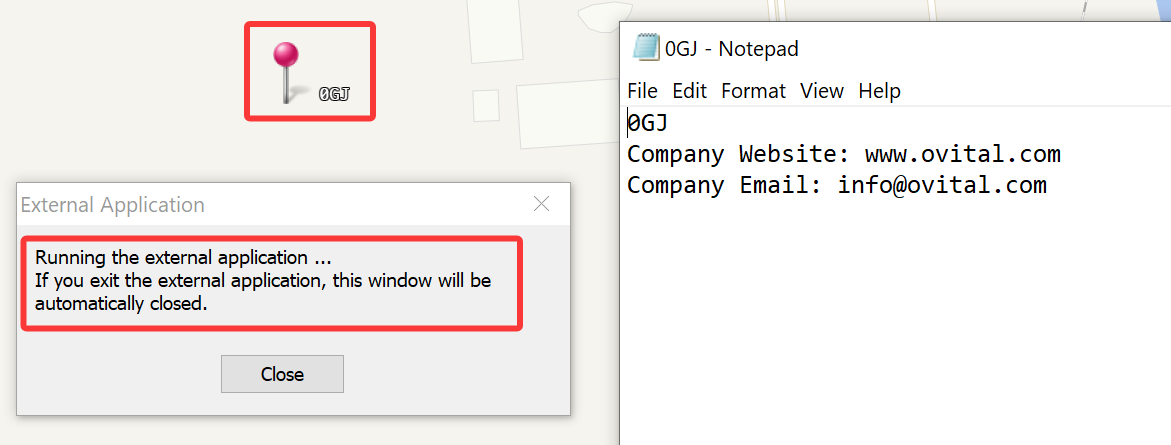
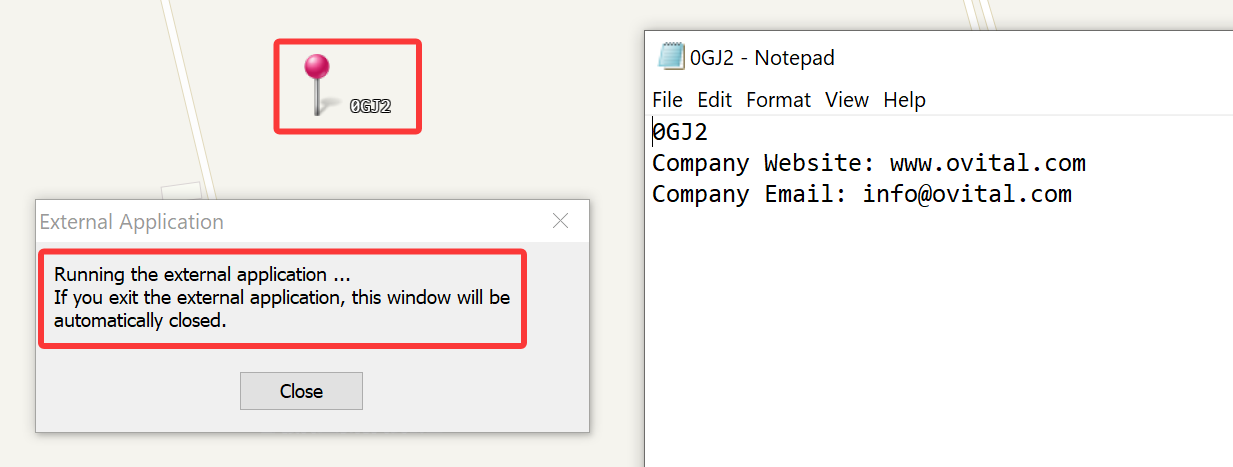
On the map, hold down the Ctrl key and click these two placemark icons to open different TXT files by using Notepad. After you close each TXT file, the [External Application] window is automatically closed.
Click the placemark 0GJ to open the associated file, as shown in the following figure:
Click the placemark 0GJ2 to open the associated file, as shown in the following figure:
Example 2: Open an IP address or URL via a third-party program
In this example, the Chrome browser is set to open the QubiMap website (www.qubimap.com).
Note: You can use this feature to achieve video monitoring in QubiMap if cameras support calling parameters.
If you use the static parameter, the same IP address or URL is opened when you click different placemarks of the same icon. That is, different placemarks of the same icon can be associated with only one IP address or URL.
If you use the dynamic parameter, however, different placemarks of the same icon can be associated with different IP addresses or URLs.
In addition, for browsers that support command-line launch parameters, such as Chrome, you can set theses parameters as static or dynamic parameters.
① Static Parameter
Find the placemark on the map, click it, and then click the button. In the [Placemark Settings] dialog box, click the icon. In the [Select Placemark Image] dialog box, click [Icon Association]. In the [Icon Association Management] dialog box, click [Add].
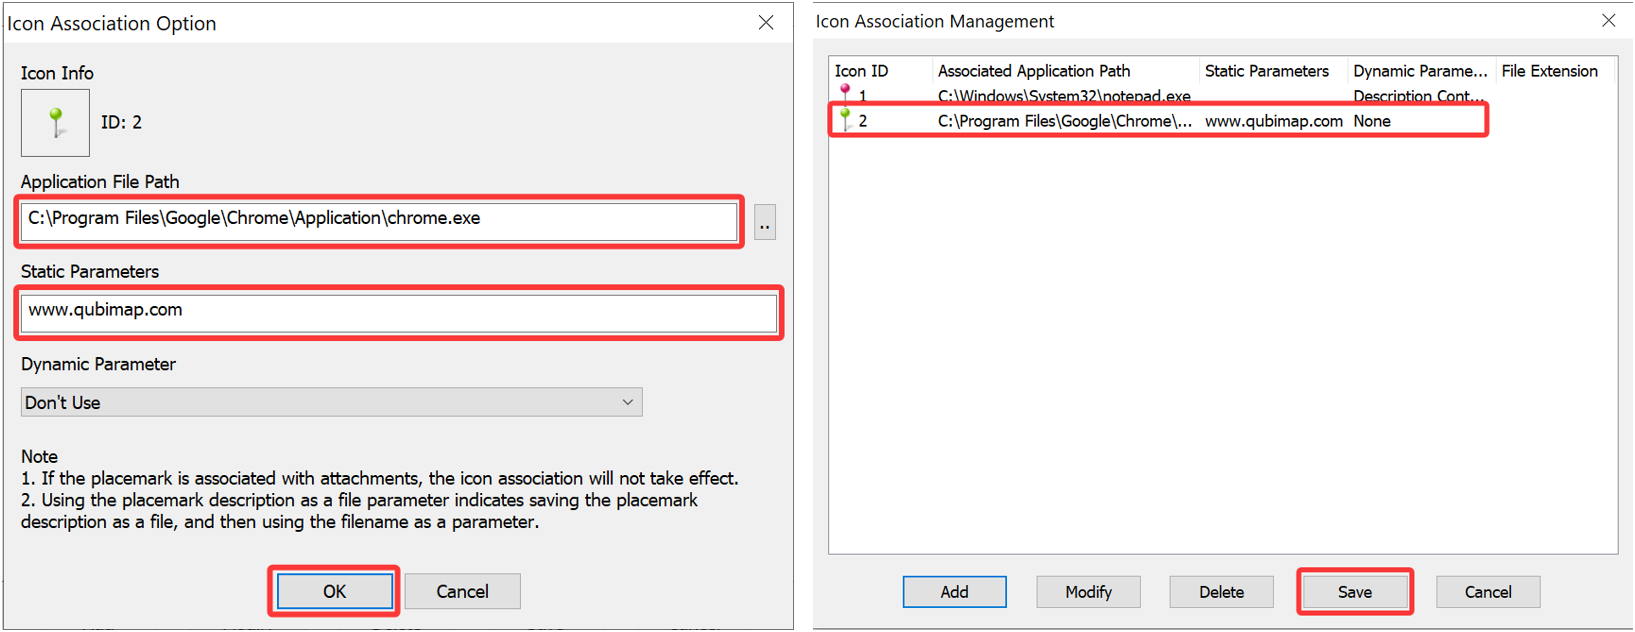
In the [Icon Association Options] dialog box, click the box under [Icon Info] to select the required icon. In the [Application File Path] field, enter the file path of Chrome, C:\Program Files\Google\Chrome\Application\chrome.exe. In the [Static Parameter] field, enter the path of the TXT file to be associated, www.qubimap.com. Then, click [OK]. In the [Icon Association Management] dialog box, click [save].
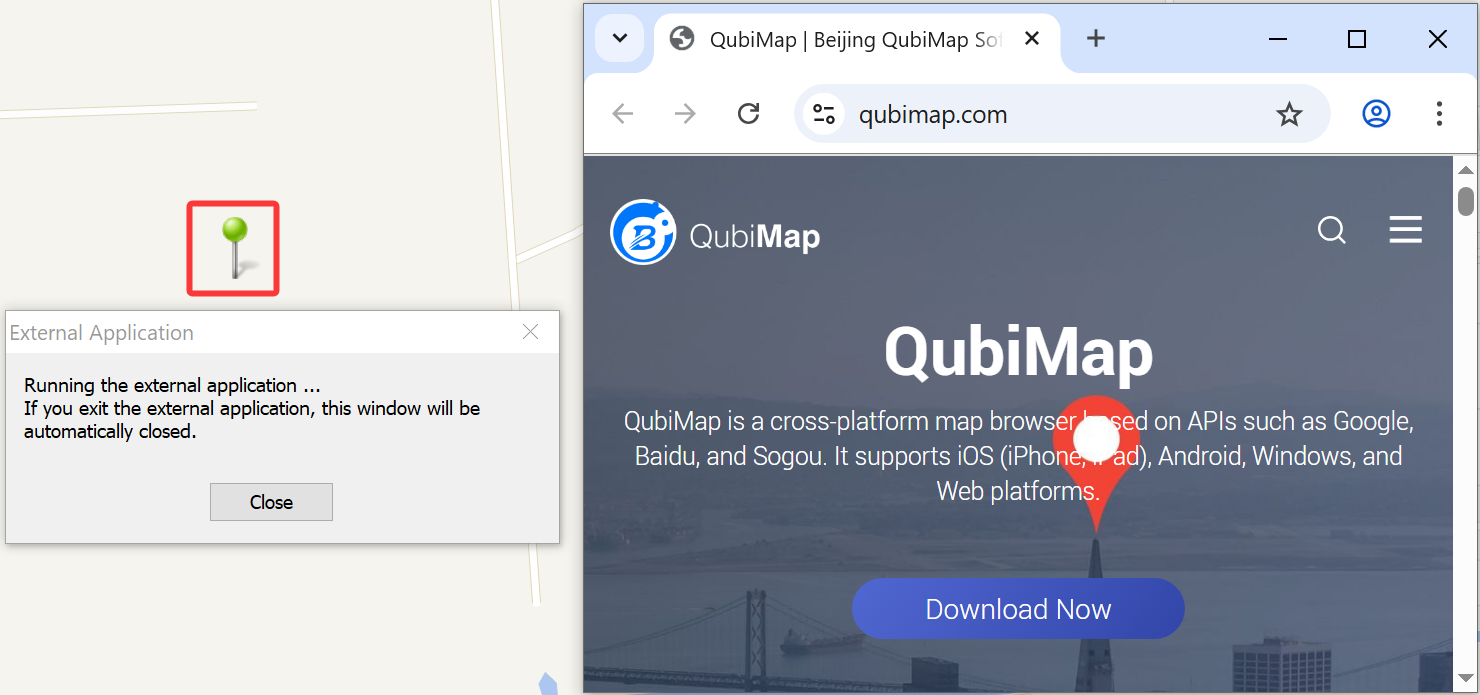
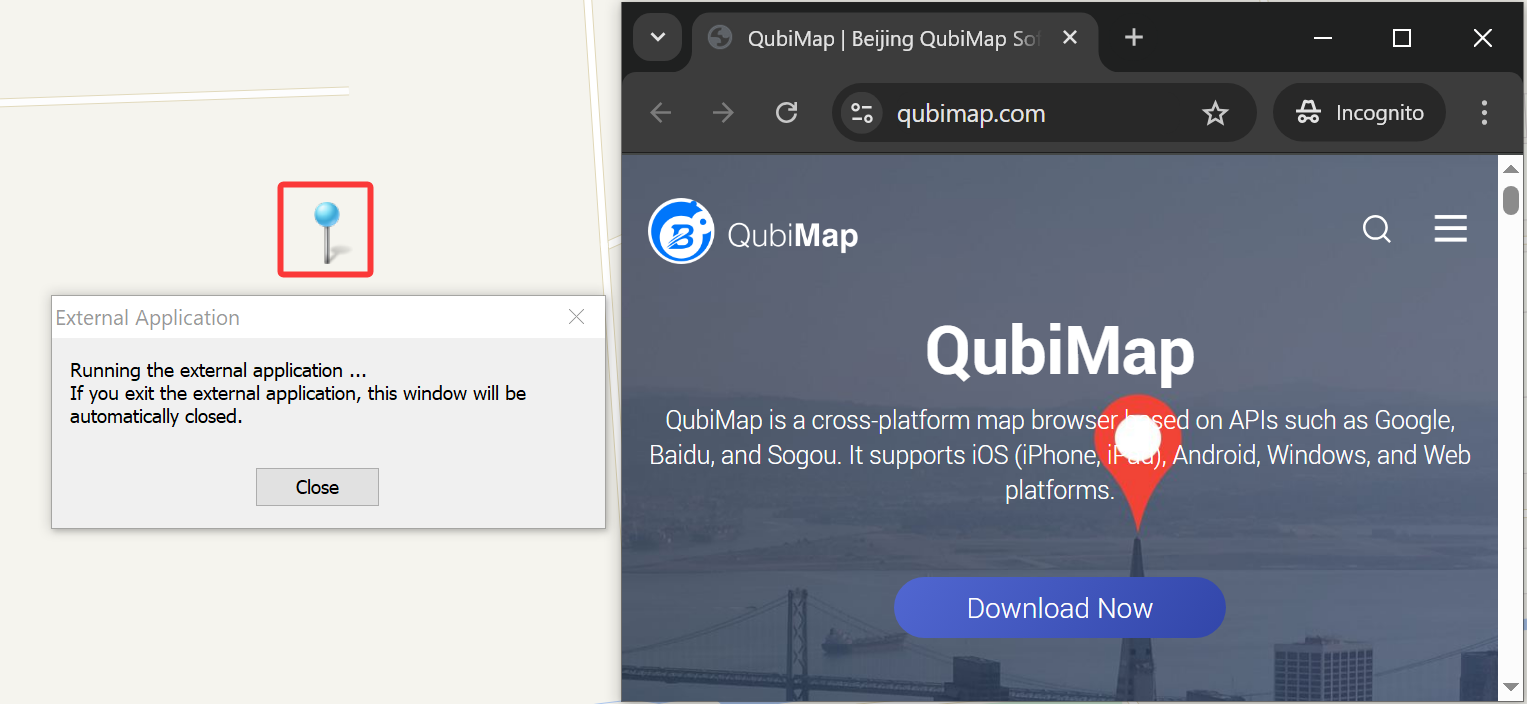
On the map, hold down the Ctrl key and click the placemark icon to open the QubiMap official website by using Chrome. After you exit the website, the [External Application] window is automatically closed.
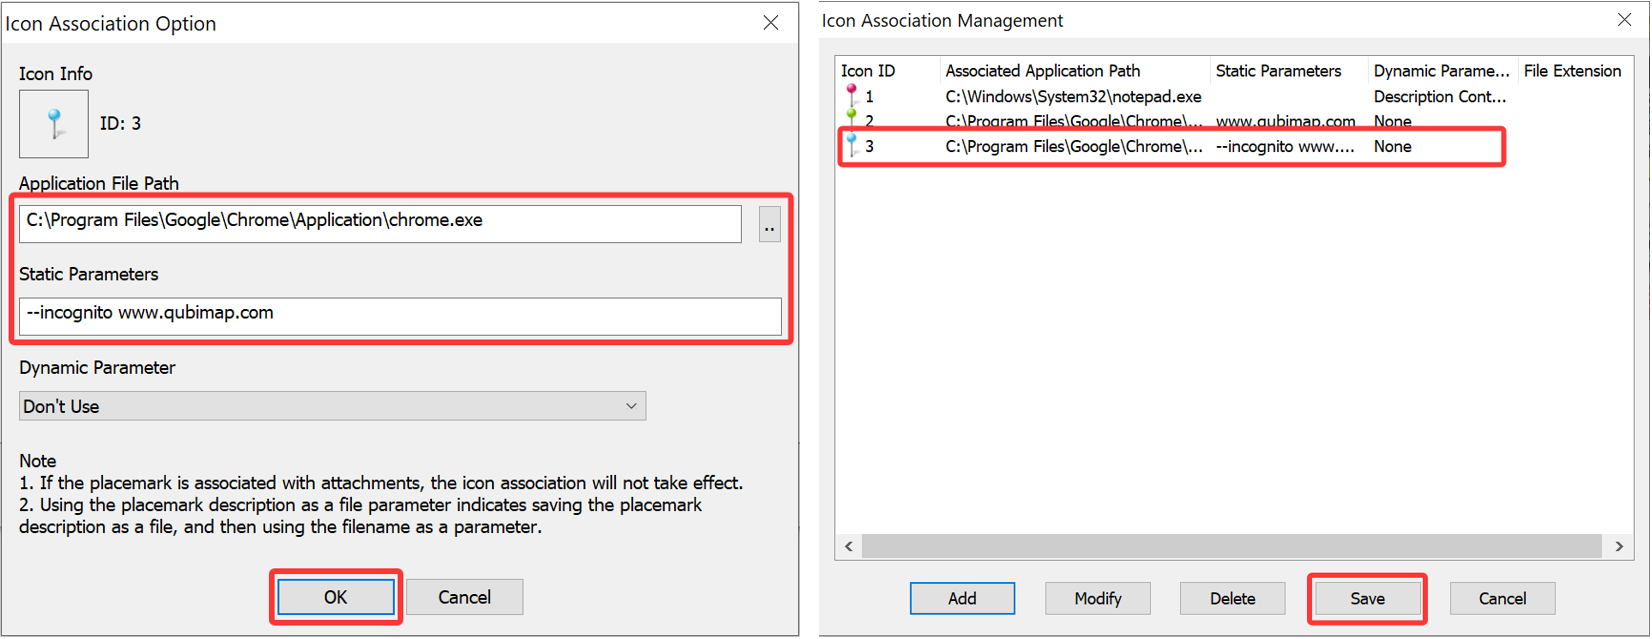
You can add a command-line launch parameter, such as –incognito, before the static parameter www.qubimap.com. Click [OK]. Then, click [Save].
On the map, hold down the Ctrl key and click the placemark icon to open the QubiMap official website by using Chrome in incognito mode. After you exit the website, the [External Application] window is automatically closed.
② Dynamic Parameter
Find the placemark on the map, click it, and then click the button. In the [Placemark Settings] dialog box, enter a URL in the [Description] field.
In this example, three URLs are entered for three placemarks with the same icon, as shown in the following figure:
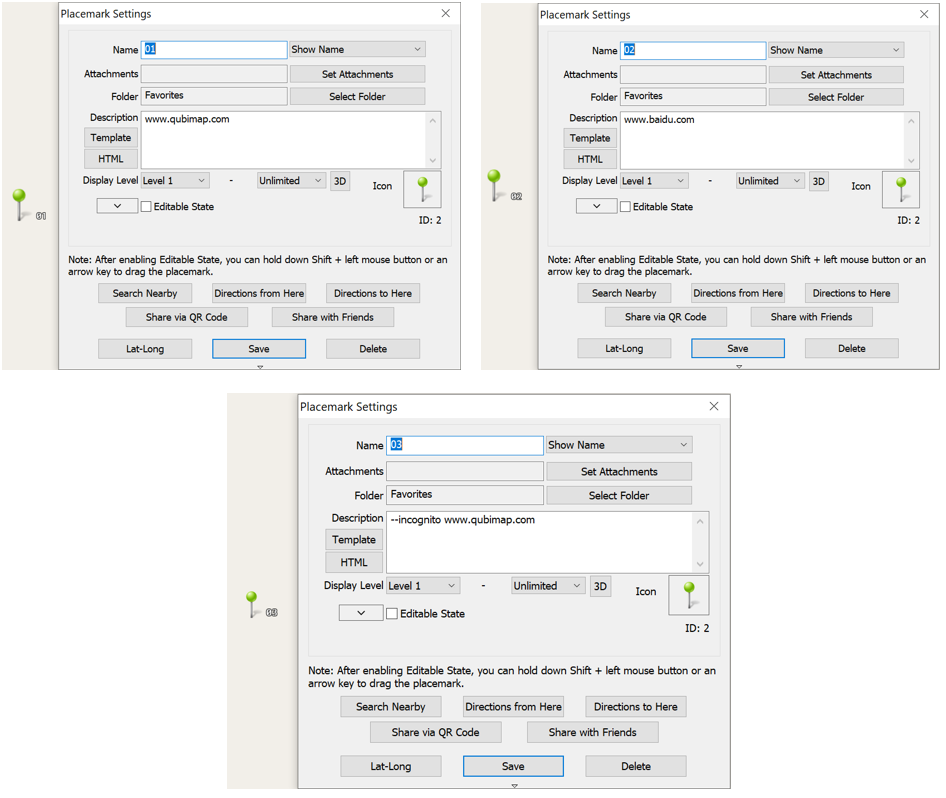
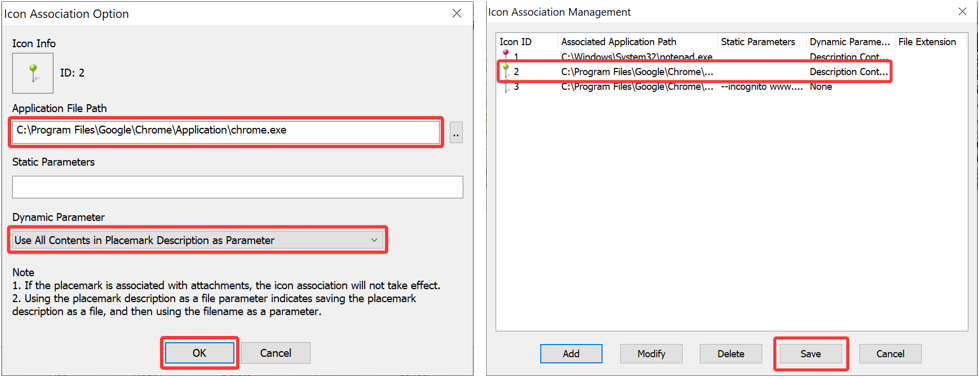
In the [Placemark Settings] dialog box, click the icon. In the [Select Placemark Image] dialog box, click [Icon Association]. In the [Icon Association Management] dialog box, click [Add]. In the [Icon Association Options] dialog box, click the box under [Icon Info] to select the required icon. In the [Application File Path] field, enter the file path of Chrome, C:\Program Files\Google\Chrome\Application\chrome.exe. In the [Dynamic Parameter] field, select [Use All Contents in Placemark Description as Parameter]. Then, click [OK]. In the [Icon Association Management] dialog box, click [save].
You only need to set one association for the same icon.
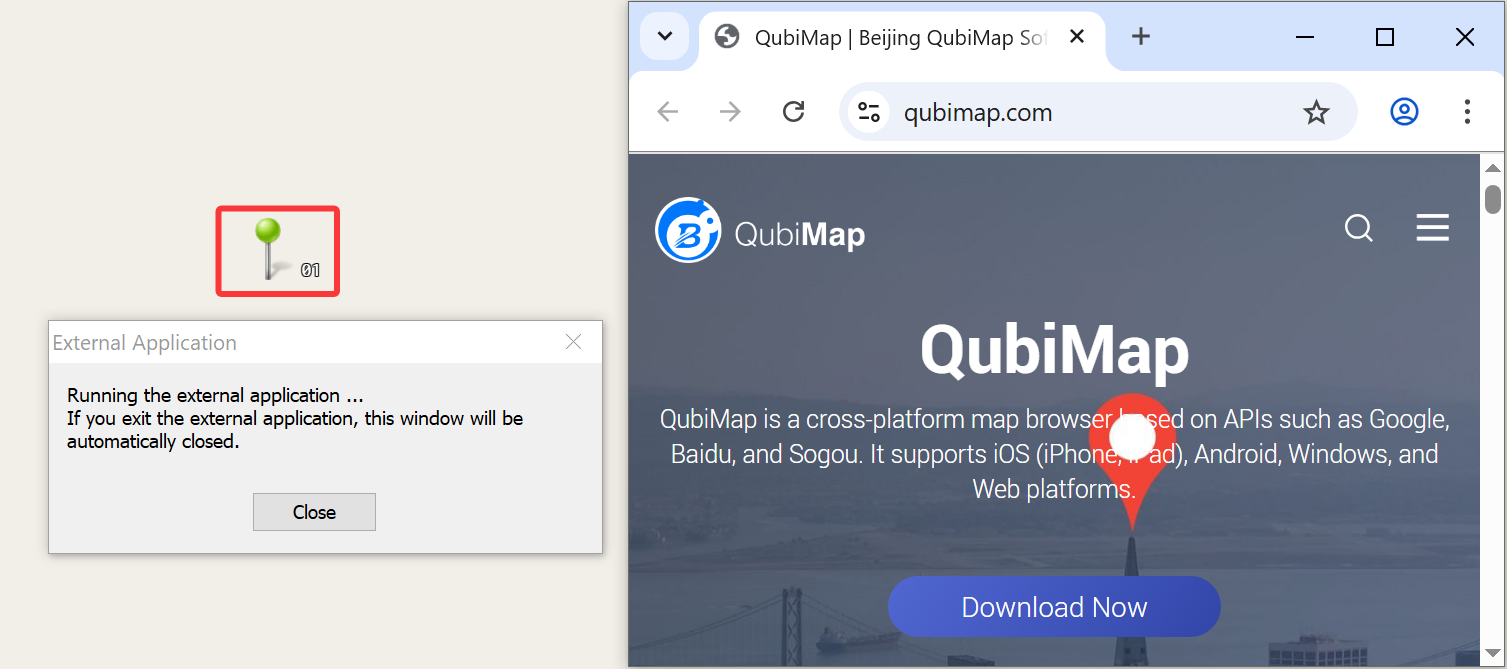
On the map, hold down the Ctrl key and click these three placemark icons to open the URLs by using Chrome. After you exit the website, the [External Application] window is automatically closed.
Click the placemark 01 to open the QubiMap website, as shown in the following figure:
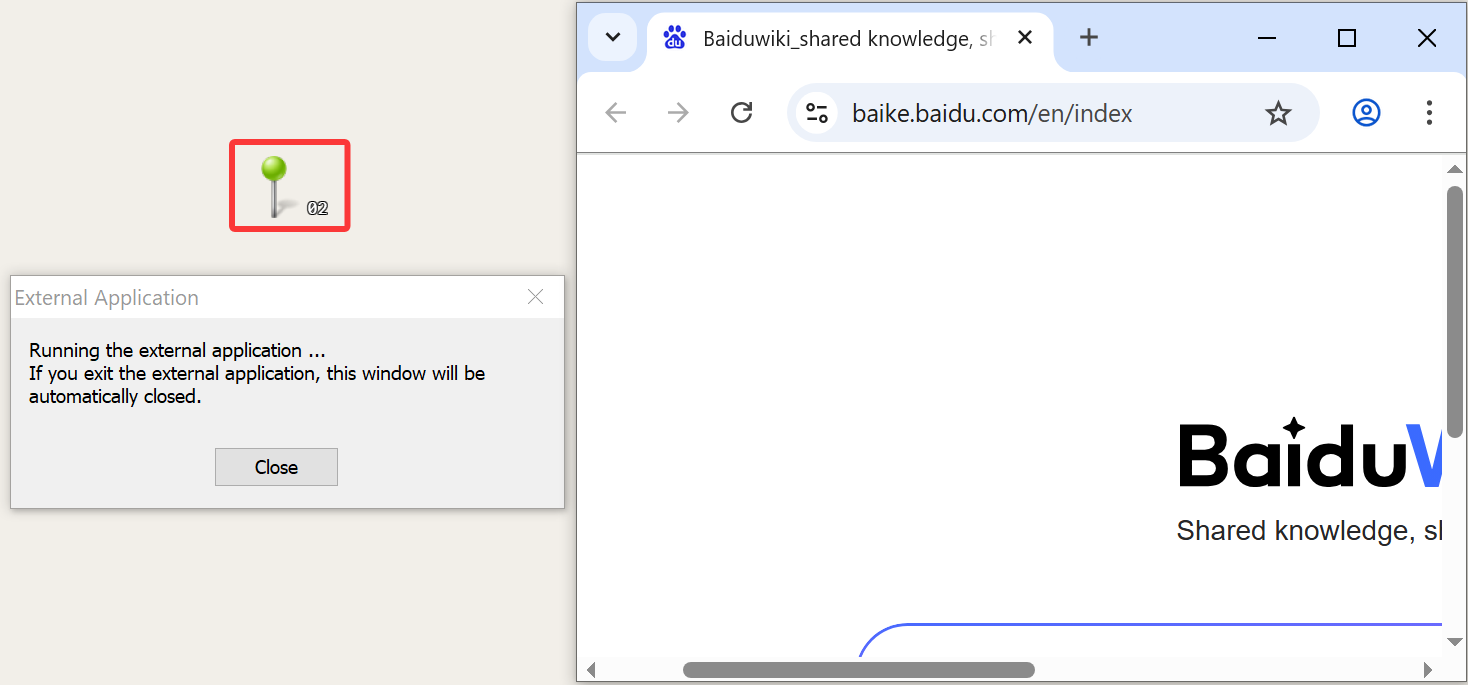
Click the placemark 02 to open the Baidu website, as shown in the following figure:
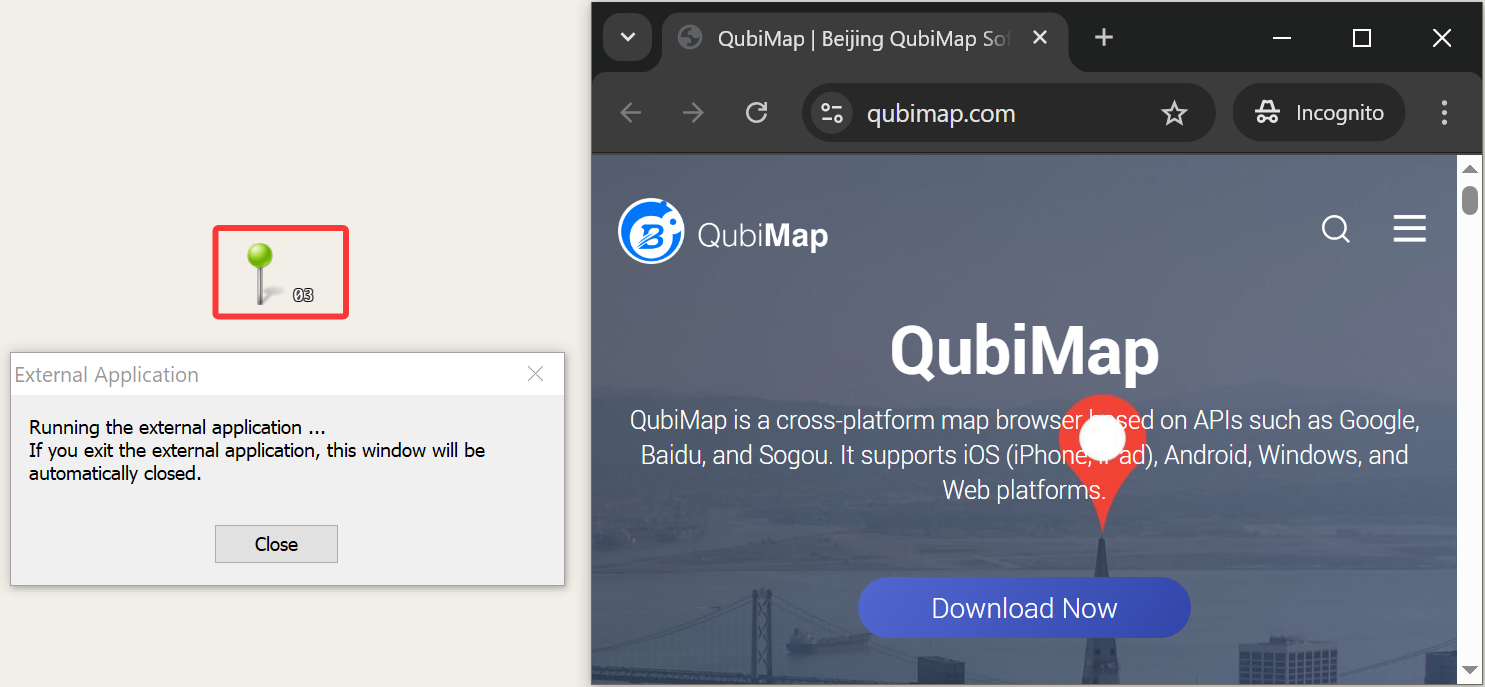
Click the placemark 03 to open the QubiMap website in incognito mode, as shown in the following figure:
Example 3: Use placemark description as a file parameter
You can call a third-party program to open the placemark description as a file. Here, Notepad is used as an example.
You can enter different information in each placemark description.
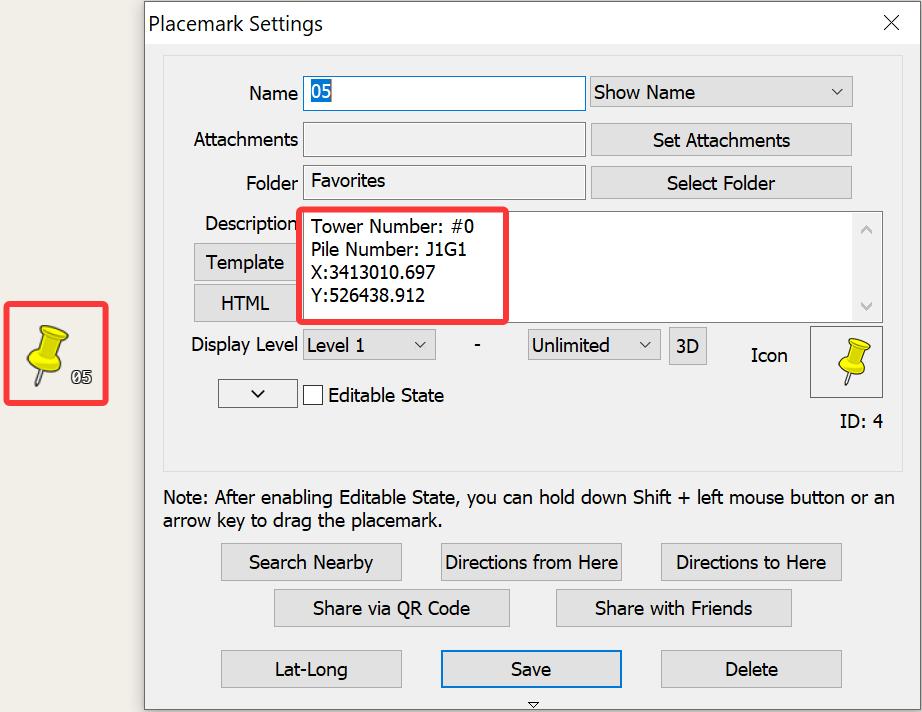
Find the placemark on the map, click it, and then click the button. In the [Placemark Settings] dialog box, enter information in the [Description] field.
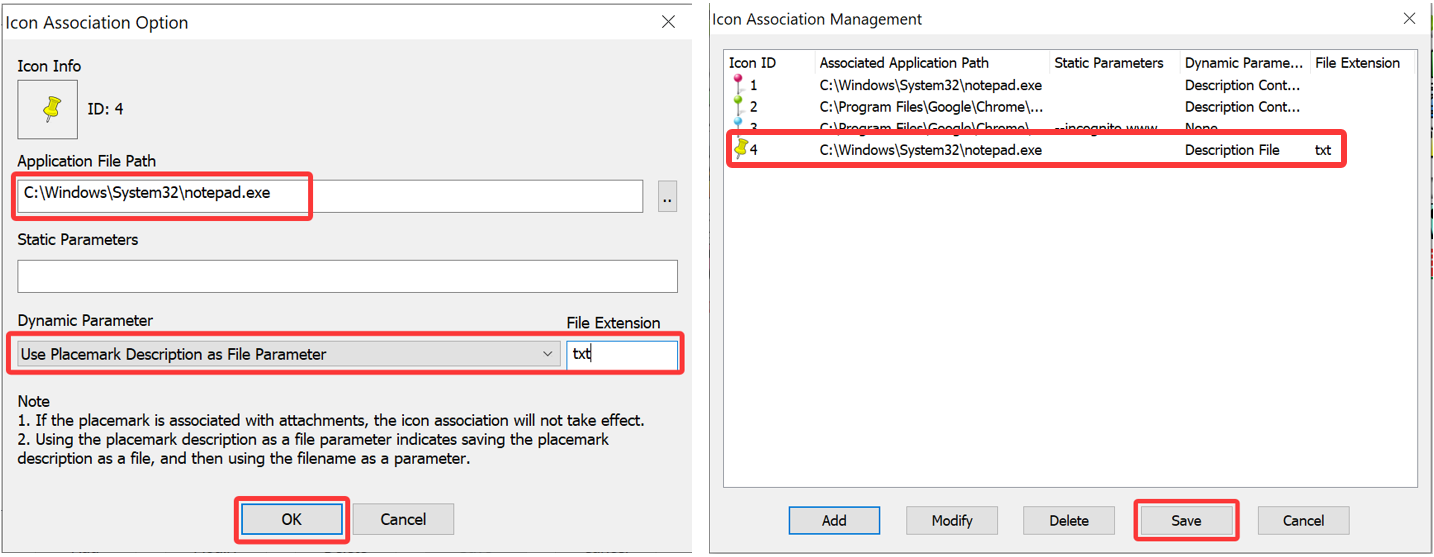
In the [Placemark Settings] dialog box, click the icon. In the [Select Placemark Image] dialog box, click [Icon Association]. In the [Icon Association Management] dialog box, click [Add]. In the [Icon Association Options] dialog box, click the box under [Icon Info] to select the required icon. In the [Application File Path] field, enter the file path of Notepad, C:\Windows\System32\notepad.exe. In the [Dynamic Parameter] field, select [Use Placemark Description as File Parameter], and specify the file extension. Then, click [OK]. In the [Icon Association Management] dialog box, click [save].
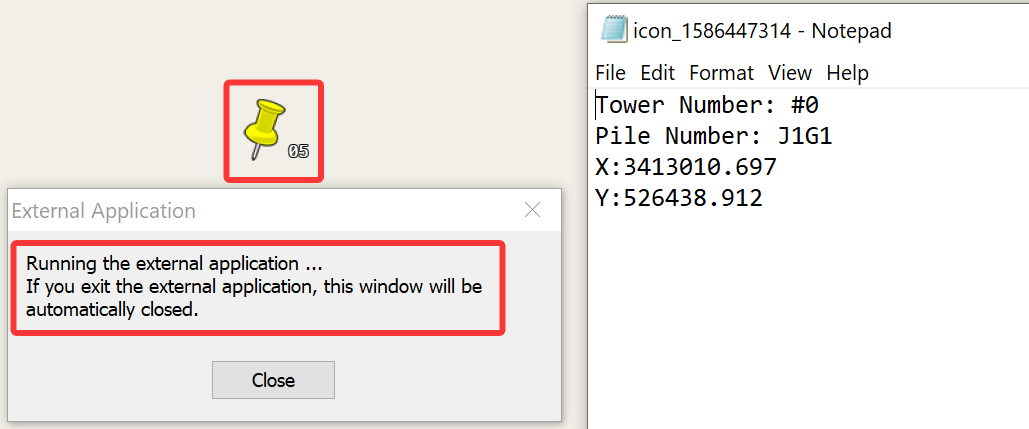
On the map, hold down the Ctrl key and click the placemark icon to open the description content as a TXT file by using Notepad. After you close the TXT file, the [External Application] window is automatically closed.
Example 4: Open placemark description as a file by using a third-party program and write the result back to the placemark description when you modify the file
You can call a third-party program to open the placemark description as a file. After you modify the file, the result is written back to the placemark description. Here, Notepad is used as an example.
You can enter different information in each placemark description.
Find the placemark on the map, click it, and then click the button. In the [Placemark Settings] dialog box, enter information in the [Description] field.
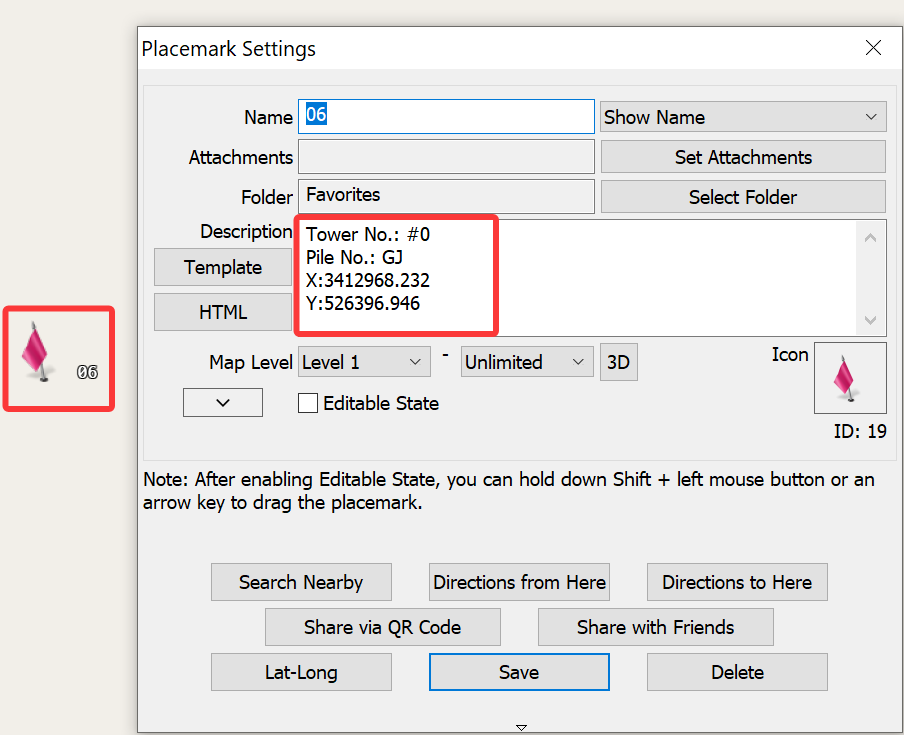
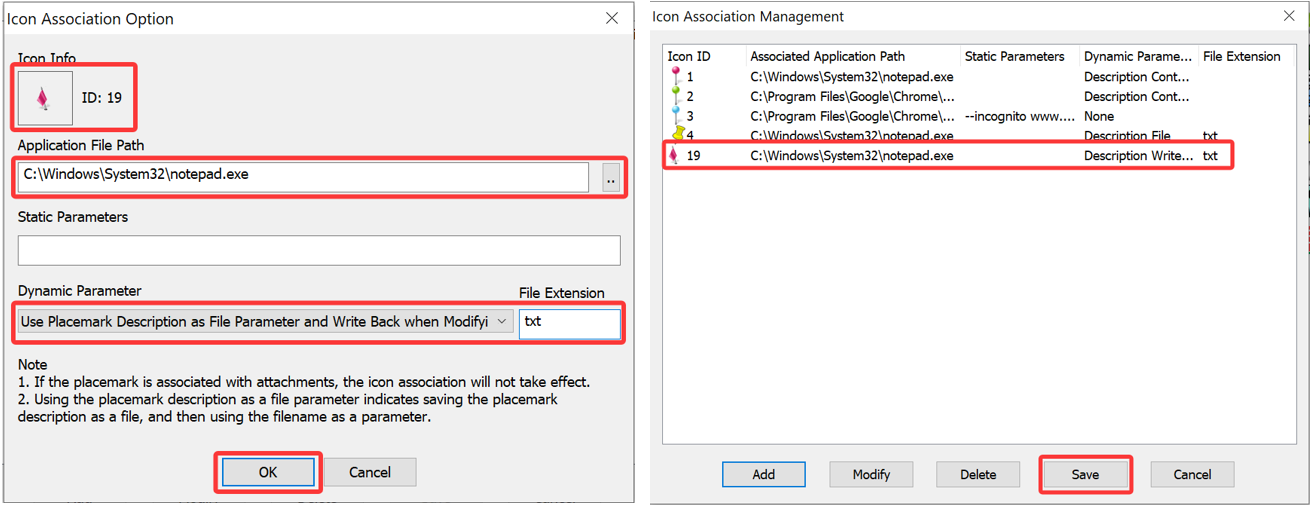
In the [Placemark Settings] dialog box, click the icon. In the [Select Placemark Image] dialog box, click [Icon Association]. In the [Icon Association Management] dialog box, click [Add]. In the [Icon Association Options] dialog box, click the box under [Icon Info] to select the required icon. In the [Application File Path] field, enter the file path of Notepad, C:\Windows\System32\notepad.exe. In the [Dynamic Parameter] field, select [Use Placemark Description as File Parameter and Write Back When Modified], and specify the file extension. Then, click [OK]. In the [Icon Association Management] dialog box, click [save].
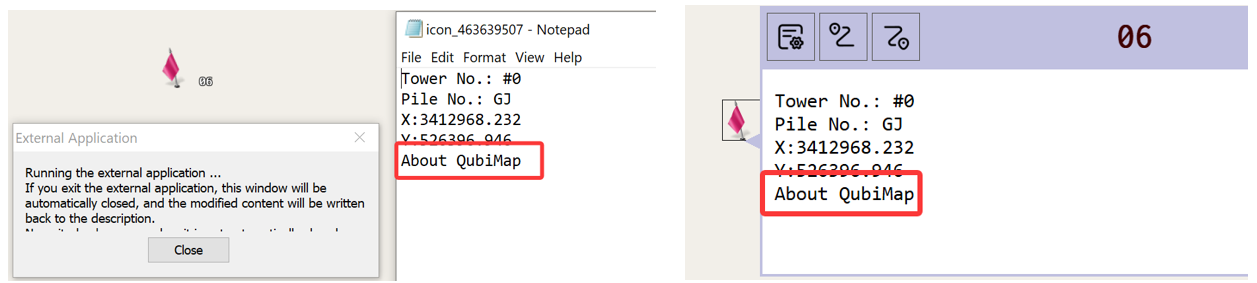
On the map, hold down the Ctrl key and click the placemark icon to open the description content as a TXT file by using Notepad.
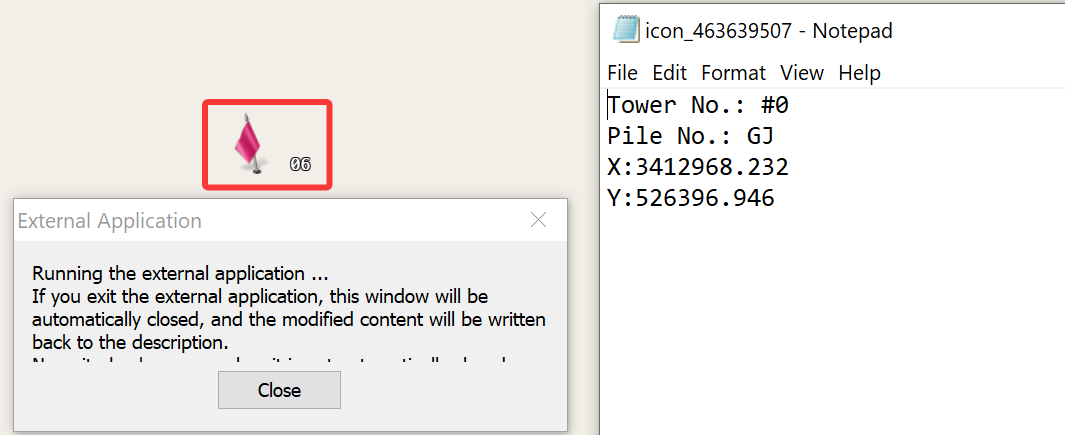
After you modify the file content, save the changes, and close the TXT file, the latest file content is updated to the placemark description.
Example 5: Use ov_argv in placemark description as parameter
Add ov_argv as a dynamic parameter to the placemark description. When you click the placemark on the map for preview, the <ov_argv:{parameter list}> in the description is skipped and not displayed. The {parameter list} section must be in JSON format, and currently only supports the icon_argv parameter. Here, Notepad is used as an example.
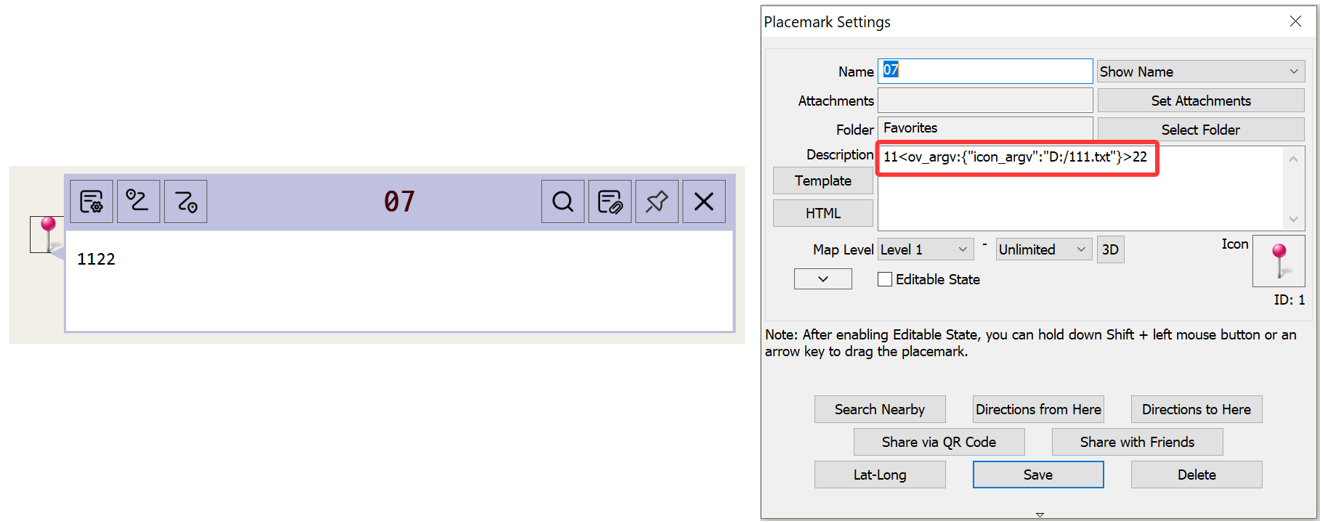
You can enter different information in each placemark description. Example: 11<ov_argv:{"icon_argv":"D:/111.txt"}>22.
Find the placemark on the map, click it, and then click the button. In the [Placemark Settings] dialog box, enter the information in the [Description] field.
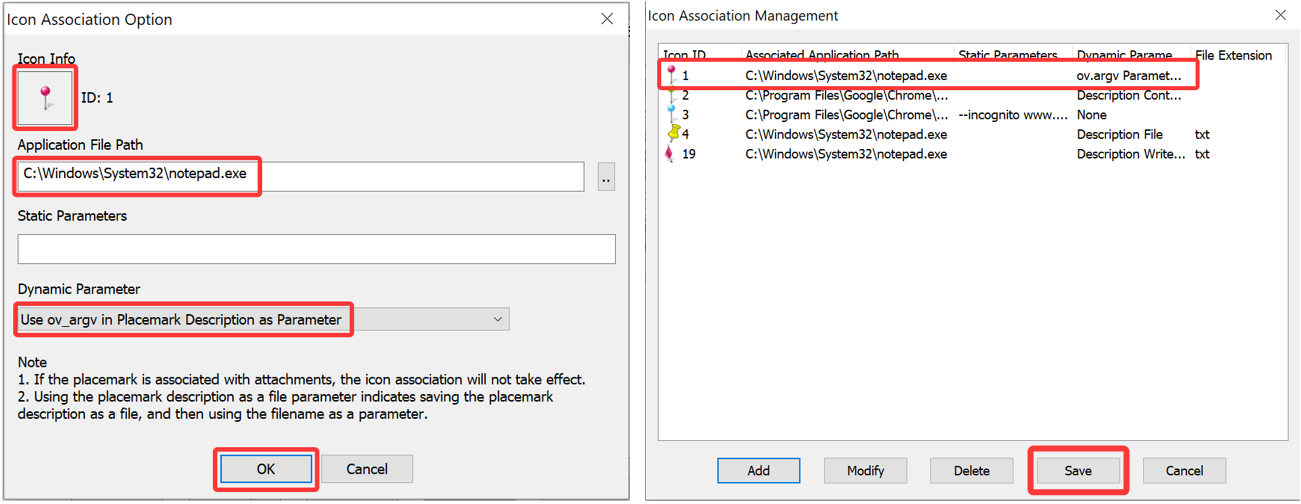
In the [Placemark Settings] dialog box, click the icon. In the [Select Placemark Image] dialog box, click [Icon Association]. In the [Icon Association Management] dialog box, click [Add]. In the [Icon Association Options] dialog box, click the box under [Icon Info] to select the required icon. In the [Application File Path] field, enter the file path of Notepad, C:\Windows\System32\notepad.exe. In the [Dynamic Parameter] field, select [Use ov_argv in Placemark Description as Parameter]. Then, click [OK]. In the [Icon Association Management] dialog box, click [save].
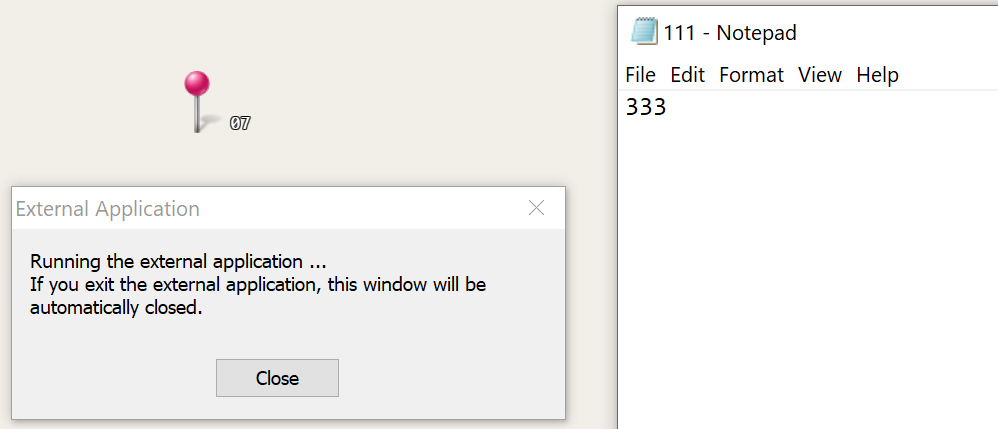
On the map, hold down the Ctrl key and click the placemark icon to open the TXT file (D:/111.txt) by using Notepad.
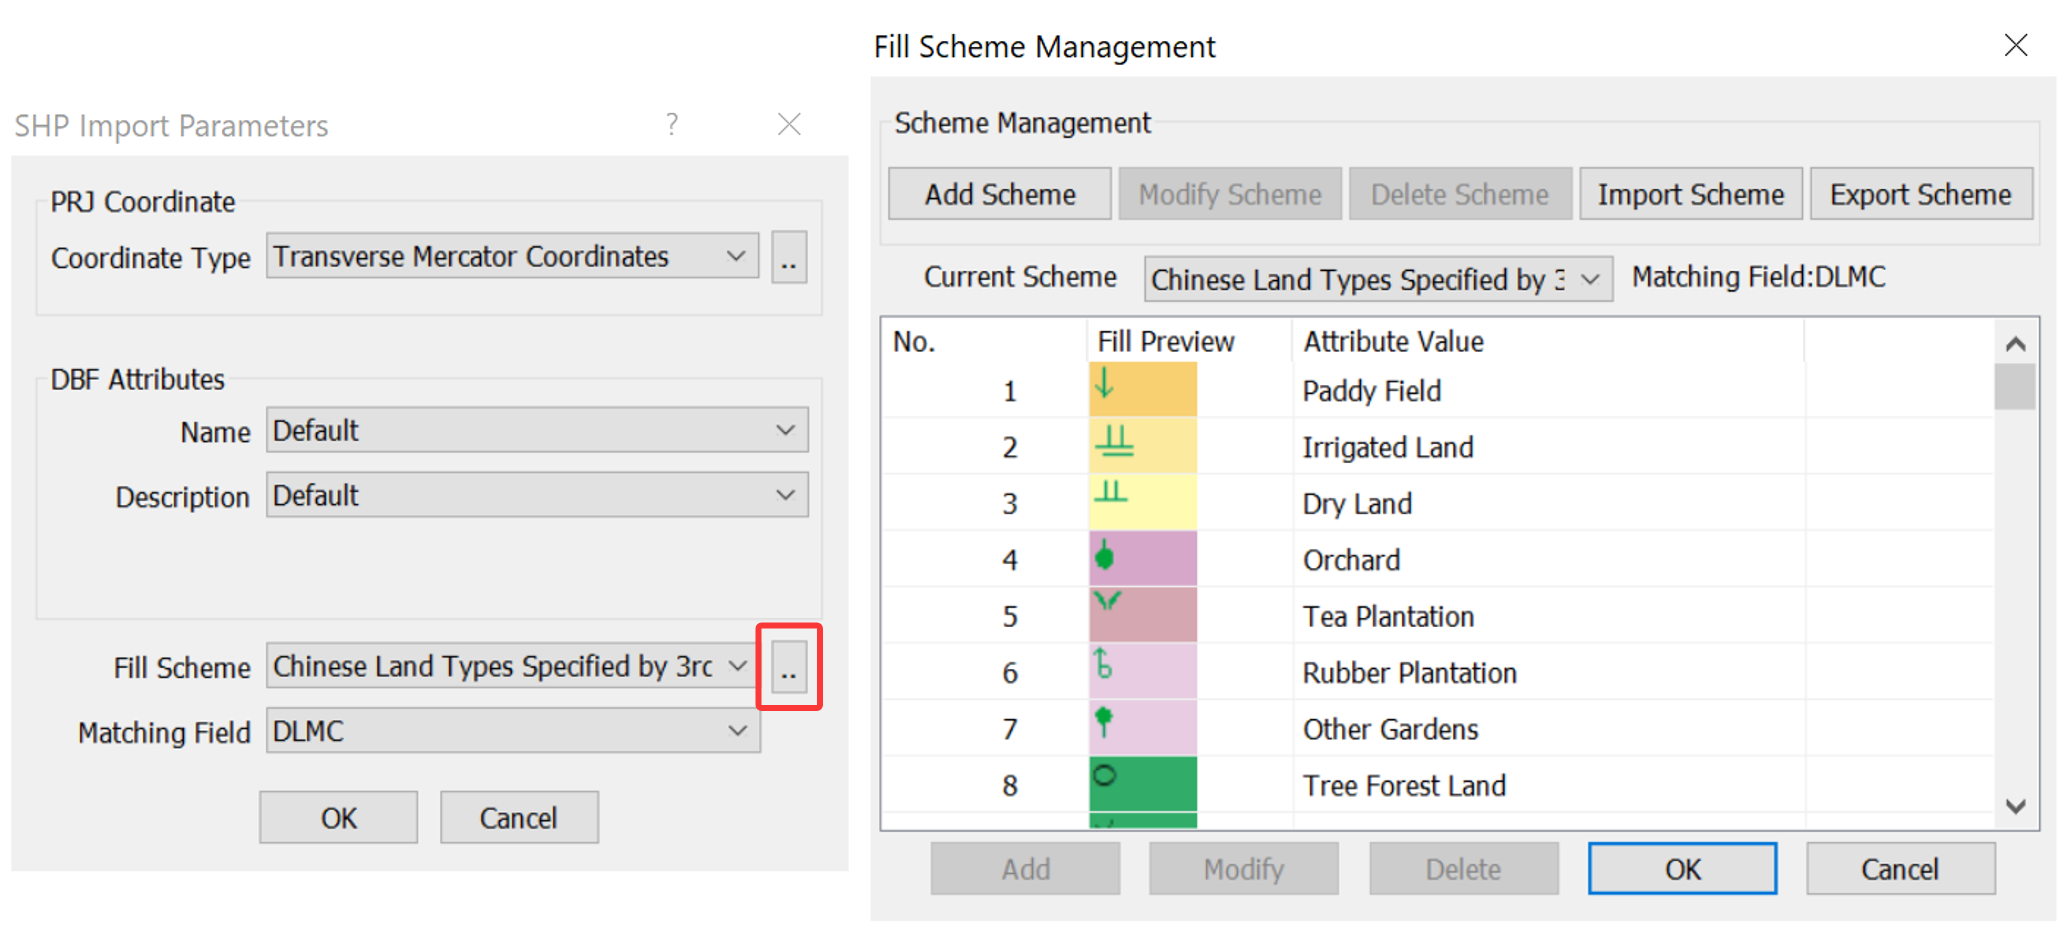
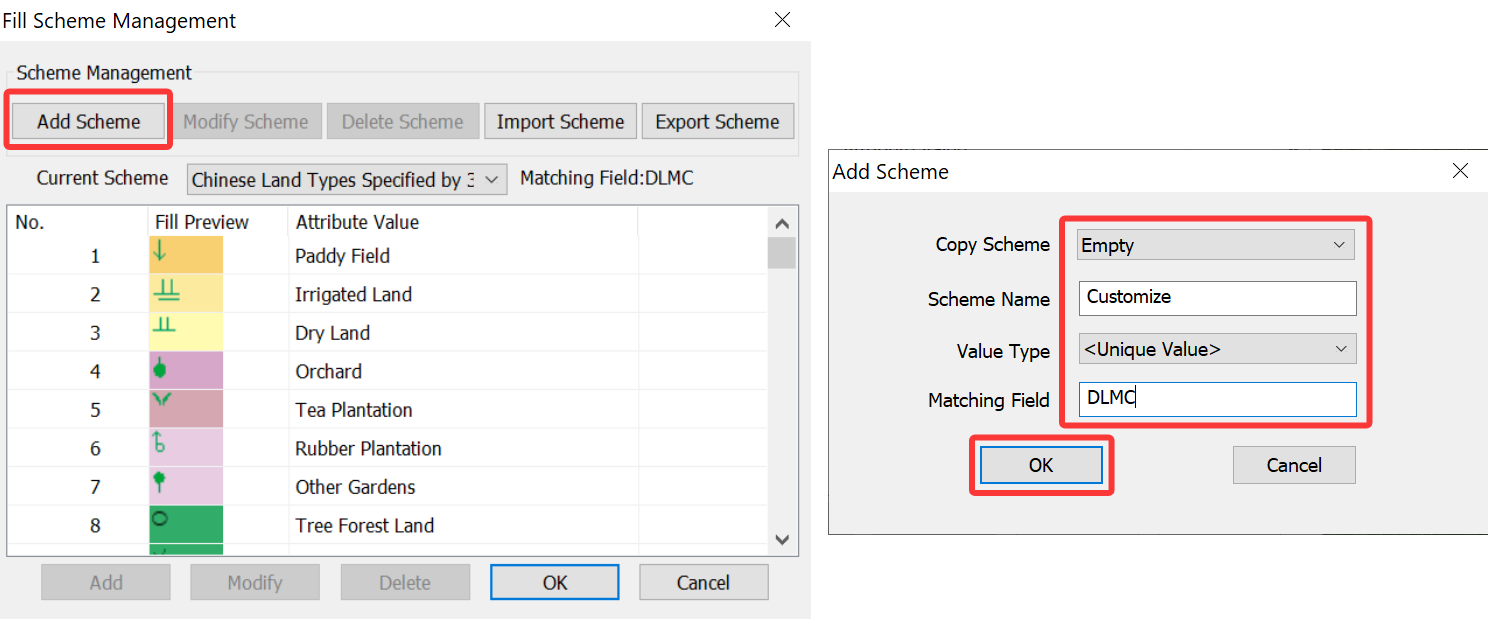
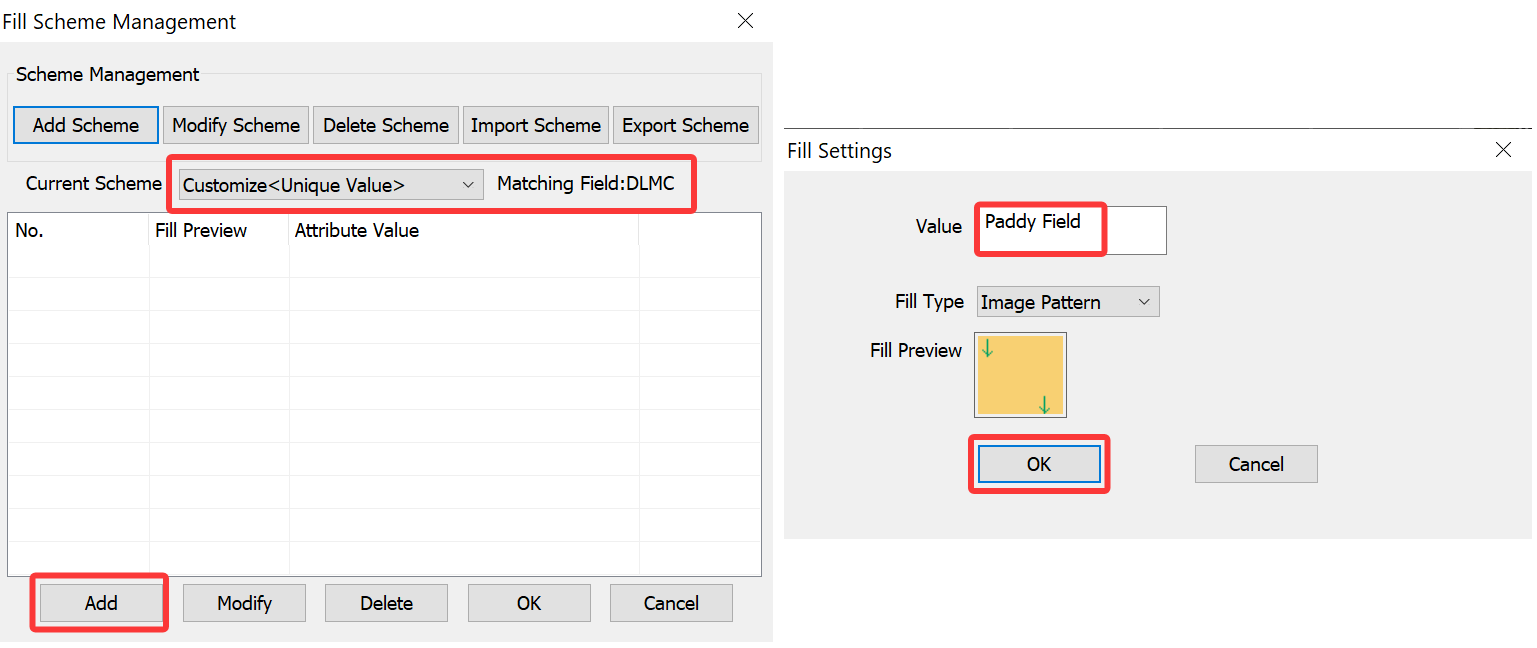
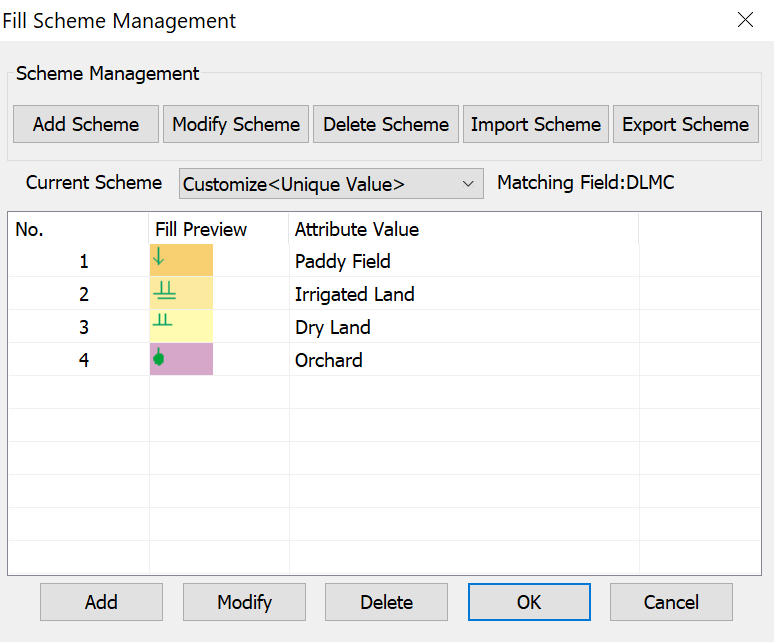
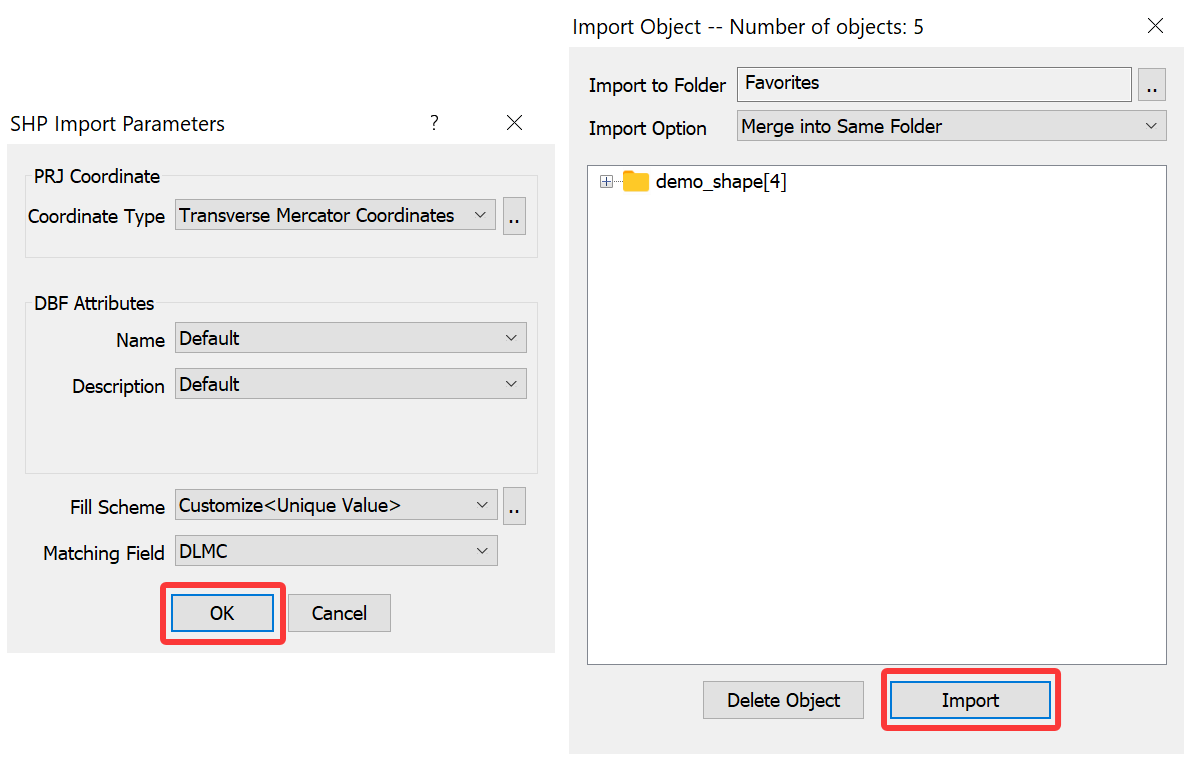
 button next to the fill scheme field. In the [Fill Scheme Management] dialog box, you can add schemes, and modify, delete, or export the added schemes. You can also import pre-defined .ovspc fill schemes. The built-in fill schemes cannot be modified or deleted.