To use the QubiMap VIP features on a computer within an intranet, offline authorization is required. Once the computer is authorized, as long as the device ID remains unchanged, you can keep using the VIP features (excluding account login and cloud synchronization) until the VIP service plan expires. Note that the device ID may change if you replace the motherboard, CPU, or network card.
★ Note:
(1) Each VIP offline license (authorization code) can only be used on one device. You cannot change the device.
(2) If the device code changes due to the replacement of computer components, the offline authorization expires. In this case, you need to purchase a new VIP offline license (authorization code).
(3) After updating the QubiMap software, you can reauthorize the computer for free if the VIP service plan has not expired.
1. Procedure
Assume that you have two computers: Computer A, which is connected to the Internet, and Computer B, deployed within the intranet. You can use Computer A to authorize Computer B so that the QubiMap VIP features are available on Computer B.
Before offline authorization, make sure that QubiMap is installed on both Computer A and Computer B.
Log in to your QubiMap account on Computer A. If you don’t have an account, please sign up.
QubiMap Coins are required for offline authorization, so make sure that your account has sufficient QubiMap Coins before authorization. For more information about how how to purchase QubiMap Coins, see the help document “How to purchase QubiMap Coins“.
1.1. Retrieve the device code and registration code of Computer B
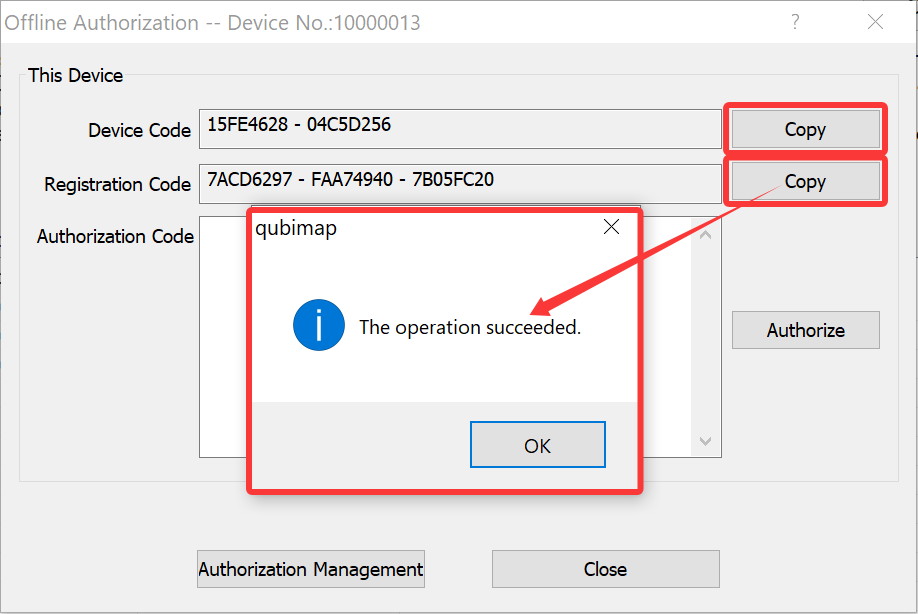
Start the QubiMap software on Computer B. Choose [Help] > [VIP Management]. In the dialog box that appears, click [Offline Authorization].

Click [Copy] to copy the device code and registration code respectively.
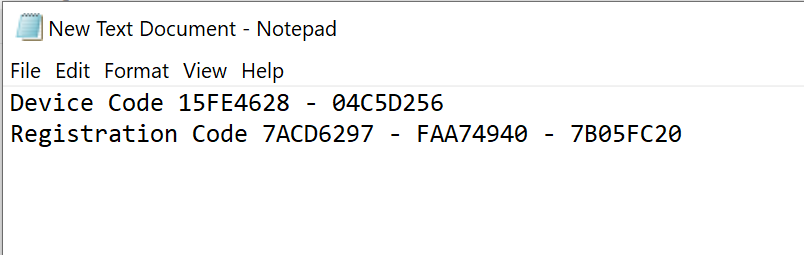
Paste them into Notepad and then copy the TXT file to Computer A.
1.2. Upgrade the VIP service plan and Generate an authorization code
On the main UI of QubiMap on Computer A, Choose [Help] > [VIP Management]. In the dialog box that appears, click [Offline Authorization].
In the [Offline Authorization] dialog box, click [Authorization Management].
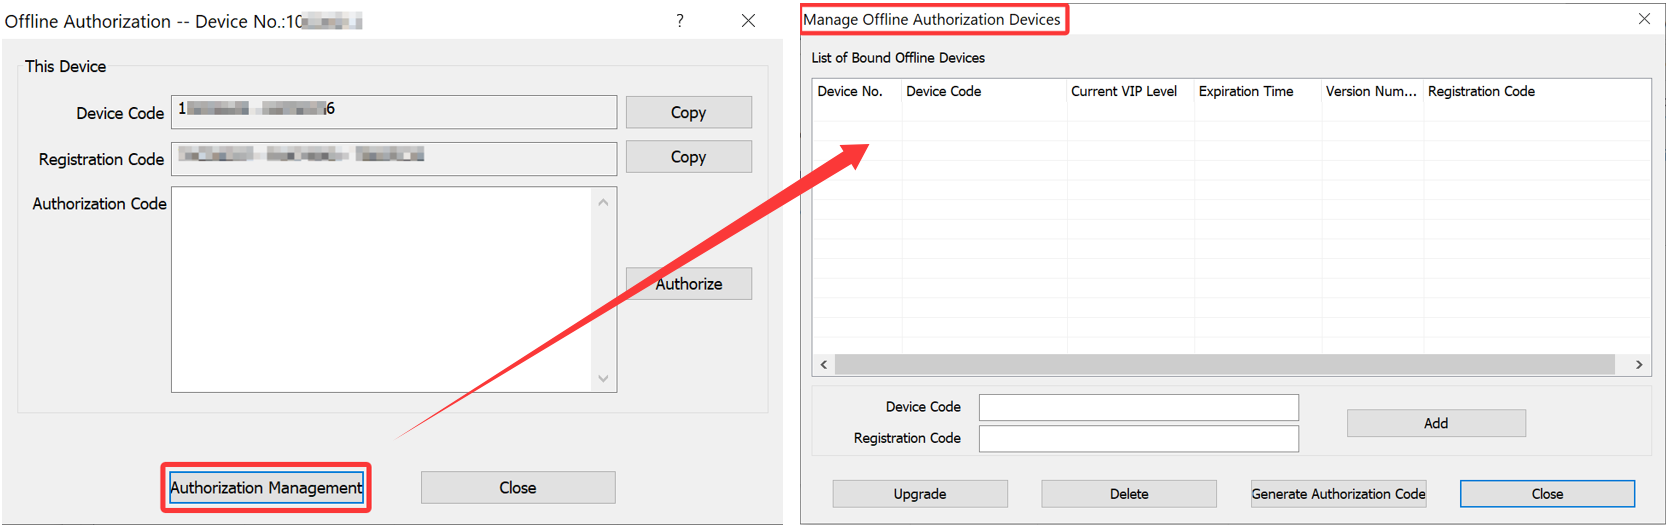
Enter the device code and registration code of Computer B in the corresponding fields, and click [Add]. The added device is displayed in the list.
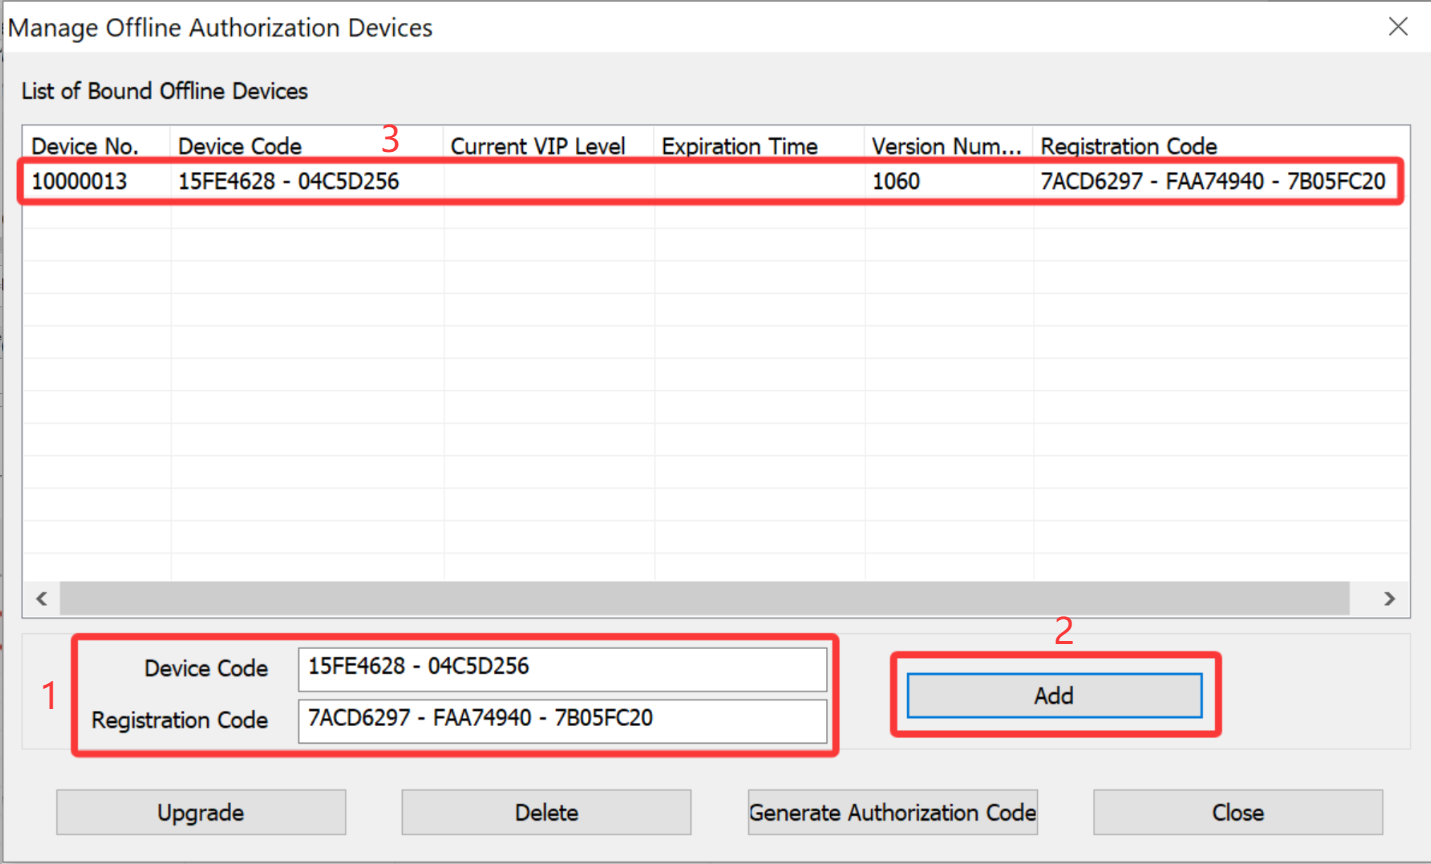
Select the device, and click [Upgrade]. In the [Upgrade VIP for Offline Device] dialog box, set the [VIP Level] and [VIP Validity Period] parameters, and click [OK].
☆ Note: The system will prompt you how many QubiMap Coins are needed. Make sure that your account has enough QubiMap Coins.
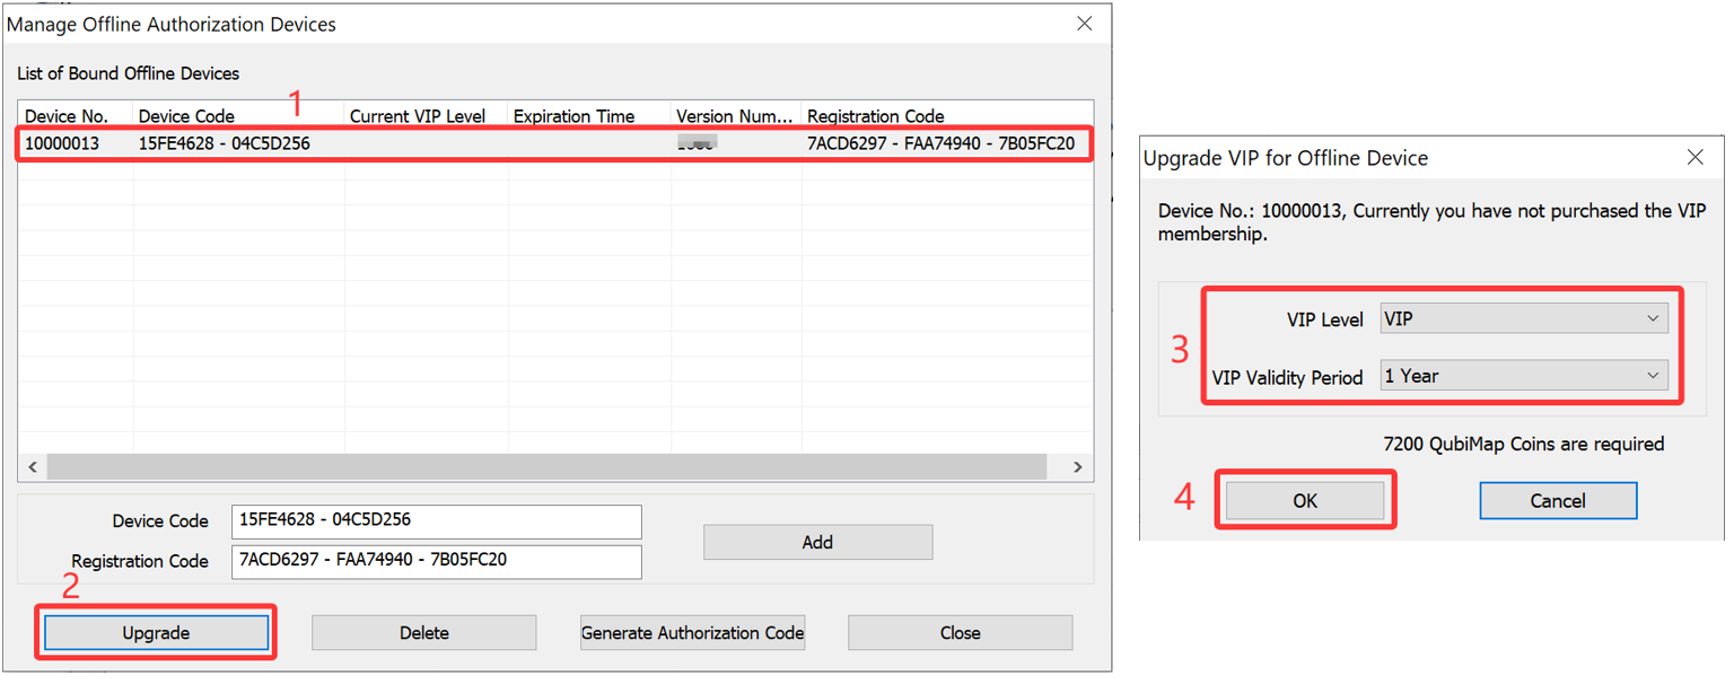
Check the [I have read and agree] box, and click [OK]. The message “Purchased.” appears, indicating that the purchase is successful.

Select the device, and click [Generate Authorization Code]. The generated authorization code is displayed in the window that appears.
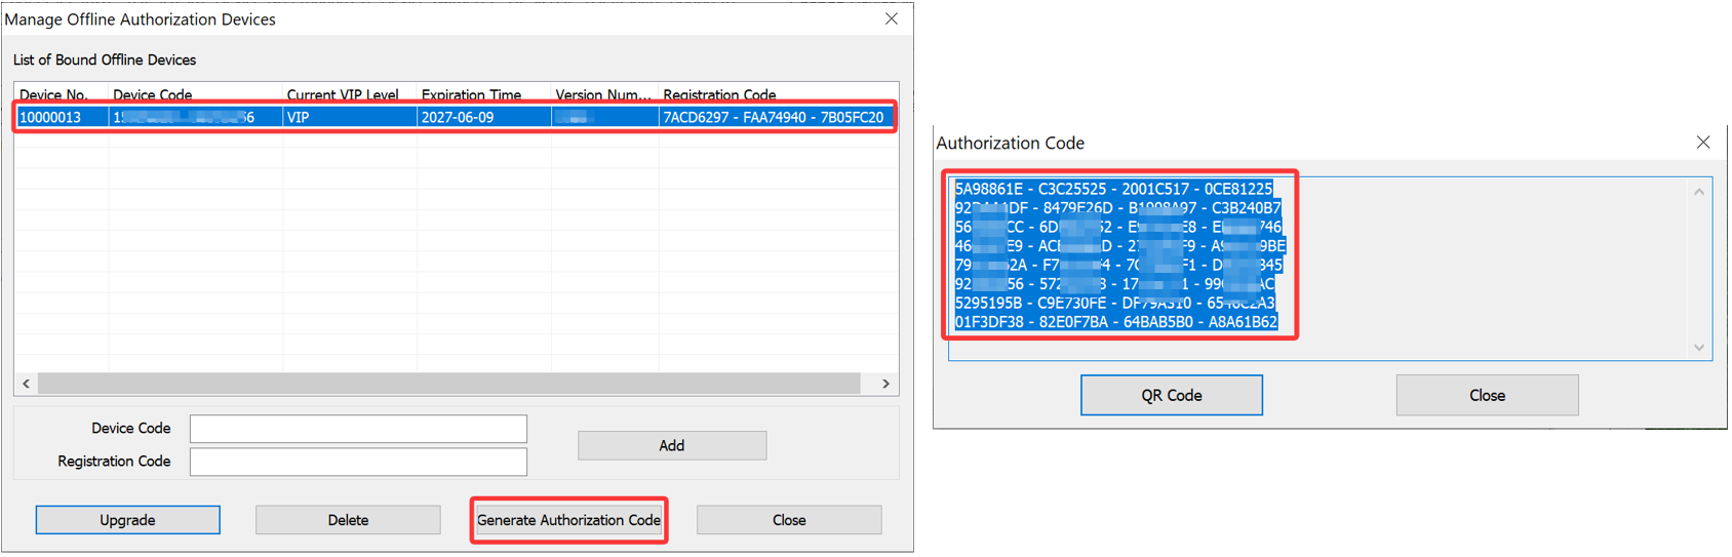
Paste it into Notepad and then copy the TXT file to Computer B.
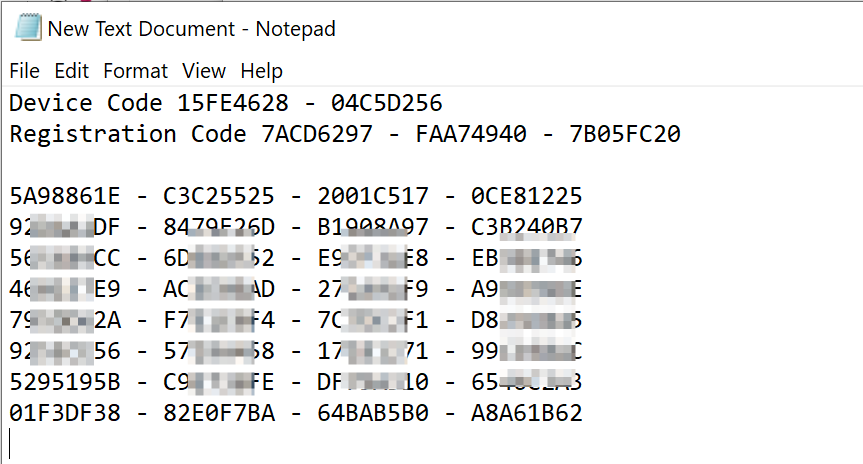
1.3. Authorize the offline device
On the main UI of QubiMap on Computer B, Choose [Help] > [VIP Management]. In the dialog box that appears, click [Offline Authorization].
In the [Offline Authorization] dialog box, copy the authorization code from the TXT file into the [Authorization Code] field, and click [Authorize].
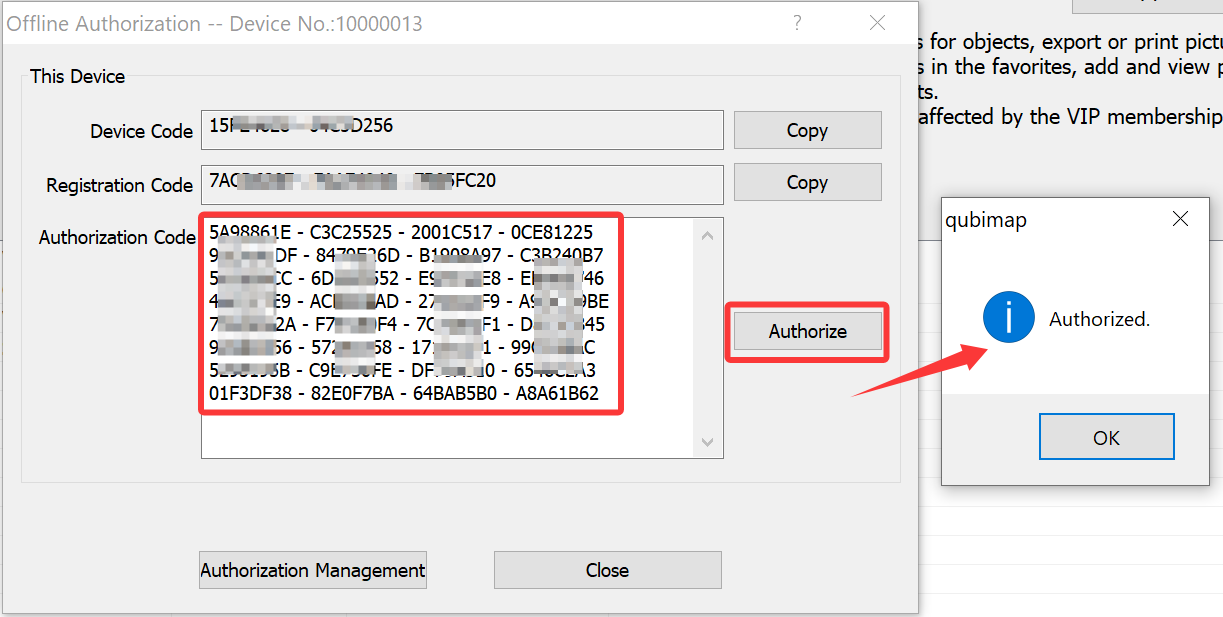
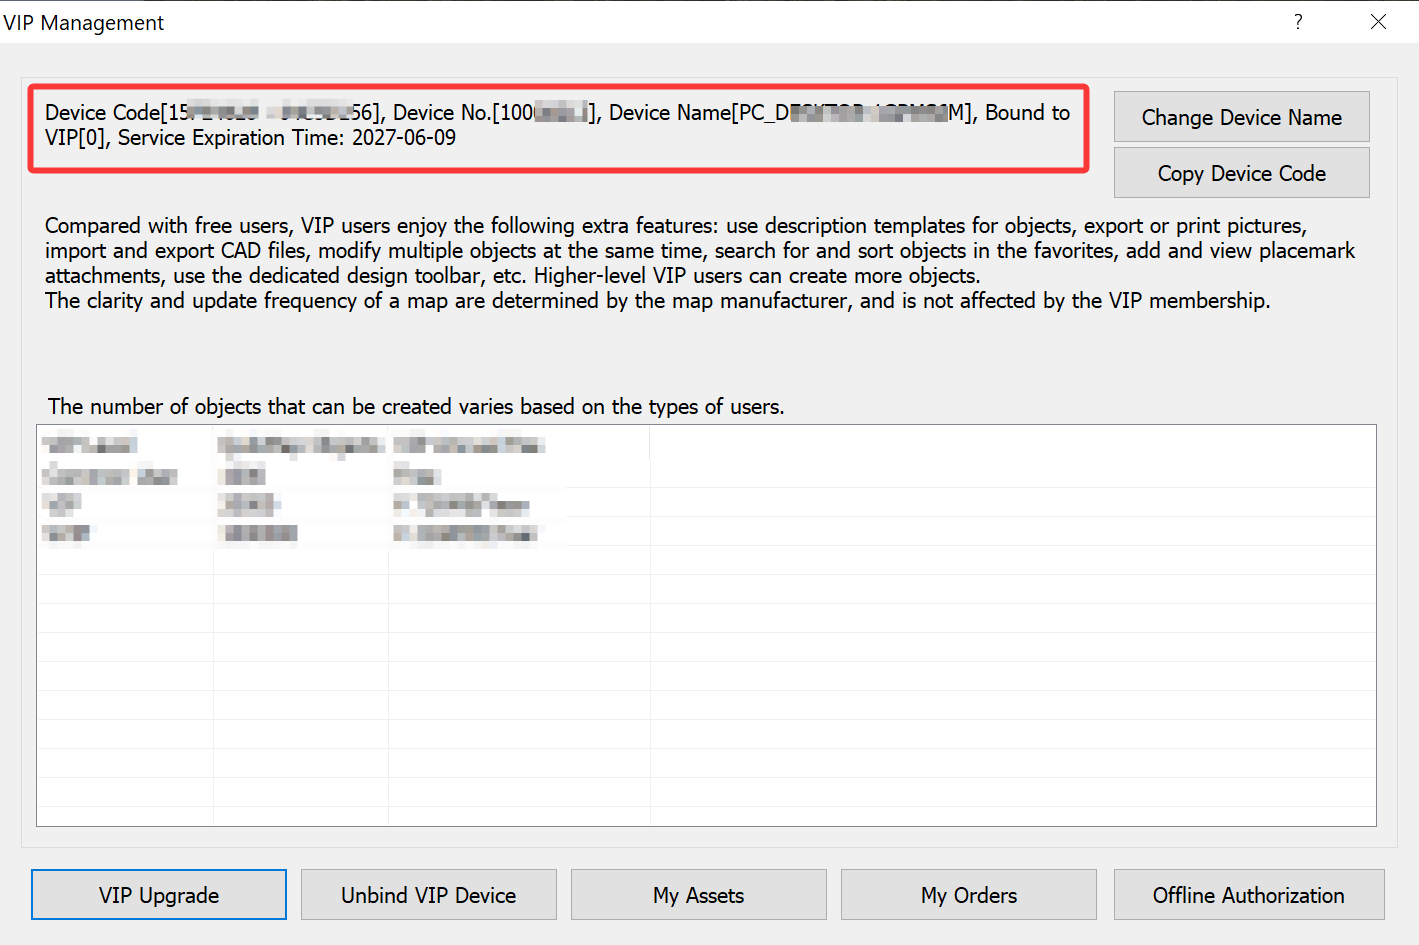
After the authorization is successful, you can view the authorization information in the [VIP Management] dialog box.
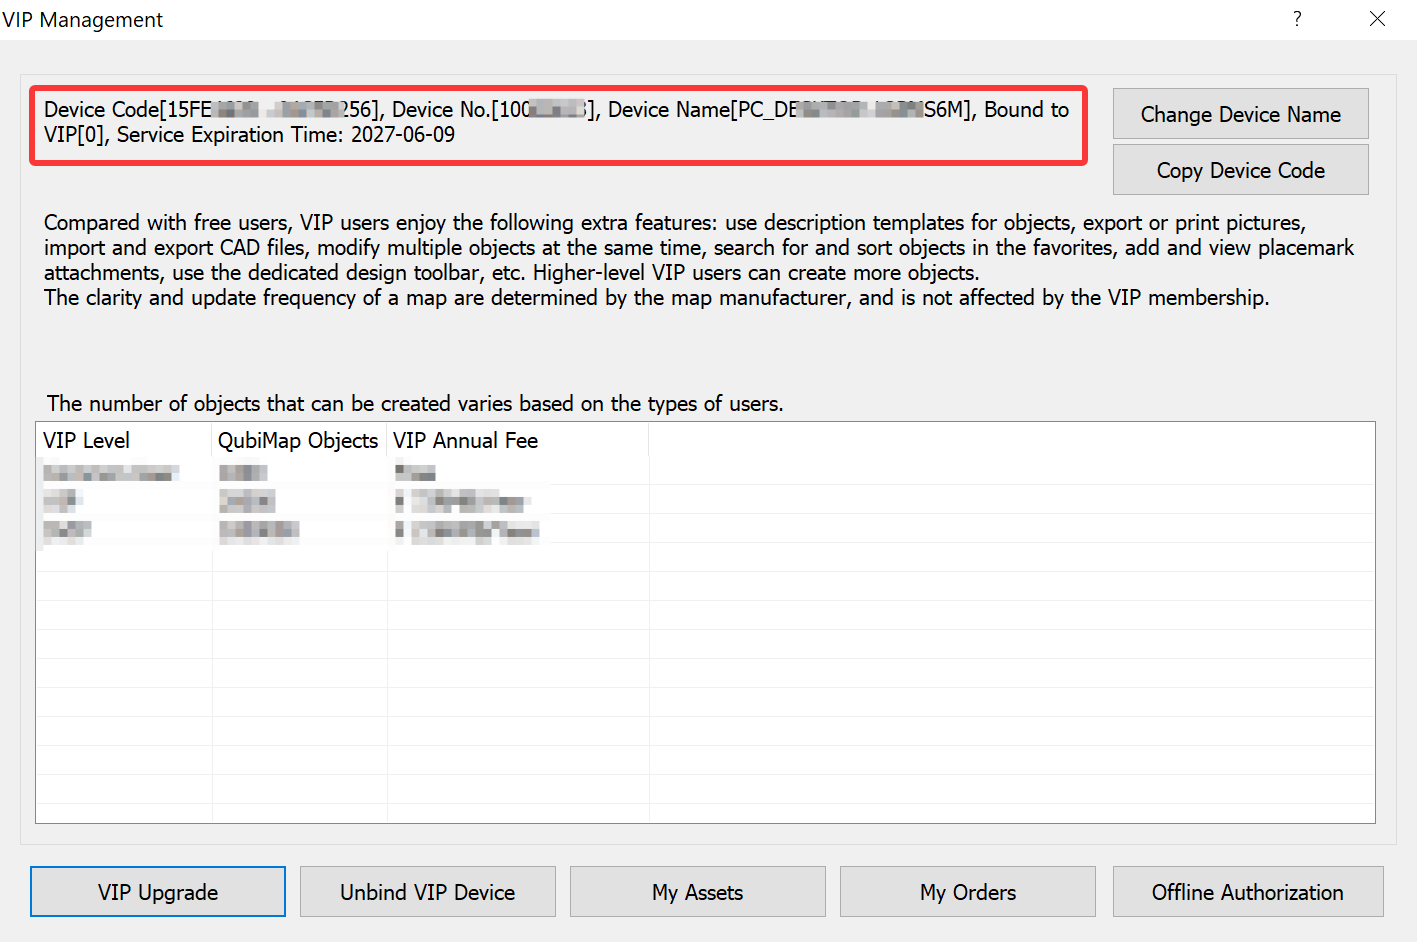
2. Reauthorize the computer after software updates
If you update the QubiMap software on the offline computer, the VIP plan will become invalid. In this case, you can reauthorize the computer for free.
As shown in the following figure, the version number of QubiMap previously installed on Computer B within the intranet is 10.5.6. The current version number is 10.6.0.
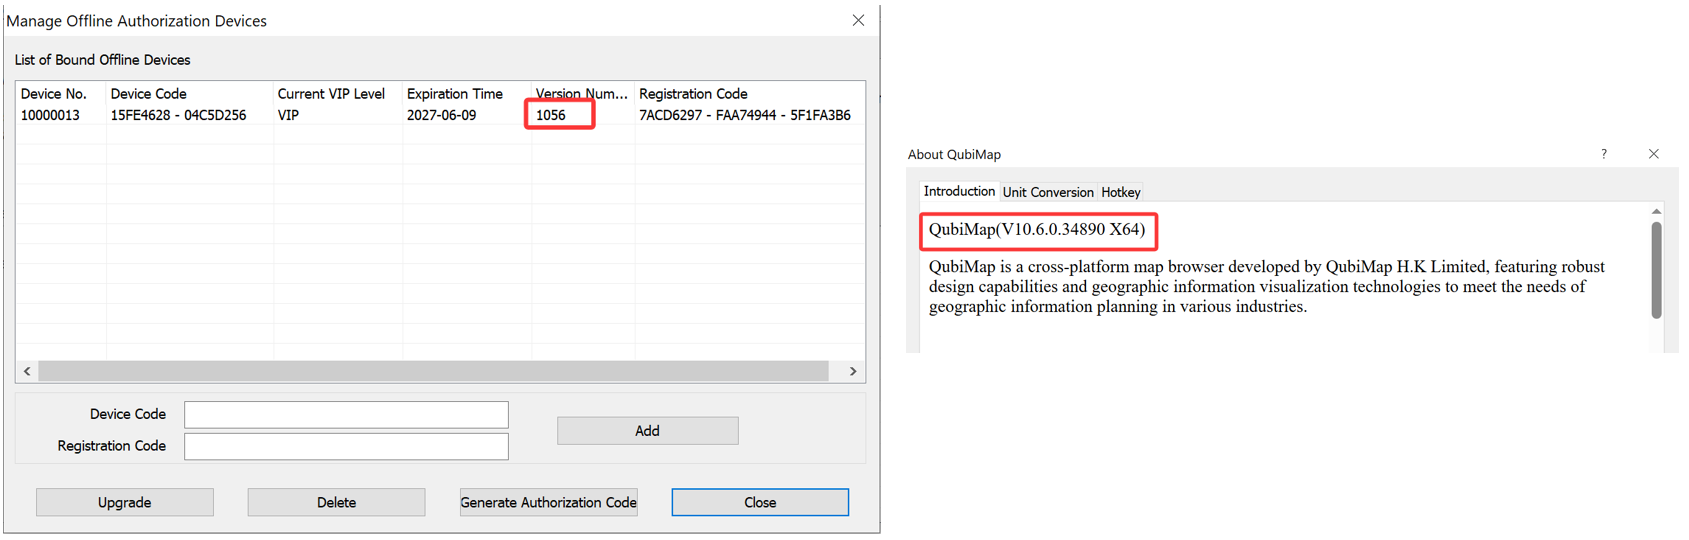
You can reauthorize the computer by following these steps:
On the main UI of QubiMap on Computer B, Choose [Help] > [VIP Management]. In the dialog box that appears, click [Offline Authorization]. Copy the device code and registration code to a TXT file, and then copy the file to Computer A.
On the main UI of QubiMap on Computer A, Choose [Help] > [VIP Management]. In the dialog box that appears, click [Offline Authorization]. In the [Offline Authorization] dialog box, click [Authorization Management]. Enter the new device code and registration code of Computer B, and click [Add].
The displayed version number becomes 1060, which indicates the current version of QubiMap installed on computer B.
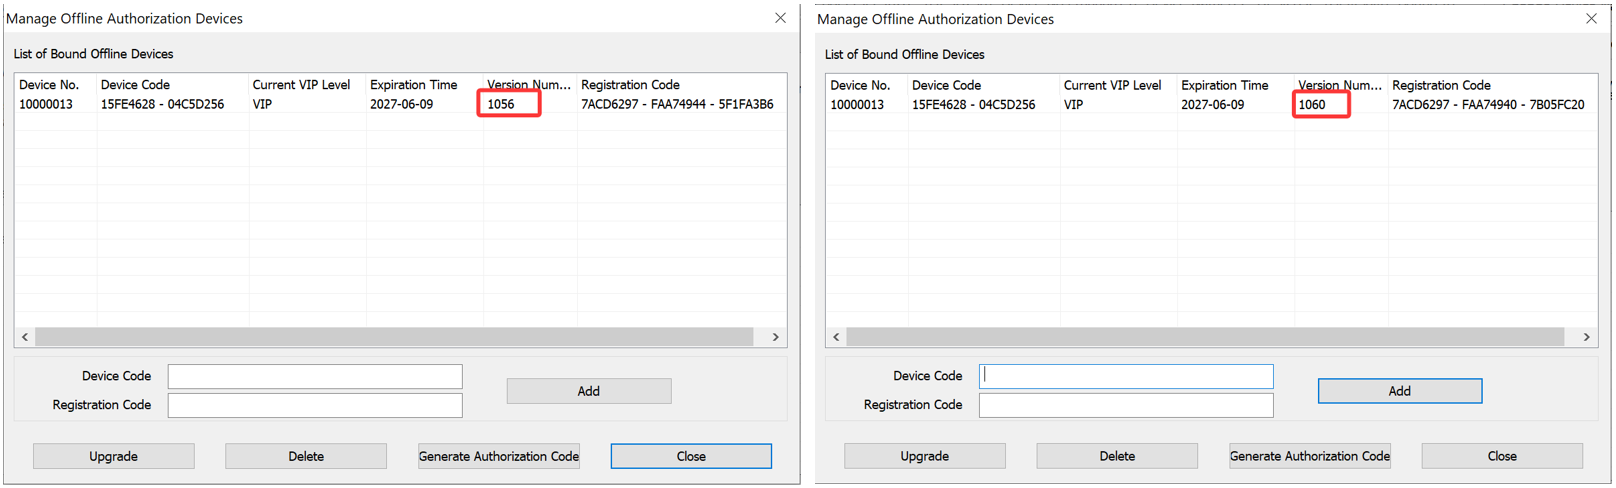
Select the device, and click [Generate Authorization Code].
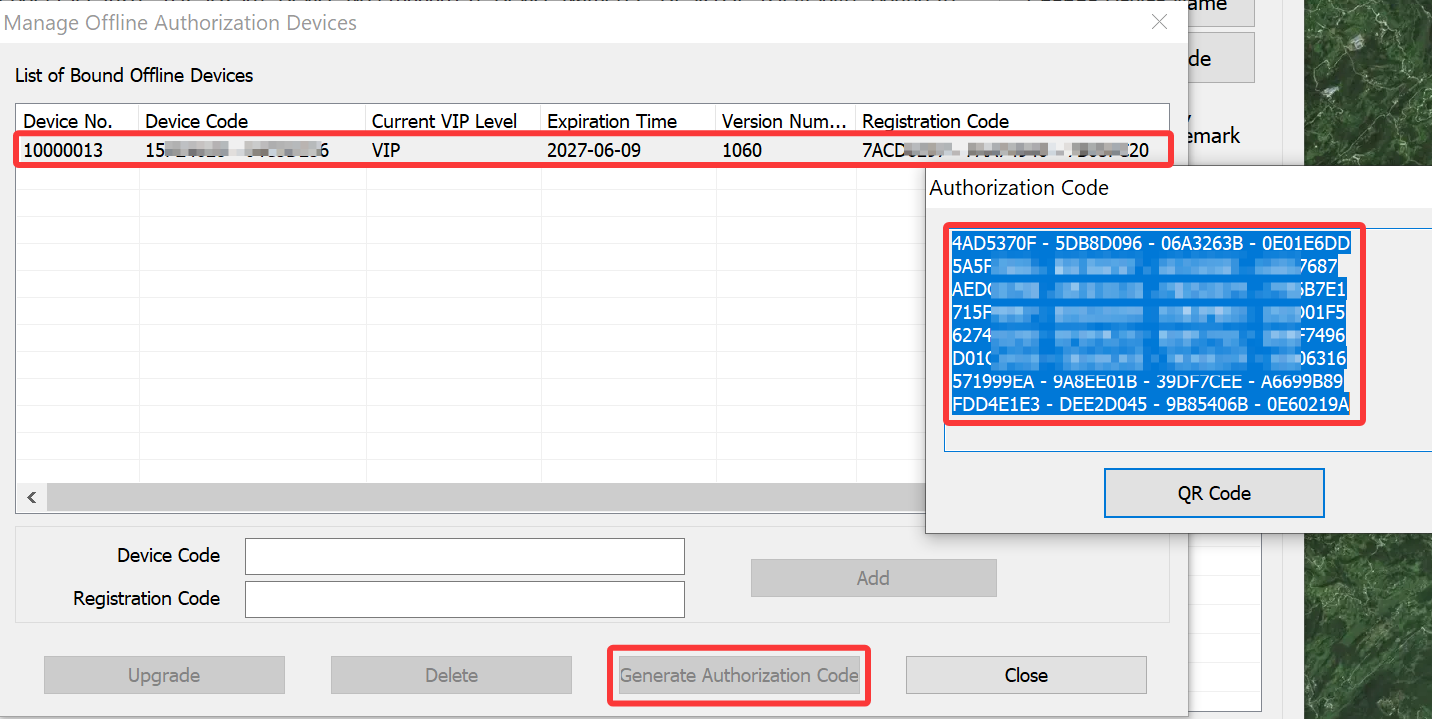
Paste the new authorization code into Notepad and then copy the TXT file to Computer B.
On the main UI of QubiMap on Computer B, Choose [Help] > [VIP Management]. In the dialog box that appears, click [Offline Authorization].
In the [Offline Authorization] dialog box, copy the authorization code from the TXT file into the [Authorization Code] field, and click [Authorize].
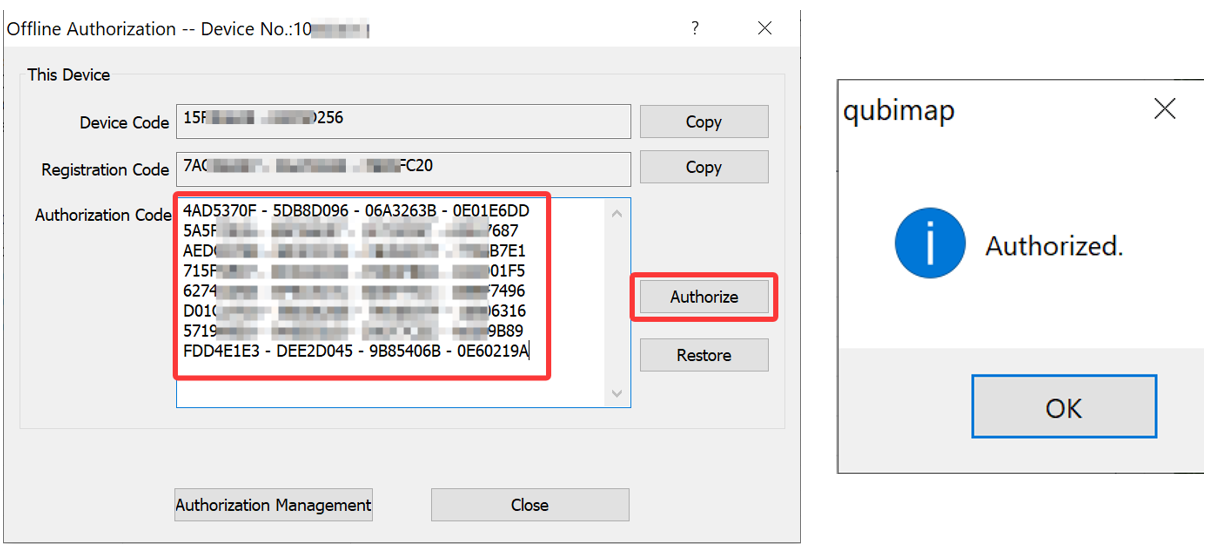
After the authorization is successful, the QubiMap VIP plan becomes valid again on Computer B. You can view the authorization information in the [VIP Management] dialog box.
A trustworthy map browser and GIS software platform now available to global customers