How to create a map animation and export it as an MP4 file
Posted on Categories Common Features
QubiMap provides the map animation feature to dynamically and vividly demonstrate various scenarios on the map, which includes location jumping, track tour, text animation, time animation, object animation, voice playback, image animation, and so on. You can use map animations for project presentation, scenario simulation, and video export.
This article describes how to create a map animation and export it as a MP4 video.
1. Create a map animation
On the QubiMap main UI of your PC, choose [Map Objects] > [Map Animation].
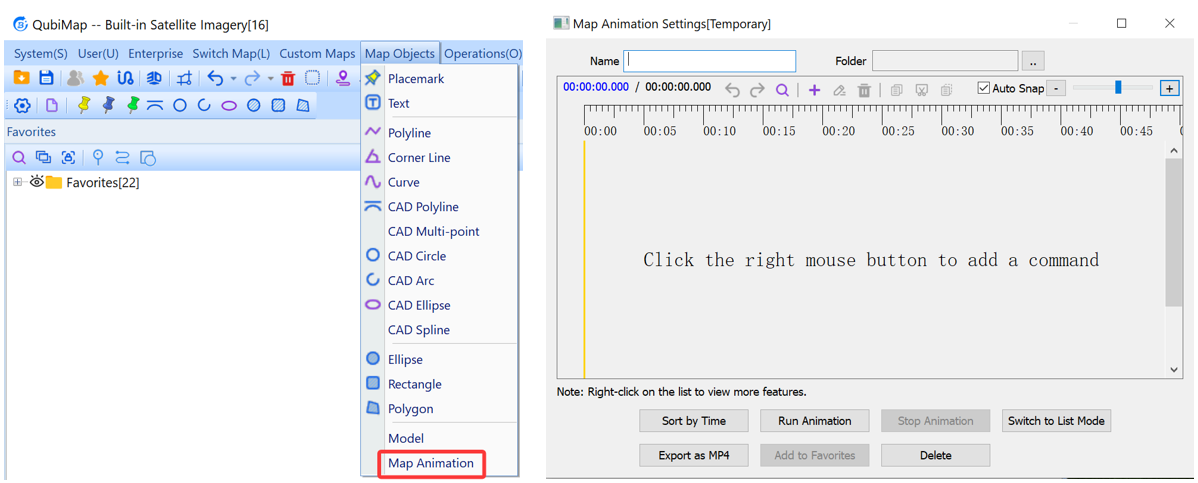
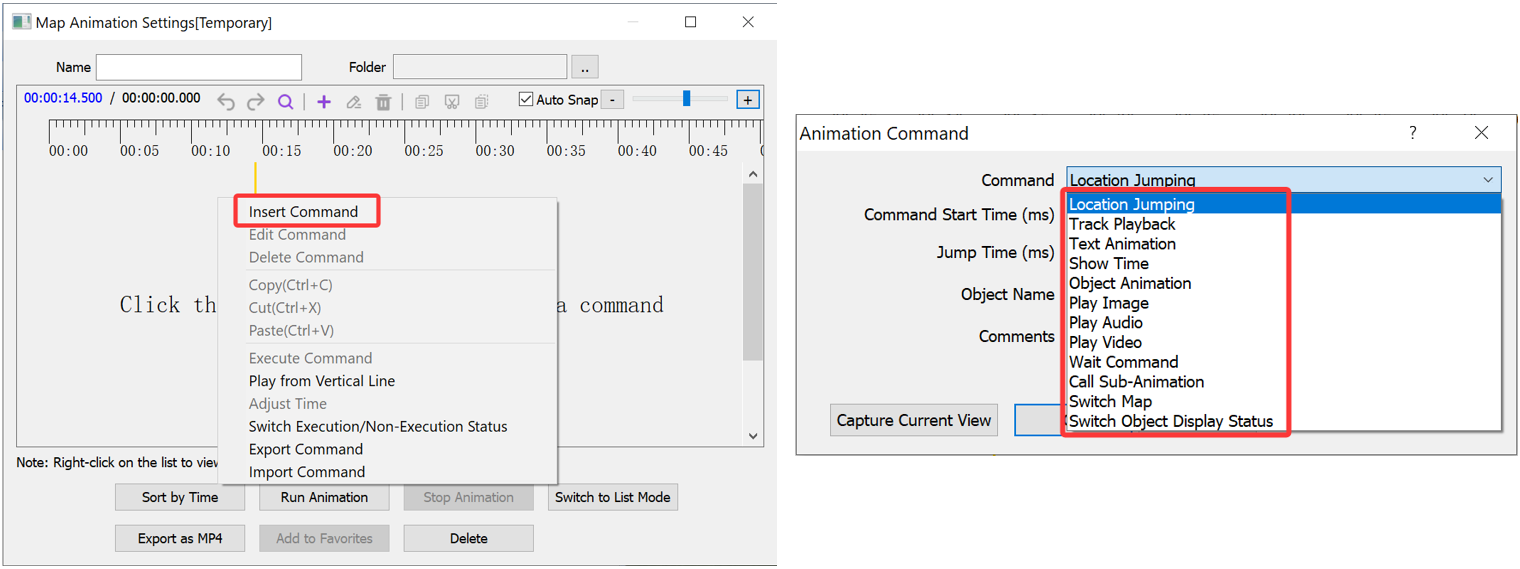
You can right-click on the command list and select [Insert Command] to add an animation command. The options include [Location Jumping], [Track Playback], [Text Animation], [Show Time], [Object Animation], [Play Image], [Play Audio], [Play Video], [Wait Command], [Call Sub-Animation], [Switch Map], and [Switch Object Display Status]. You can add various commands as needed to generate an animation.
* Note: To save more than 10 animation commands, you need to purchase a VIP plan. *
① Location Jumping
Select [Location Jumping] from the command drop-down list. Set the parameters as needed.
Command Start Time (ms): The start time to execute this command. To start from the beginning, set it to 0. You can also set it to a time value after another animation command ends.
Jump Time (ms): The duration of the jump.
Object Name: You can click the  button next to [Object Name] to select an existing placemark, track, or shape as the jump destination. You can also click the
  button to enter the latitude, longitude, altitude, and viewpoint distance as needed. If you want to use the current view’s location as the jump destination, click the [Capture Current View] button.
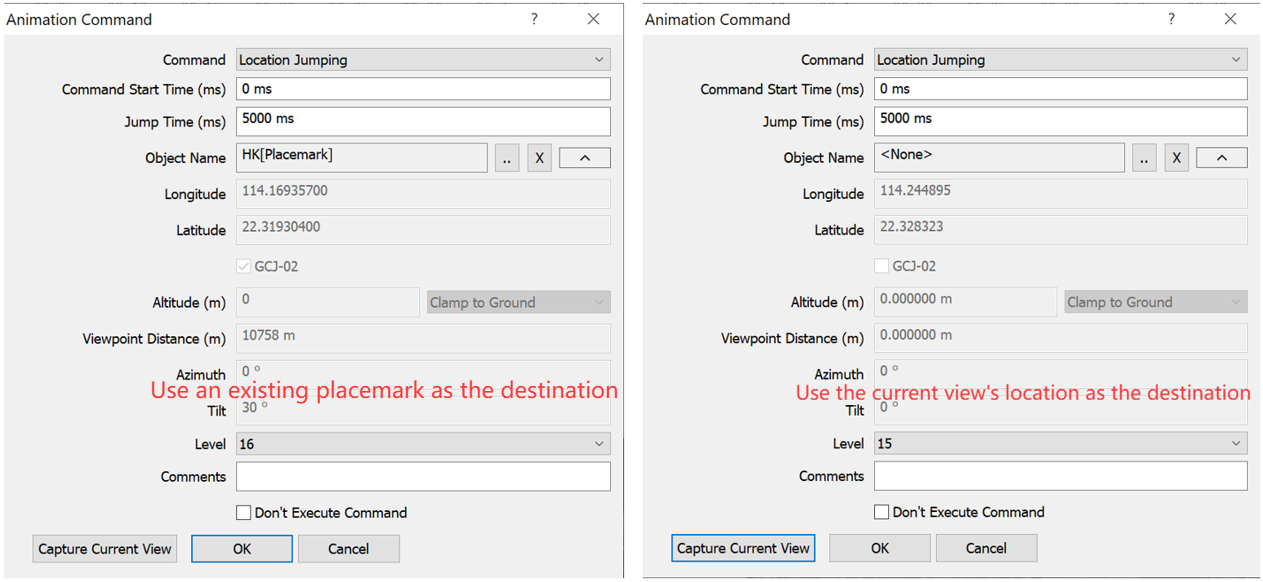
Comments: You can add a description to this animation command.
Don’t Execute Command: Check this box to prevent this command from running when you run the map animation.
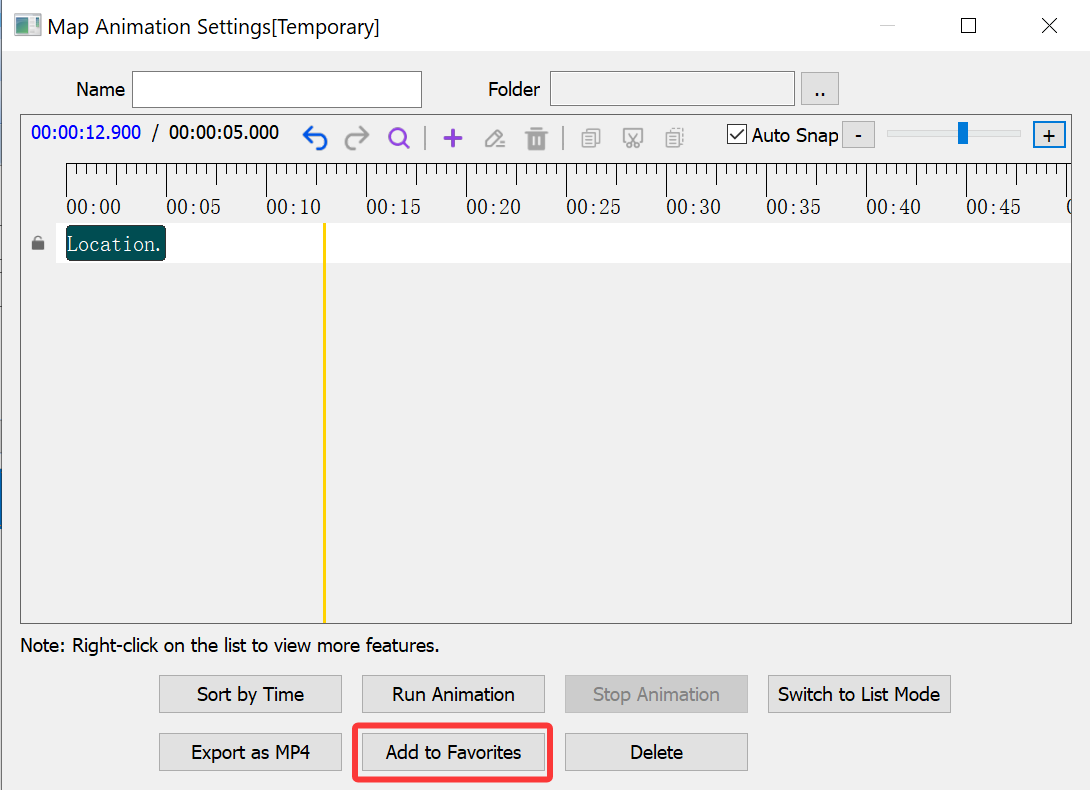
After you set the parameters, click [OK]. In the [Map Animation Settings] dialog box, click [Add to Favorites] to add the animation to your favorites.
② Track Playback
Select [Track Playback] from the command drop-down list. Set the parameters as needed. You can click the  button next to [Track Name] to select a single track or a folder that contains multiple tracks.
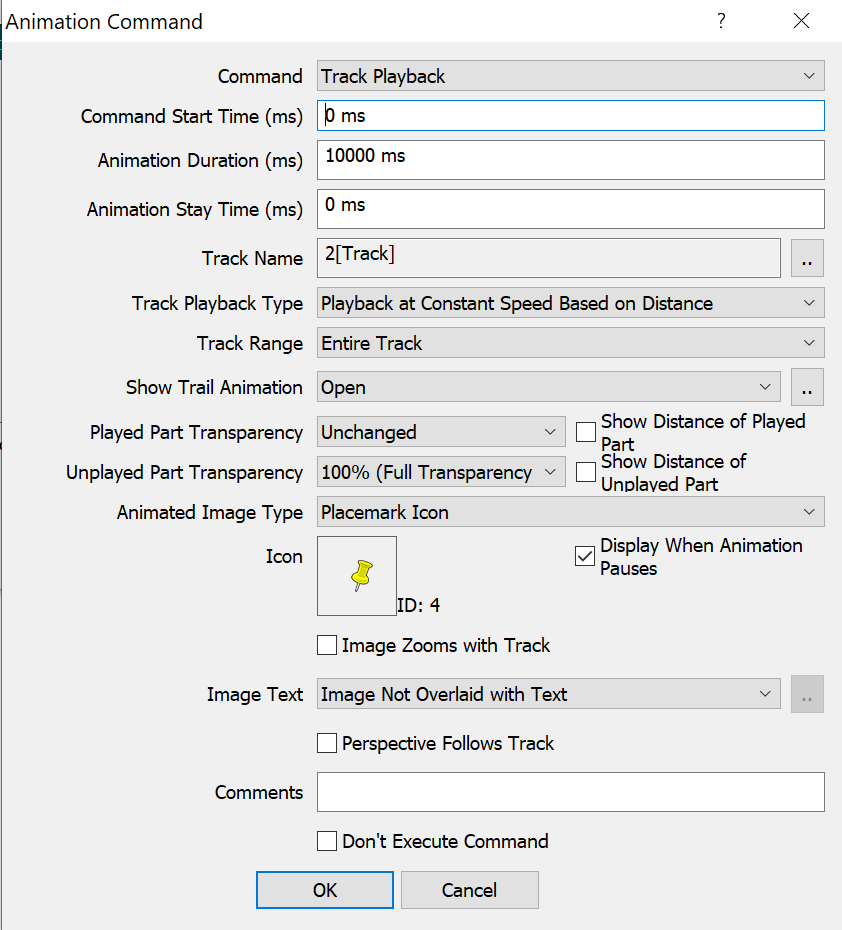
Command Start Time (ms): The start time to execute this command. To start from the beginning, set it to 0. You can also set it to a time value after another animation command ends.
Animation Duration (ms): The time period required for the animation playback.
Animation Stay Time (ms): The stay period after the animation playback is completed.
Track Playback Type: You can select one of the following values as needed:
A. Playback at Constant Speed Based on Distance: Play the track animation at a constant speed based on the track distance;
B. Instant Playback with Same Interval of Track Time: Play the track animation immediately with the same interval based on the track time range;
C. Scheduled Playback with Same Interval of Track Time: Play the track animation immediately with the same interval based on the specified track time range;
Note: If you need to set a start time and end time (time range), you must first go to [Track Settings] → [Advanced] → [Edit Track Points] to add time parameters to the track points. Otherwise, the [Track Playback] command cannot be executed. The starting point of the track must have a time value, and at least two track points need to have time values. Additionally, the time values of track points must be in ascending order. If the time value of a track point is no later than the previous point, that time value is skipped. If intermediate points lack time values, the system distributes the time evenly based on the distance.
Track Range: Set the range of the track for playback. You can specify the entire track, or select some part of the track by distance or time.
Show Trail Animation: If you enable this feature, the trail is displayed in the animation image during track playback. You can click the  alt=”image-20240110171422511″ style=”zoom:80%; The “/> button to set the trail display style.
Played Part Transparency: Set the transparency for the played part of the track. You can select a value from 0% (opaque) to 100% (fully transparent).
Unplayed Part Transparency: Set the transparency for the unplayed part of the track. You can select a value from 0% (opaque) to 100% (fully transparent).
Animation Image Type: You select a placemark icon or image to move on the track during the playback.
Image Text: You can select one of the following values as needed:
A. Image Not Overlaid with Text: No text is displayed on the image (icon);
B. Image Not Overlaid with Track Name: The track name is displayed on the image (icon);
C. Image Overlaid with Custom Text: Specify custom text to be displayed on the image (icon). You can also set the text position.
Comments: You can add a description to this animation command.
After you set the parameters, click [OK]. In the [Map Animation Settings] dialog box, click [Add to Favorites] to add the animation to your favorites.
③ Text Animation
Select [Text Animation] from the command drop-down list. Set the parameters as needed.
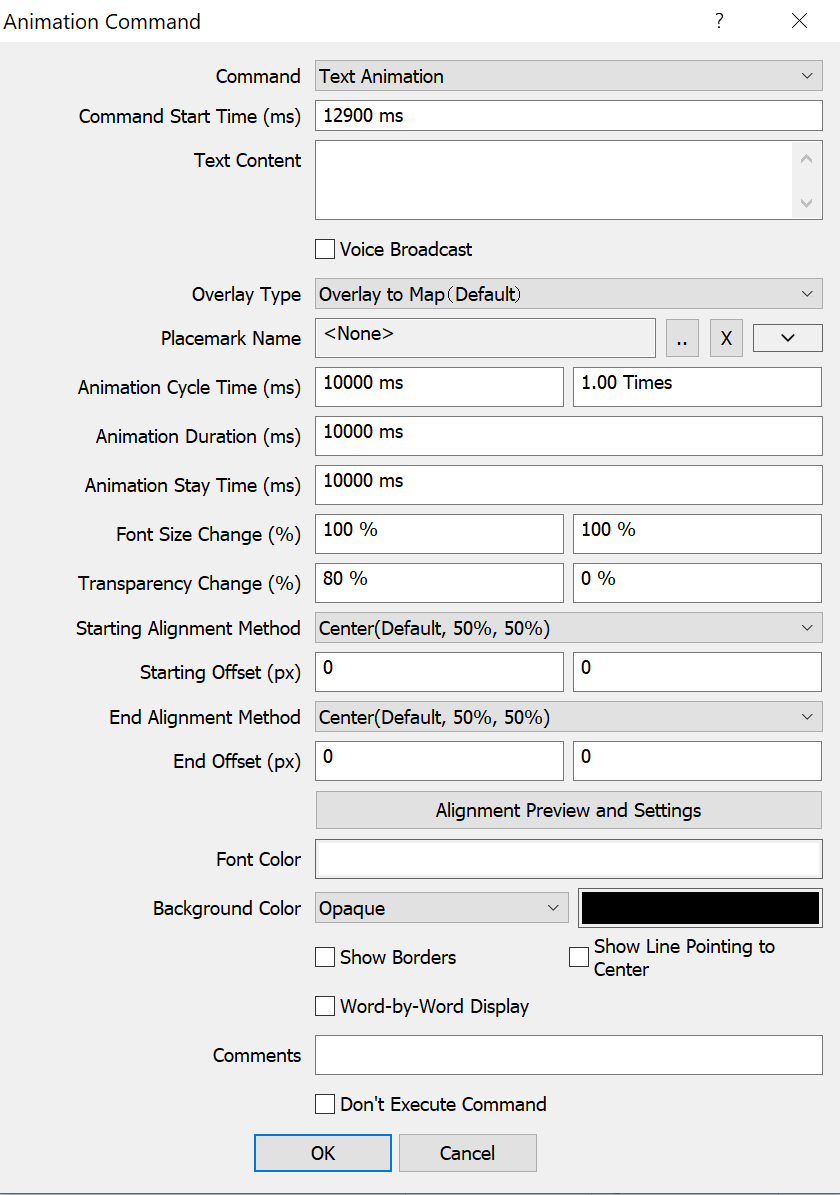
Text Content: Multi-line text is supported. You can use the Enter key to start a new line. To change the text color, add <#x> before the text, where x ranges from 0 to 8. 0 represents the default color that is specified by using the Font Color parameter, while 1–8 corresponds to black, white, red, green, blue, yellow, cyan, and magenta, respectively. For example, if the text content is “abc<#1>de<#3>fg<#0>kk”, “abc” and “kk” appear in the default color, “de” appears in black, and “fg” appears in red. Text animations also support voice broadcast, with dozens of different announcer voices available.
Overlay Type: You can select either of the following values as needed:
A. Overlay to Map (Default): Overlay the text to the specified placemark or Lat-Long point on the map.
You can click the  icon to select a placemark for overlay, as shown in the following figure:
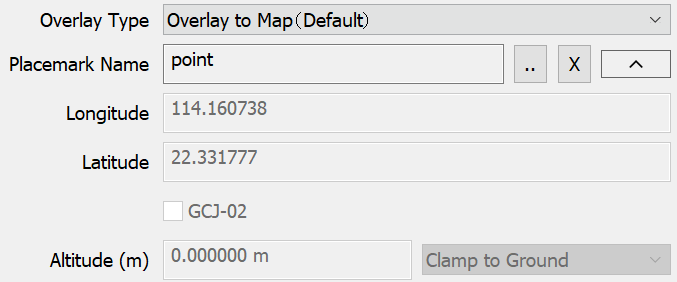
You can also click the  icon to select a placemark for overlay, as shown in the following figure:
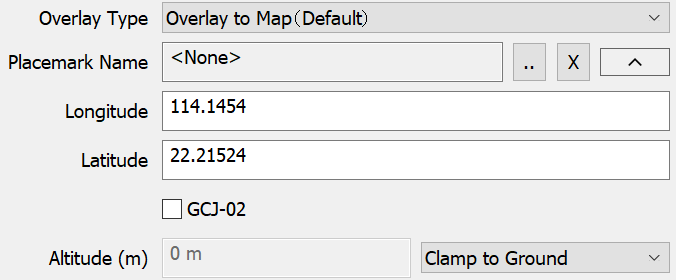
B. Overlay to Screen: Demonstrate the text directly on the screen.
Alignment: If you set the overlay type to [Overlay to Screen], this value is relative to the screen. If you set the overlay type to [Overlay to Map], this value is relative to the specified placemark or Lat-Long point.
Alignment Preview and Settings: You can view and set the text position on the [Text Animation Position Settings] page.
Set other parameters such as the animation time, font size, transparency, and font color as needed.
Then, click [OK]. In the [Map Animation Settings] dialog box, click [Add to Favorites] to add the animation to your favorites.
④ Show Time
This command is used to show the time information on the map as an animation. Select [Show Time] from the command drop-down list. Set the parameters as needed.
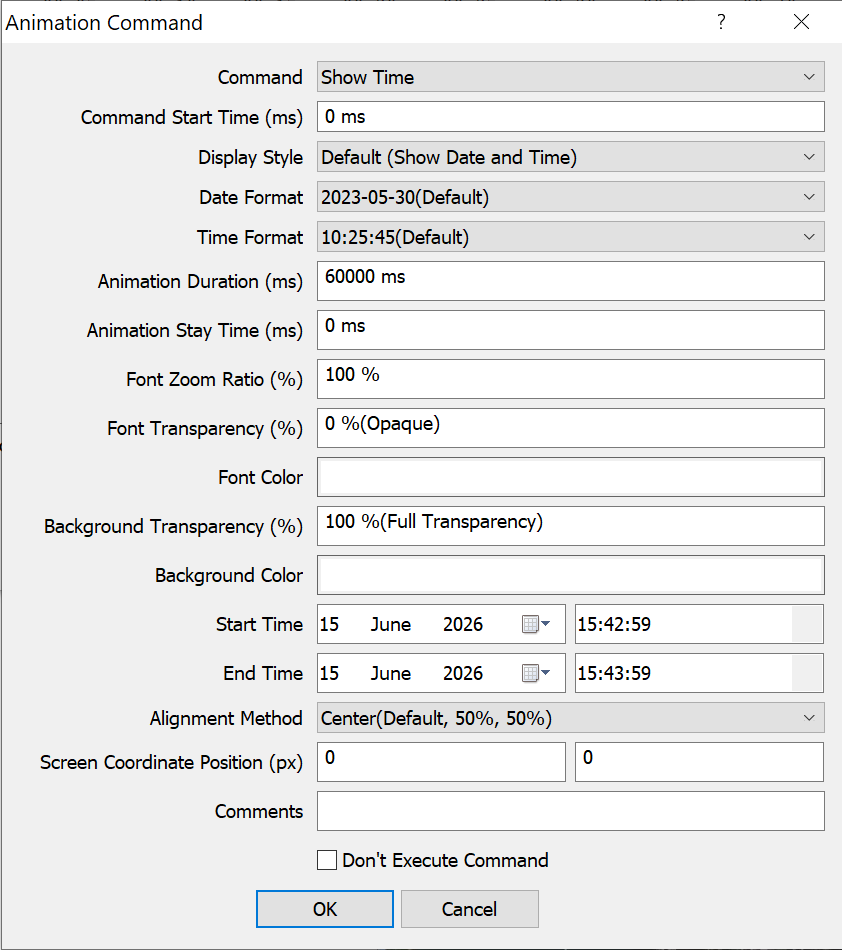
Then, click [OK]. In the [Map Animation Settings] dialog box, click [Add to Favorites] to add the animation to your favorites.
⑤ Object Animation
This command is used to show map objects including placemarks, tracks, and shapes on the map as an animation. Select [Object Animation] from the command drop-down list. Set the parameters as needed. You can click the button next to [Object Name] to select a single object or a folder that contains multiple objects.
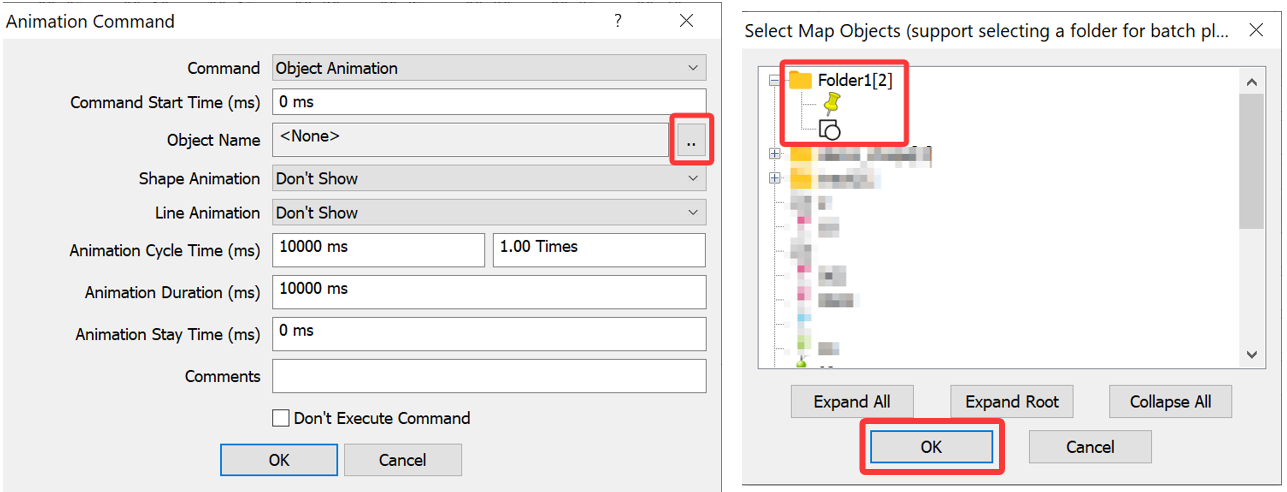
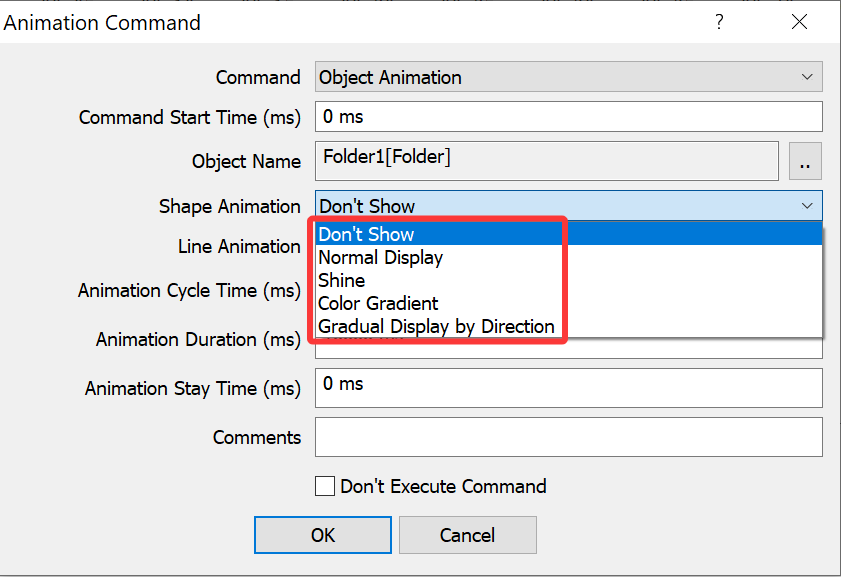
Shape Animation:
A. Don’t Show: Do not show shape objects while executing this command.
B. Normal Display: Show shape objects while executing this command.
C. Shine: Shape objects flash on the map.
D. Color Gradient: Shapes gradually change from the opposite color to the set color. For example, if the shape color is set to black, the color will gradually change from white to black during the animation playback.
E. Gradual Display by Direction: You can set the [Animation Angle] parameter, and shapes will be gradually displayed based on the angle.
Line Animation: The first 5 options are the same as [Shape Animation]. The additional option is [Gradually Display by Track Point], indicating that tracks will be gradually displayed based on track points.
Animation Cycle Time (ms): The time period required for the animation playback each time. You can set multiple cycle times.
Animation Duration (ms): The total time period required for the animation playback.
Animation Stay Time (ms): The stay period after the animation playback is completed.
Comments: You can add a description to this animation command.
After you set the parameters, click [OK]. In the [Map Animation Settings] dialog box, click [Add to Favorites] to add the animation to your favorites.
⑥ Play Audio
Select [Play Audio] from the command drop-down list. Set the parameters as needed. You can click the  button next to [Attachment Name] to select an audio file from the placemark attachment library.
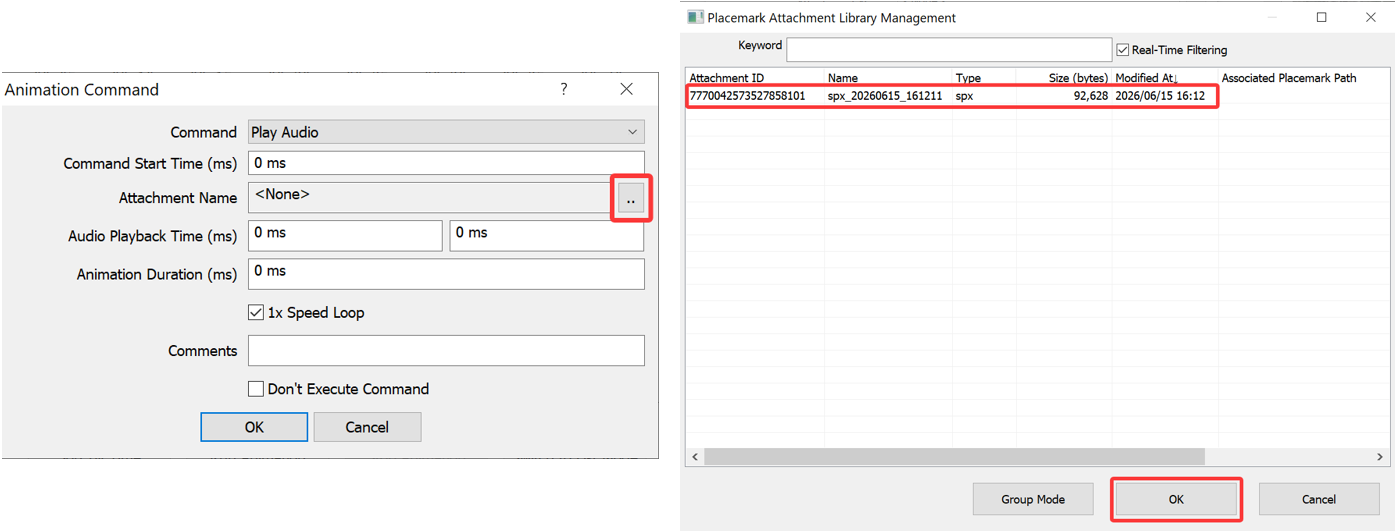
After you set the parameters, click [OK]. In the [Map Animation Settings] dialog box, click [Add to Favorites] to add the animation to your favorites.
⑦ Play Image
This command is used to show placemark images on the map. Select [Play Image] from the command drop-down list. Set the parameters as needed.
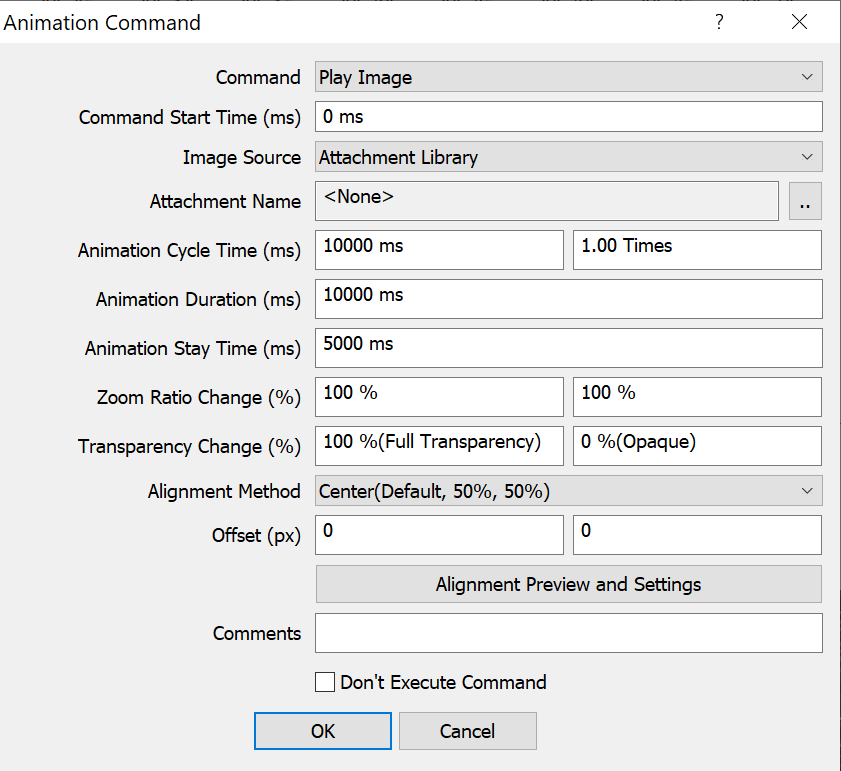
Image Source: You can select images from placemarks or the attachment library.
A. If you select [Attachment Library], click the  icon next to [Attachment Name] to select image attachments from the attachment library;
B. If you select [Placemark Attachment], click the  icon next to [Placemark Name] to select one or more placemarks that have image attachments, as shown in the following figure:
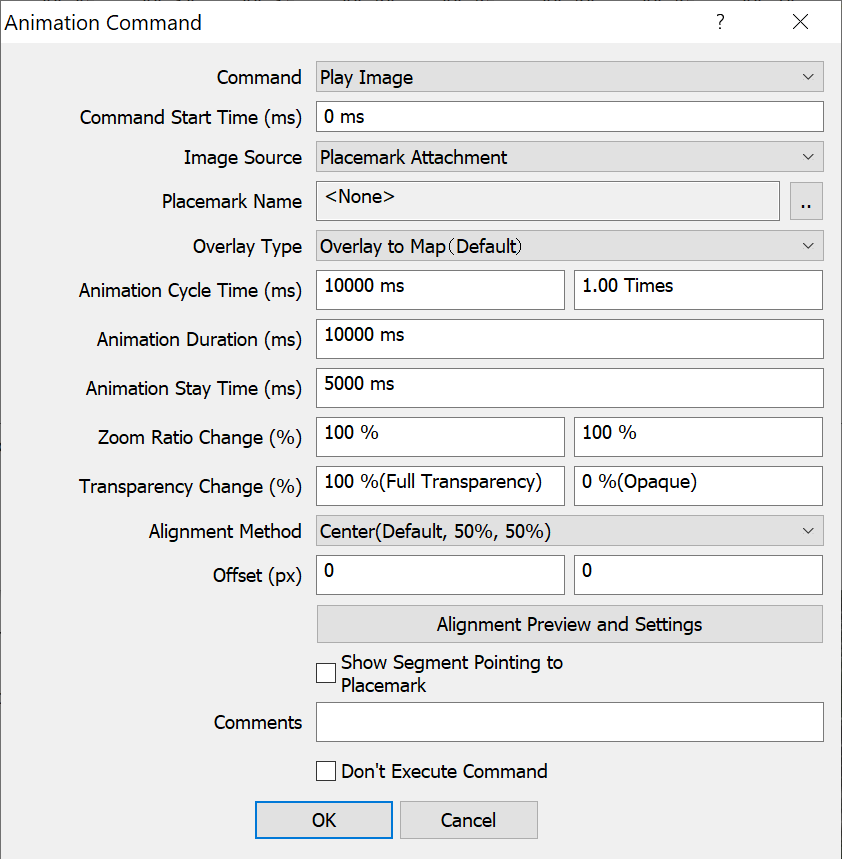
Overlay Type: You can select [Overlay to Map (Default)] or [Overlay to Screen].
A. [Overlay to Map]: Images are aligned based on placemarks. If you select [Show Segment Pointing to Placemark], a line segment will be drawn from the displayed image to the corresponding placemark.
B. [Overlay to Screen]: Images are aligned based on placemarks based on the map window.
Set other parameters such as the animation time, zoom ratio, and transparency as needed.
Then, click [OK]. In the [Map Animation Settings] dialog box, click [Add to Favorites] to add the animation to your favorites.
⑧ Play Video
This command is used to show videos on the map. Select [Play Video] from the command drop-down list. Set the parameters as needed. You can click the button next to [Attachment Name] to select a video file from the placemark attachment library.
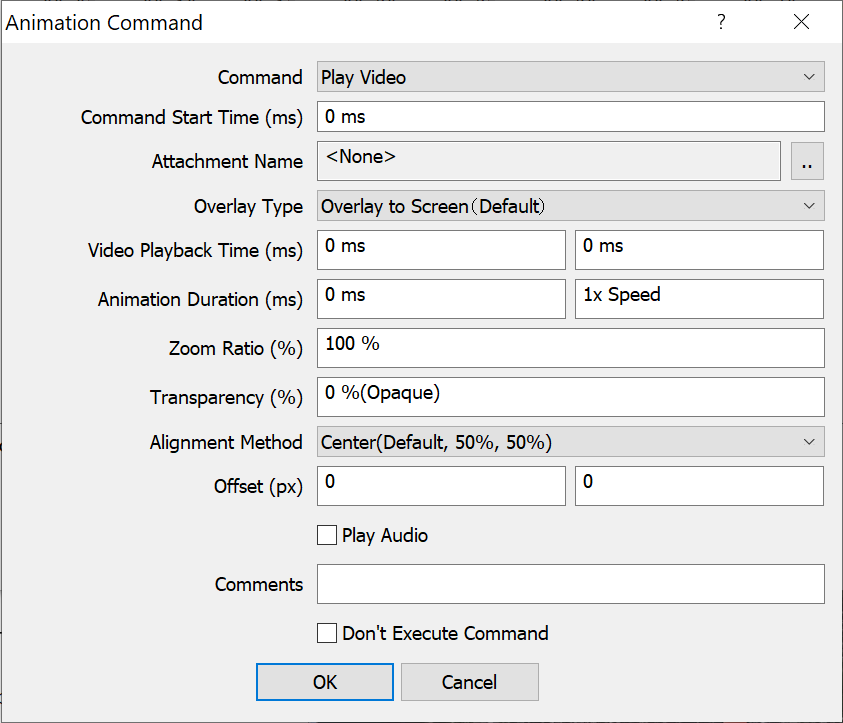
Overlay Type: You can select [Overlay to Map] or [Overlay to Screen (Default)].
A. [Overlay to Map]: Images are aligned based on placemarks.
B. [Overlay to Screen]: Images are aligned based on placemarks based on the map window.
Set other parameters such as the animation time, zoom ratio, and transparency as needed.
Then, click [OK]. In the [Map Animation Settings] dialog box, click [Add to Favorites] to add the animation to your favorites.
⑨ Wait Command
This command is used to extend the duration of other animation commands so as to make the animation more orderly and organized. Select [Play Video] from the command drop-down list. Set the parameters as needed.
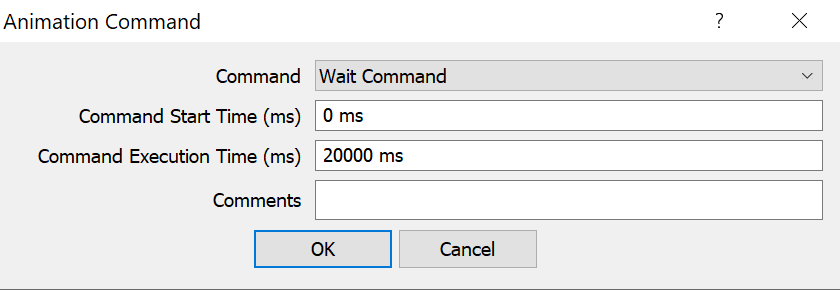
Then, click [OK]. In the [Map Animation Settings] dialog box, click [Add to Favorites] to add the animation to your favorites.
⑩ Call Sub-Animation
This command is used to call an already created map animation (In this case, it is called “sub-animation”). Select [Call Sub-Animation] from the command drop-down list, and click the button next to [Sub-Animation Name] to select an animation.
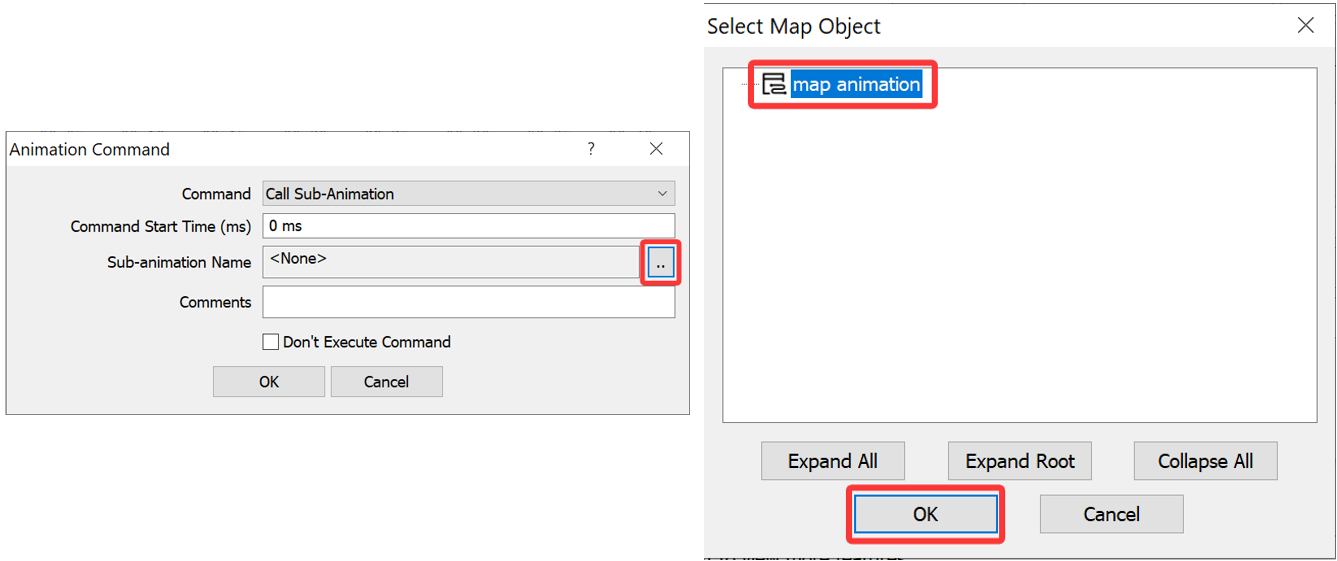
Click [OK] → [OK]. In the [Map Animation Settings] dialog box, click [Add to Favorites] to add the animation to your favorites.
⑪ Switch Map
This command is used to achieve smooth transition between map layers and 2D/3D modes.
Select [Switch Map] from the command drop-down list. Set the [Map Type] and [3D/2D Mode] parameters as needed.
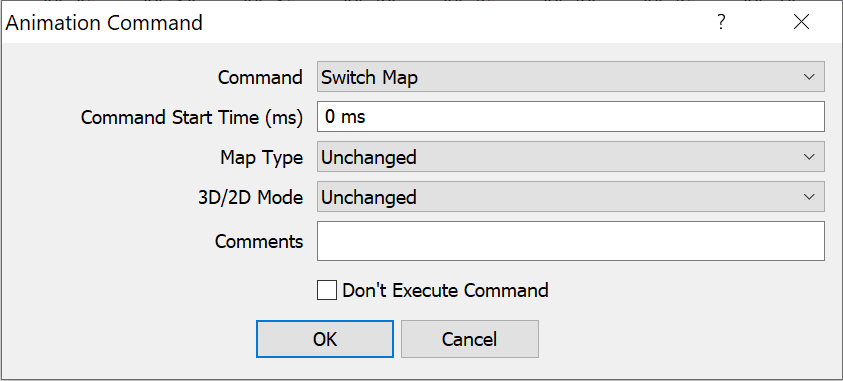
Then, click [OK]. In the [Map Animation Settings] dialog box, click [Add to Favorites] to add the animation to your favorites.
⑫ Switch Object Display Status
The command is used to show or hide one or more objects on the map. Select [Switch Object Display Status] from the command drop-down list, and click the icon next to [Object Name] to select the required objects.
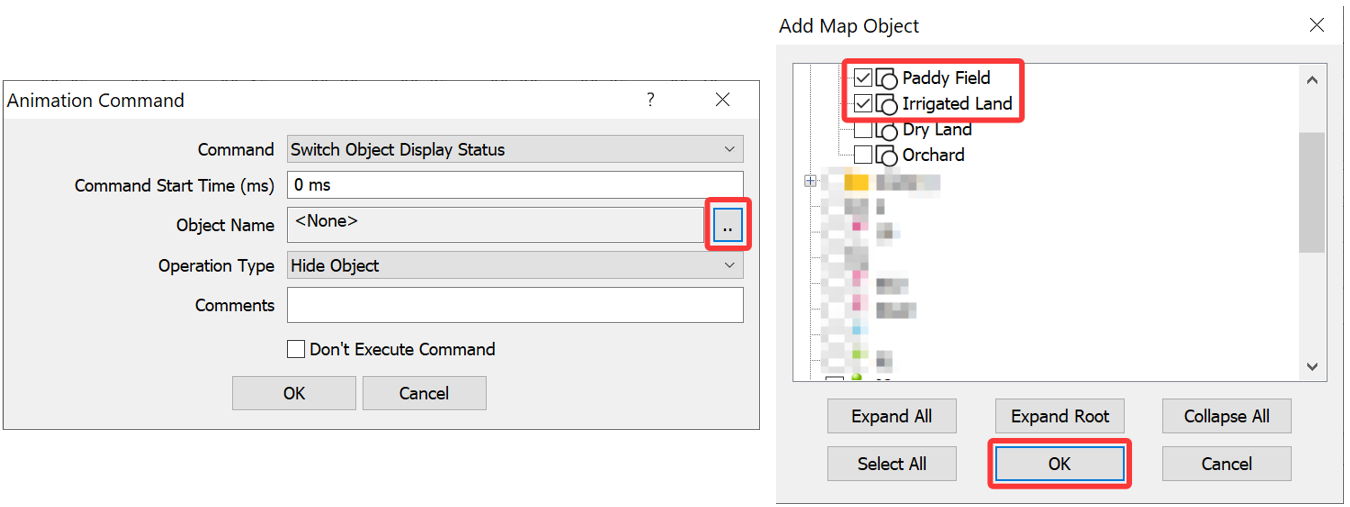
Click [OK] → [OK]. In the [Map Animation Settings] dialog box, click [Add to Favorites] to add the animation to your favorites.
2. Play the map animation
Find the map animation in the favorites, and double-click it for playback.
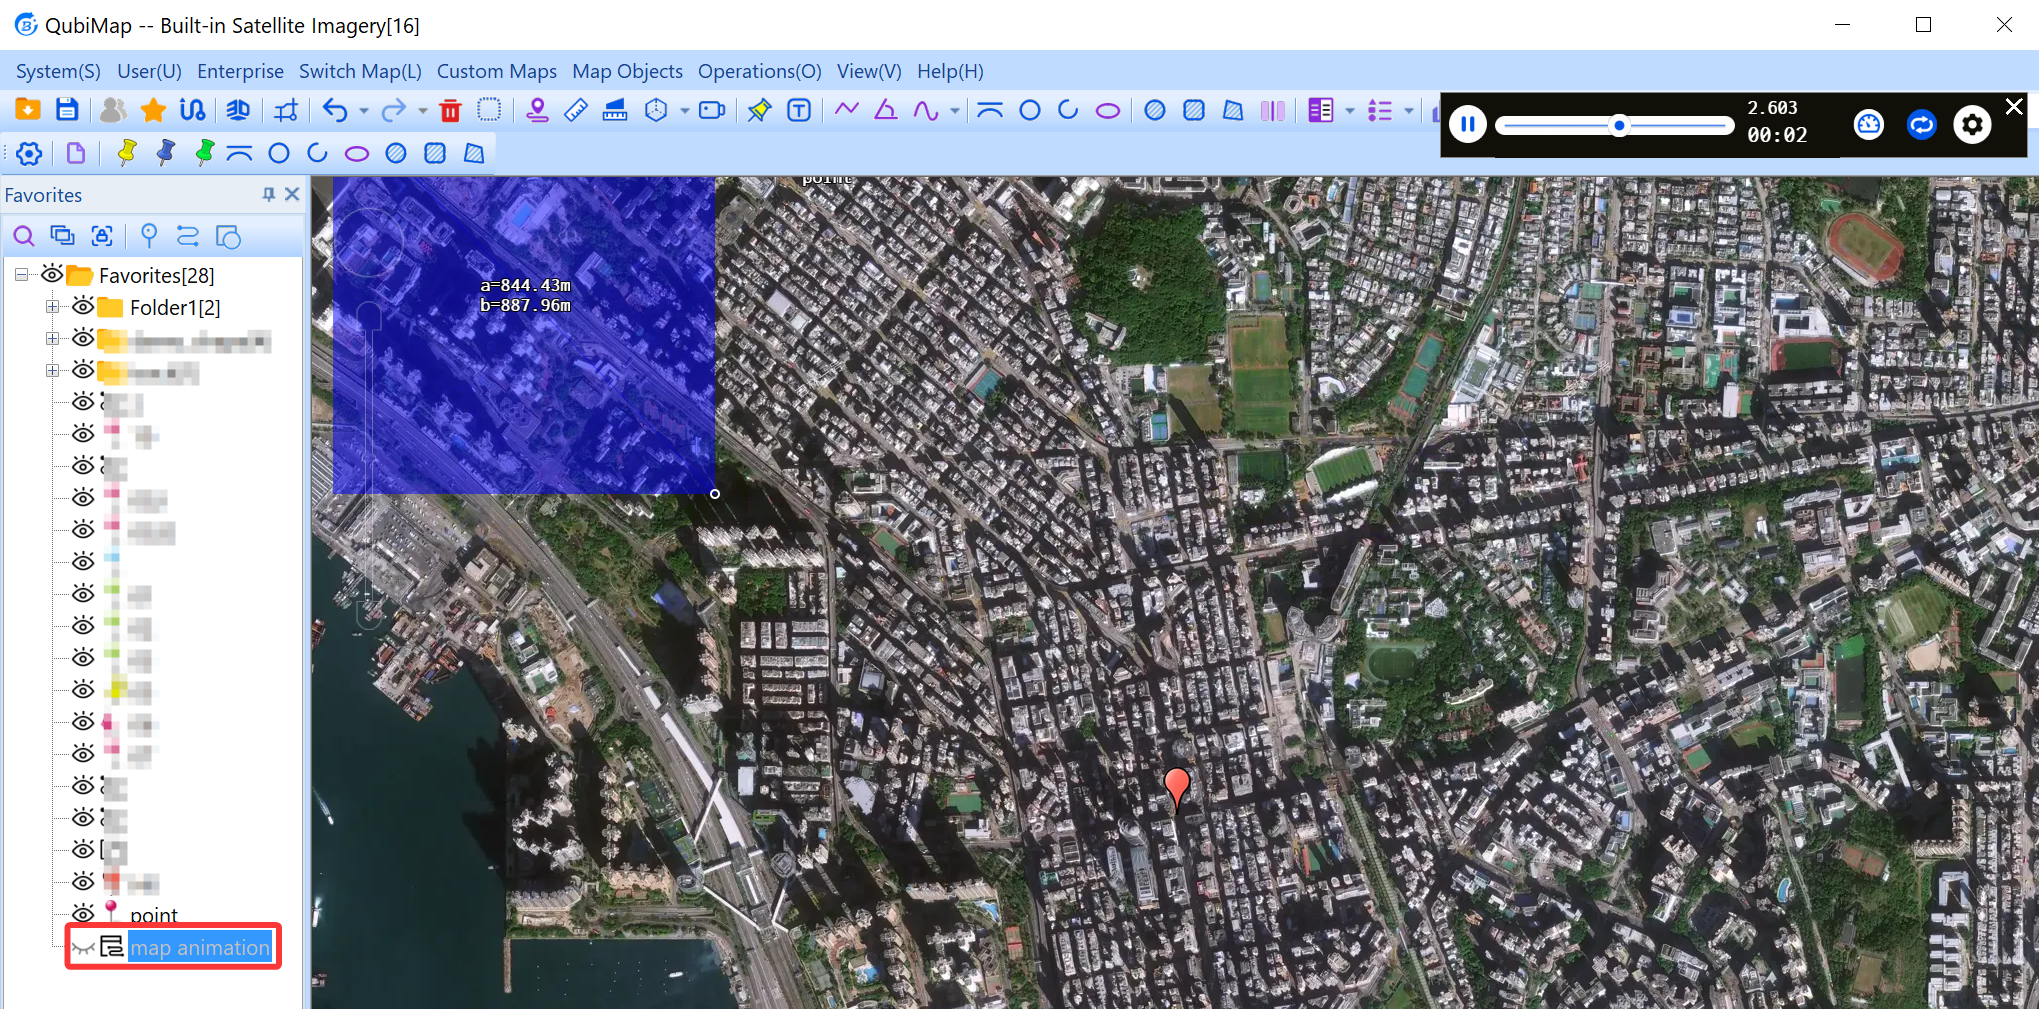
3. Export the map animation as a MP4 video
Find the map animation in the favorites, right-click it, and select [Attributes]. In the [Map Animation Settings] dialog box, click [Export as MP4].
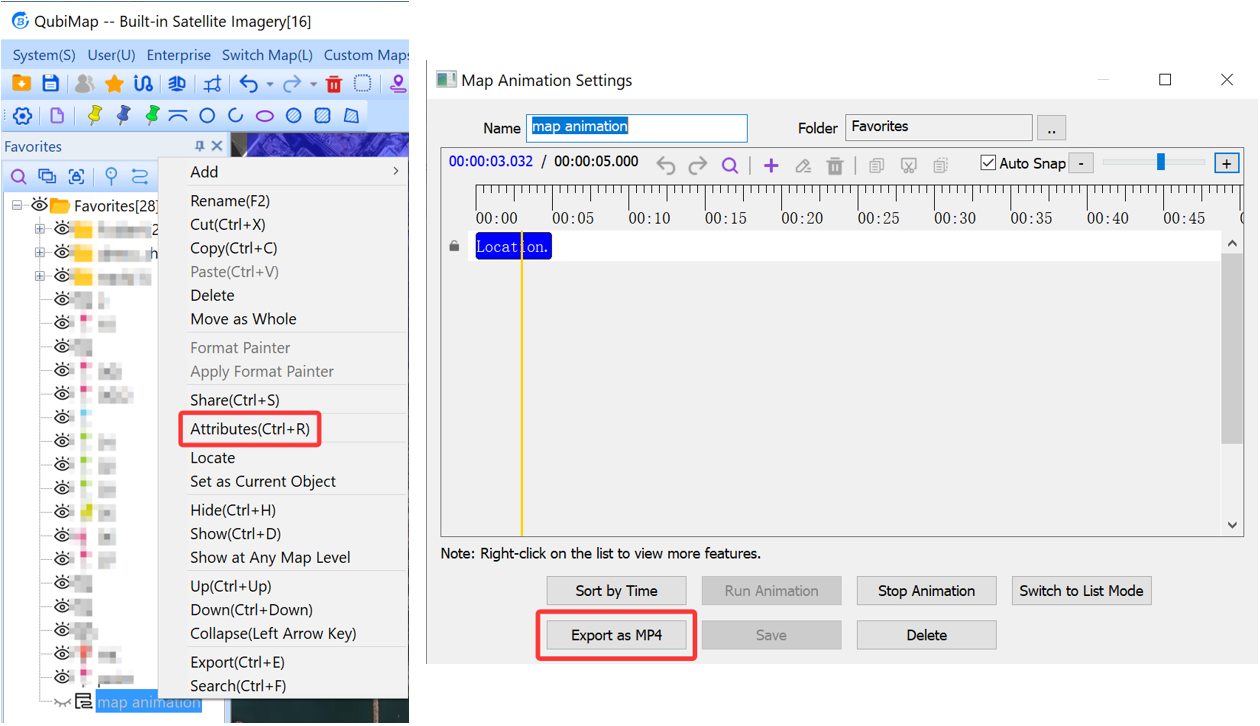
In the [Video Settings] dialog box, click the  icon to set a file path, set the other parameters as needed, and click [OK].
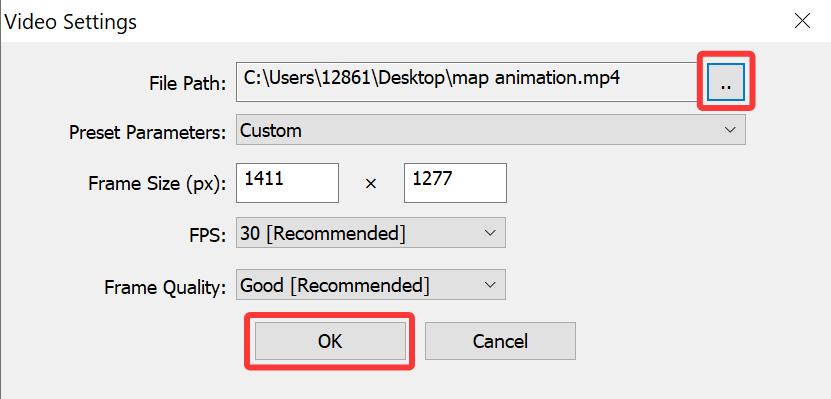
Note: For the [Frame Quality] parameters, we recommend that you select [Good]. If you select [Best], the file size may be too large.
A message indicating that recording is in progress appears. After the video recording is completed, the window is automatically closed. If you want to cancel the operation, click [Stop Recording].
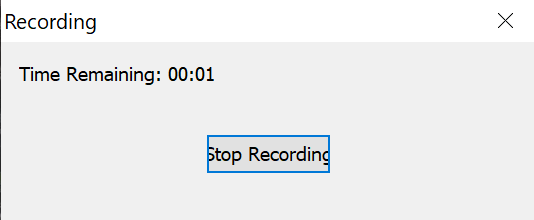
The MP4 file is generated at the specified location.
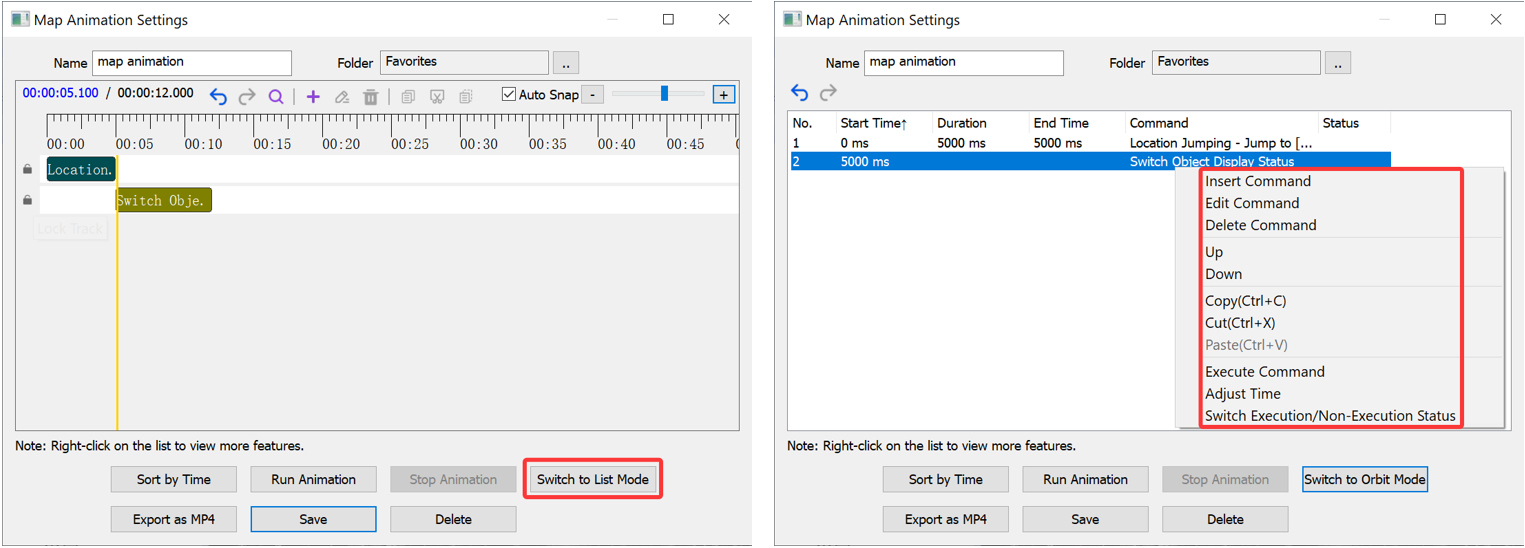
4. List mode
In the [Map Animation Settings] dialog box, you can switch to list mode. Then, you can select an animation command, and right-click it to edit, delete, move up, move down, copy, cut, execute the command, adjust the start time, and switch between the execution/non-execution status.